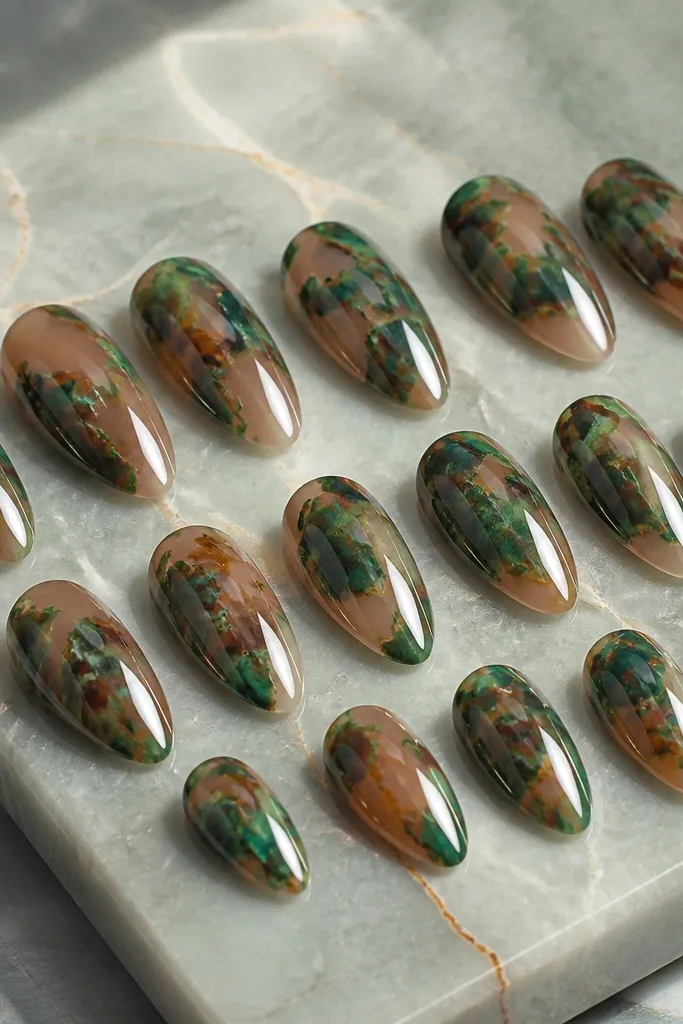
1. Forest Jelly Base with Center Shell Veins
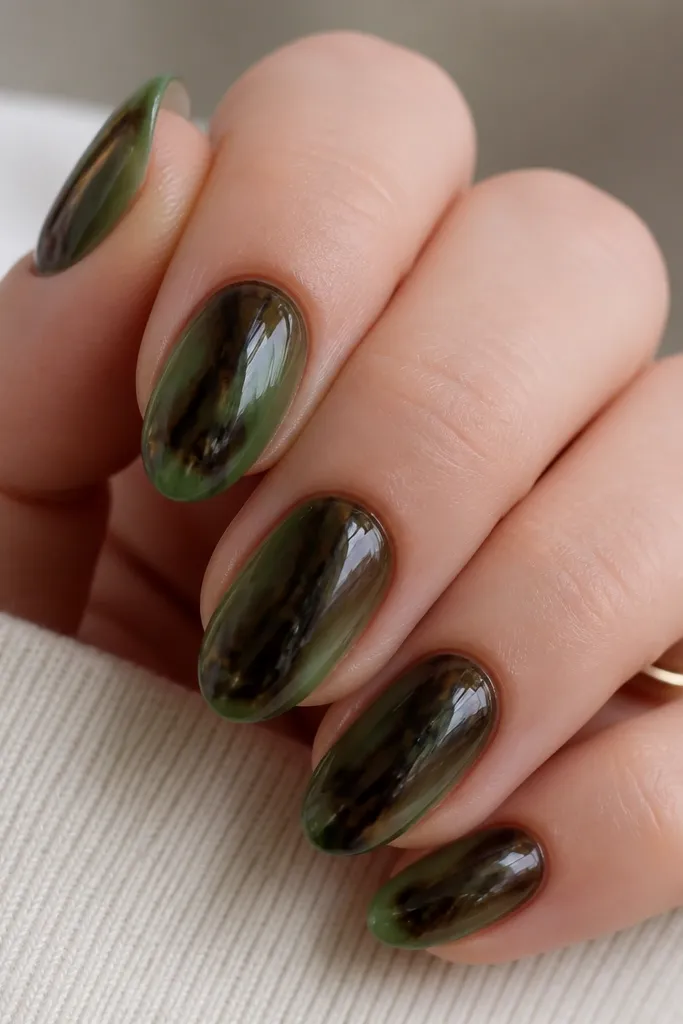
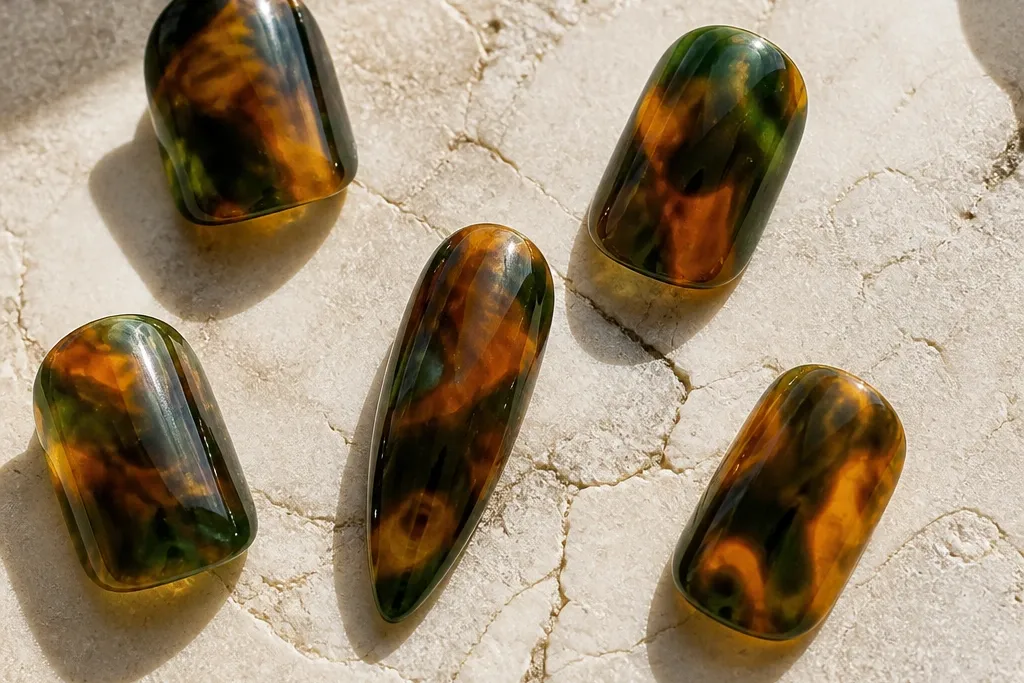
This design starts with a sheer forest green jelly, so you get that fresh green glow without turning the set heavy. I keep the tortoiseshell veins dark brown-black and fairly thin, then concentrate them down the middle like a natural “spine.” It flatters medium to deeper skin tones because the green stays saturated and the brown lines add warmth. It also works on both short almond and medium coffin, because the vertical placement makes the nail look longer. For everyday wear, it reads stylish even when you’re not wearing jewelry.
Step 1: Apply two thin coats of forest green jelly, curing fully between coats, then wipe the tacky layer lightly with alcohol if your system requires it. Step 2: Using a fine liner gel or a toothpick, drag 2-3 dark brown-black shell lines from just above the nail’s midpoint toward the tip, then add short branches that taper off. Step 3: Add a tiny amount of lighter brown between the lines so the marbling has depth, cure, then finish with a glossy topcoat. Step 4: Cap the free edge with topcoat so the tip stays smooth for daily wear.
Editor's noteIf your lines look too bold, pull them thinner with a nearly dry brush — you want hairline edges, not thick stripes.
Skip thisSkip opaque green paint — it makes the shell look painted on instead of embedded.
2. Emerald French Tip Tortoise Edges
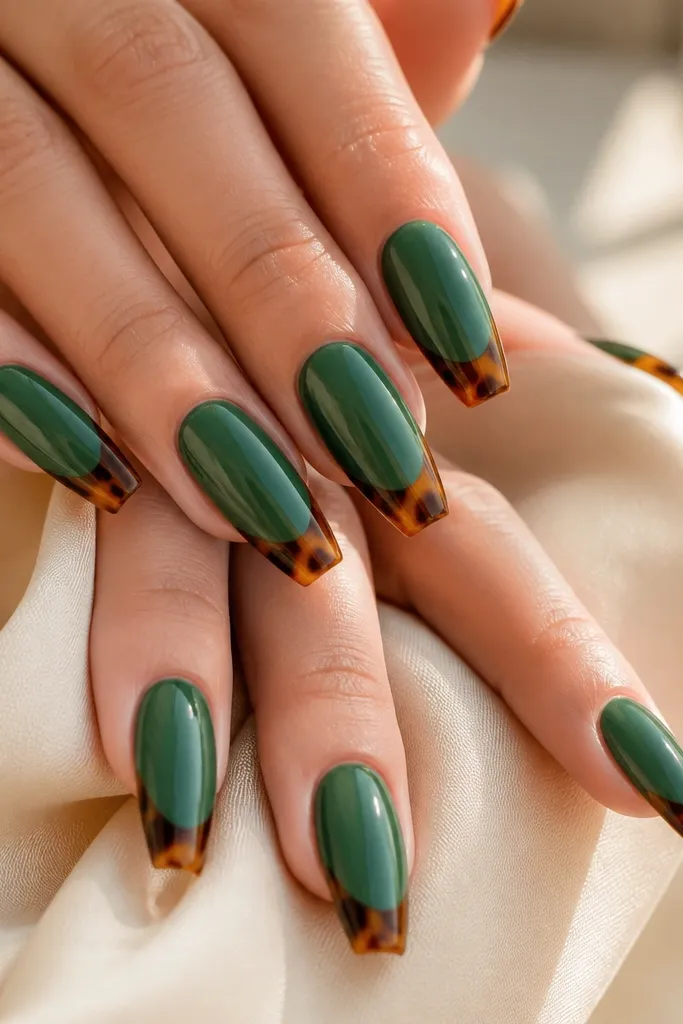
I love this one because it looks polished even when you’re not great at full nail art. The emerald base stays calm, and the tortoiseshell only lives in the French tip zone, which keeps the design tidy. It flatters hands that look better with clean cuticle edges — you’ll notice your nails look “finished” right away. Emerald also complements warm undertones because the brown-gold shell echoes gold jewelry. Wear it to work, then keep the same set for dinner because the tip detail catches light.
Step 1: Paint two coats of emerald green (slightly sheer jelly if you can) and cure, leaving the cuticle area neat. Step 2: Apply a French tip guide or freehand a thin white-free edge, then fill the tip with a mix of caramel brown and dark brown-black in irregular bands. Step 3: With a marbling tool, drag a few thin lines through the bands to imitate shell movement, cure again. Step 4: Seal with a glossy topcoat and lightly buff the tip edge so it doesn’t feel thick.
Editor's noteUse a striping brush for the French boundary — a sharp line makes the whole set look salon-done.
Skip thisDon’t blend the tip into the base with thick gel — it blurs the French line and kills the crisp look.
3. Sage and Umber Shell Marble Diagonal
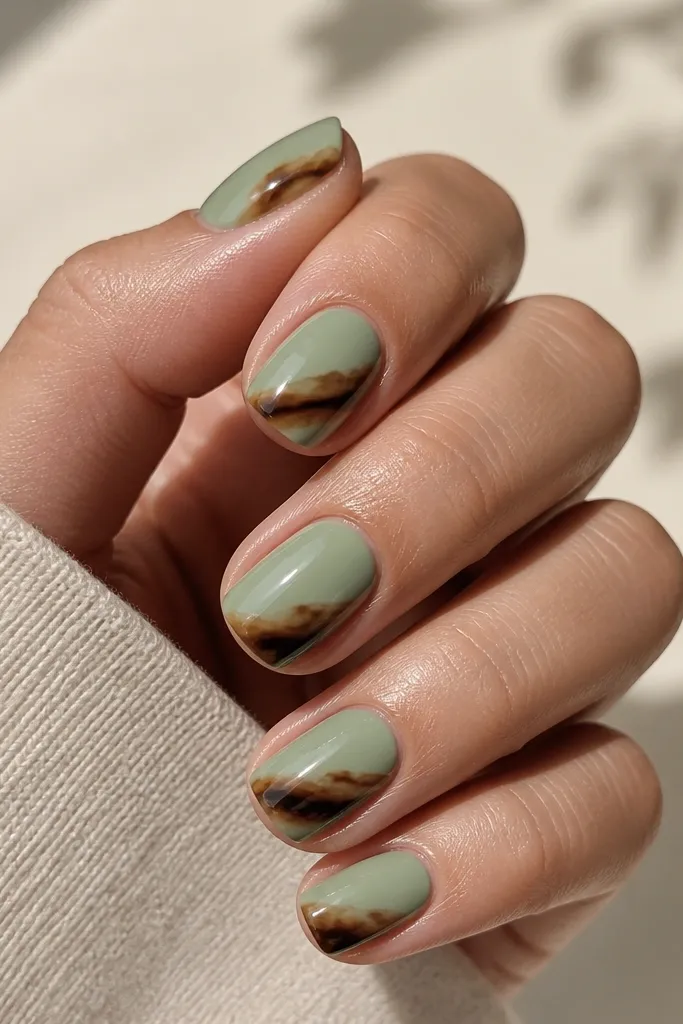
This set is for when you want green that feels airy, not heavy. Sage on the base makes your hands look softer, and the diagonal shell placement gives motion — it feels modern instead of classic French. The umber and chocolate tones keep it grounded, while the faint golden-brown lines add warmth. It flatters fair to medium skin tones especially well because the sage doesn’t overpower your nail bed. If you like minimal nail art but still want something interesting, this hits the sweet spot.
Step 1: Apply two thin coats of sage green (semi-sheer), cure, and keep the surface smooth by wiping the tacky layer if needed. Step 2: Place a diagonal band of darker umber starting near one sidewall and ending close to the opposite tip, then feather outward with a marbling tool. Step 3: Add thin chocolate streaks within the band, then drag a couple of lines through to create shell ripples. Step 4: Clean up the sides with a small brush dipped in alcohol, cure, and topcoat glossy.
Editor's noteIf your diagonal looks crooked, use the nail’s natural curve as your guide and keep the thickest part near the center of the nail.
Skip thisSkip chunky dots of shell gel — they make the marble look like stickers.
4. Cuticle Half-Moon Shell Fade
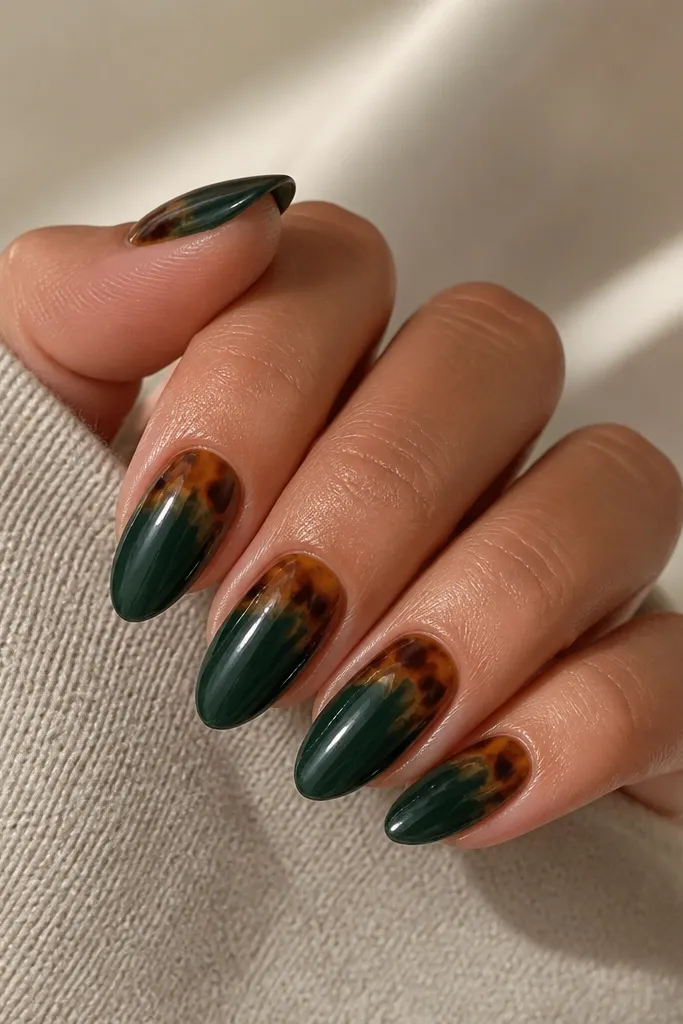
This design puts the art where it’s most flattering — right at the cuticle line, where your eye naturally goes. The half-moon shell fade is great if you want green nails but don’t want full marbling coverage. The deep green base keeps it dramatic, and the warm brown shell adds contrast that looks good on every skin tone. I’ve worn this with both gold and silver rings; the caramel tones make gold look extra warm. It also photographs well because the fade creates a soft gradient effect.
Step 1: Paint a deep green base in two coats, cure, and keep the cuticle area tidy. Step 2: With a small detail brush, paint a half-moon of tortoiseshell at the cuticle using caramel brown first, then add dark brown-black flecks and thin lines. Step 3: Drag the shell outward with a clean brush lightly dipped in the base color to soften the edges into the green, cure. Step 4: Finish with one or two glossy topcoat layers and cap the free edge.
Editor's noteUse a smaller brush than you think you need — the half-moon should feel crisp, not fuzzy.
Skip thisDon’t overblend the fade — if it turns muddy, the art disappears.
5. Tortoise Shell Tips Over Olive Nude
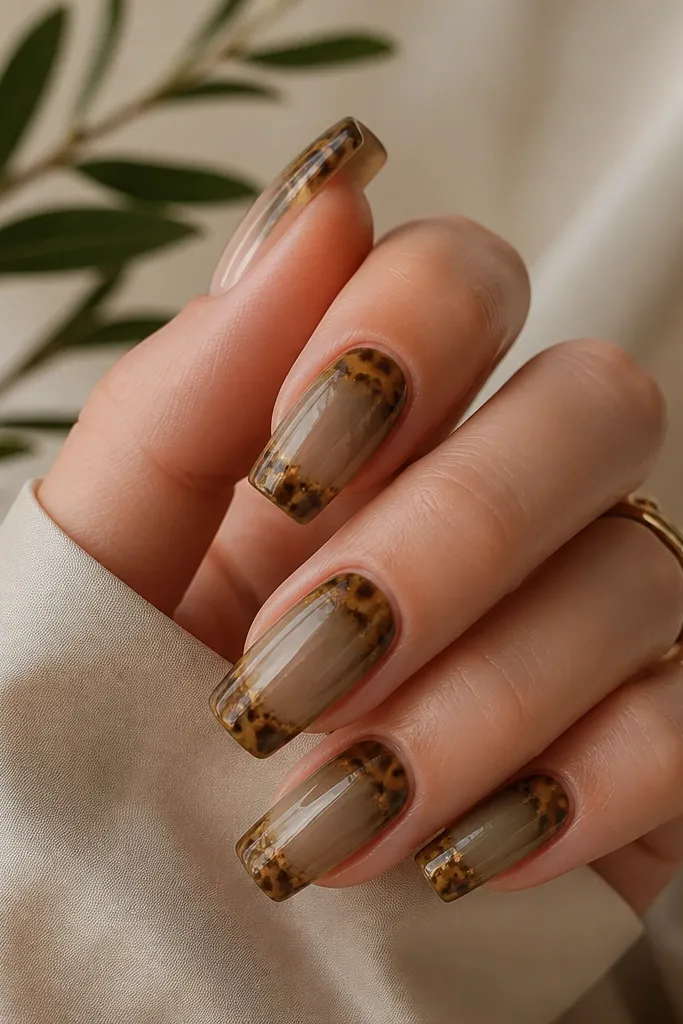
This is my go-to when I want green that looks grown-up. The olive nude base makes your nails look naturally healthy, and the tortoiseshell tips add interest without overwhelming your nail bed. The pattern feels luxe because the warm browns sit on top of a milky green-tinted nude. It flatters short nail beds too, because the base is close to your natural tone, and the tip detail creates length. For weddings or events, it looks like you planned it.
Step 1: Apply two coats of olive nude (milky sheer) and cure. Step 2: Tape a straight line or use a tip stencil to define the top third, then paint tortoiseshell bands across the tip using caramel and dark brown-black. Step 3: Marbling tool time — drag a few thin lines through the bands so the shell looks organic, then soften the lower edge of the shell with a thin glaze of olive nude. Step 4: Seal with glossy topcoat and cure fully.
Editor's noteKeep the shell densest at the very tip — leave the lower half cleaner so the nude base still shows.
Skip thisSkip heavy coverage at the cuticle — it makes the nude base look dirty.
6. Deep Green Matte Shell with Gloss Lines
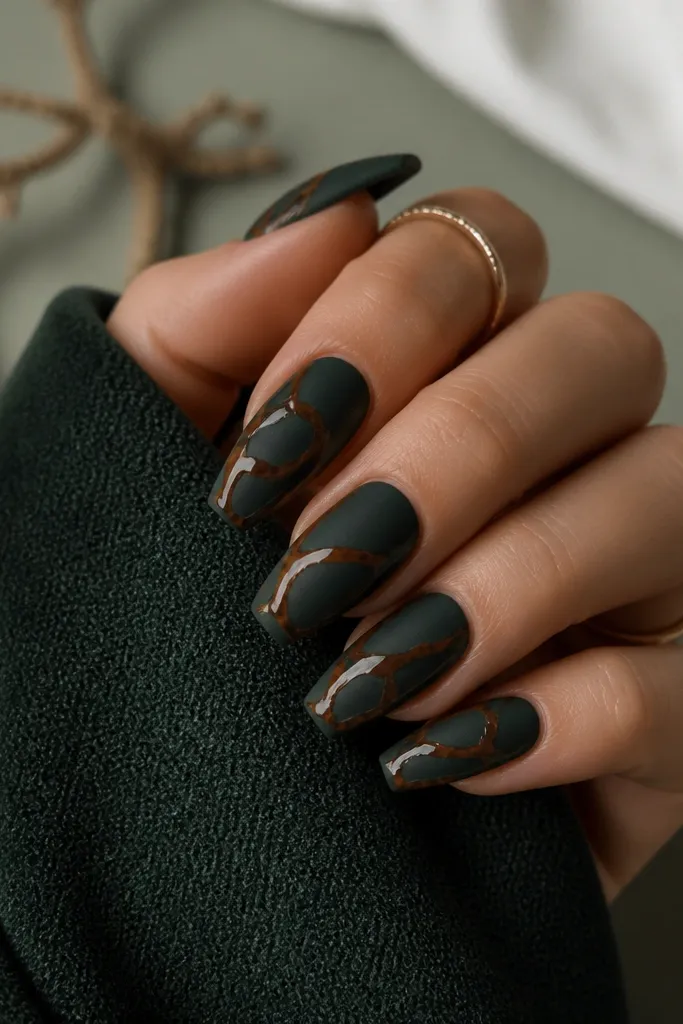
This one feels editorial and it’s surprisingly wearable. The deep green matte base kills glare, then glossy shell lines bring the design back to life. I like it on hands that have long fingers because the matte finish makes the nail shape look crisp. It also flatters olive and warm undertones because the caramel highlights warm up the green. If you wear mostly neutral outfits, this gives you a nail look that still feels intentional. It’s also great for photos because the texture contrast reads clearly.
Step 1: Paint two coats of deep green gel, cure, then apply a matte topcoat and cure. Step 2: With a thin liner brush, paint tortoiseshell lines on top using caramel and dark brown-black, then cure again. Step 3: Apply a glossy topcoat only over the shell lines (not the whole nail) so you keep the matte base texture. Step 4: Clean the edges with a small brush and alcohol so the glossy lines look sharp.
Editor's notePractice the liner motion on a spare nail spoon or paper — shell lines should be controlled and thin.
Skip thisDon’t matte the whole nail after you’ve painted the shell lines — you lose the shiny contrast.
7. Green Tortoise Aura Around the Sides
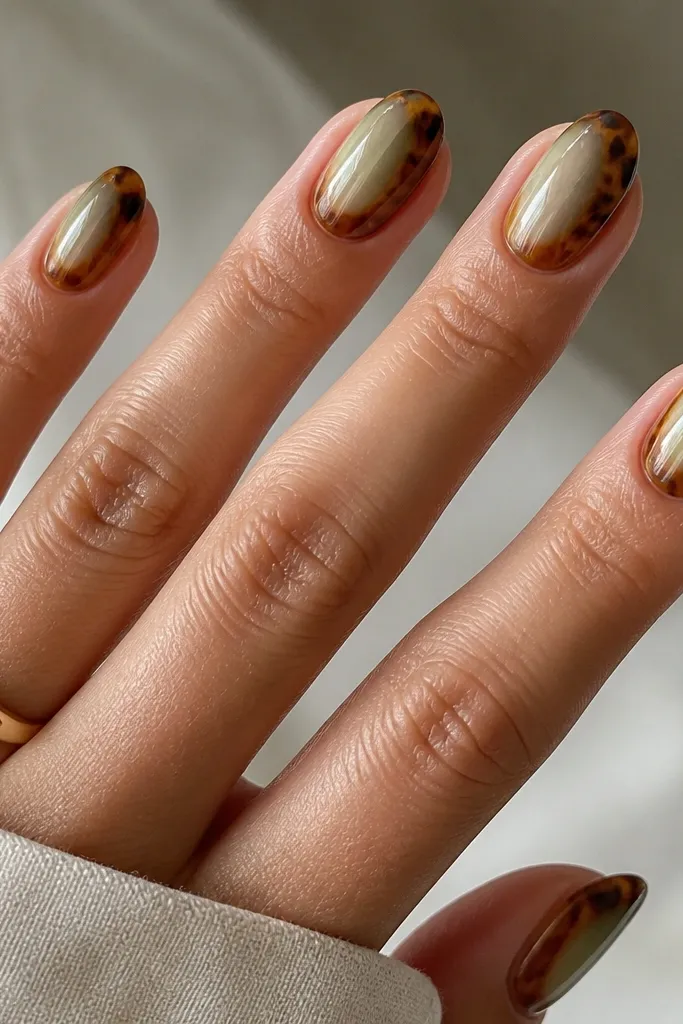
This design makes the nail look narrower and longer because the center stays lighter. I use a clear-to-green gradient so the middle looks airy, then I frame the sides with tortoiseshell. It’s flattering if your nail bed is wide or if you want a slimming effect. The side marbling also catches light as you move your hands, so it looks like a subtle pattern rather than full-on nail art. It’s a good choice for workdays because the center stays clean.
Step 1: Create a soft gradient by applying a clear base or nude jelly at the center and blending green outward toward the sidewalls, cure. Step 2: Paint tortoiseshell along both sidewalls using caramel first, then add dark brown-black streaks and tiny flecks. Step 3: Use a clean brush to pull the edges slightly inward so the shell forms an aura frame, cure. Step 4: Seal with glossy topcoat, focusing on smoothing over the sidewalls.
Editor's noteKeep the darkest shell bits near the side center, not up at the cuticle corners — it looks cleaner.
Skip thisSkip thick blobs at the sidewalls — they catch on hair and feel rough.
8. Green Shell with Micro Gold Flecks
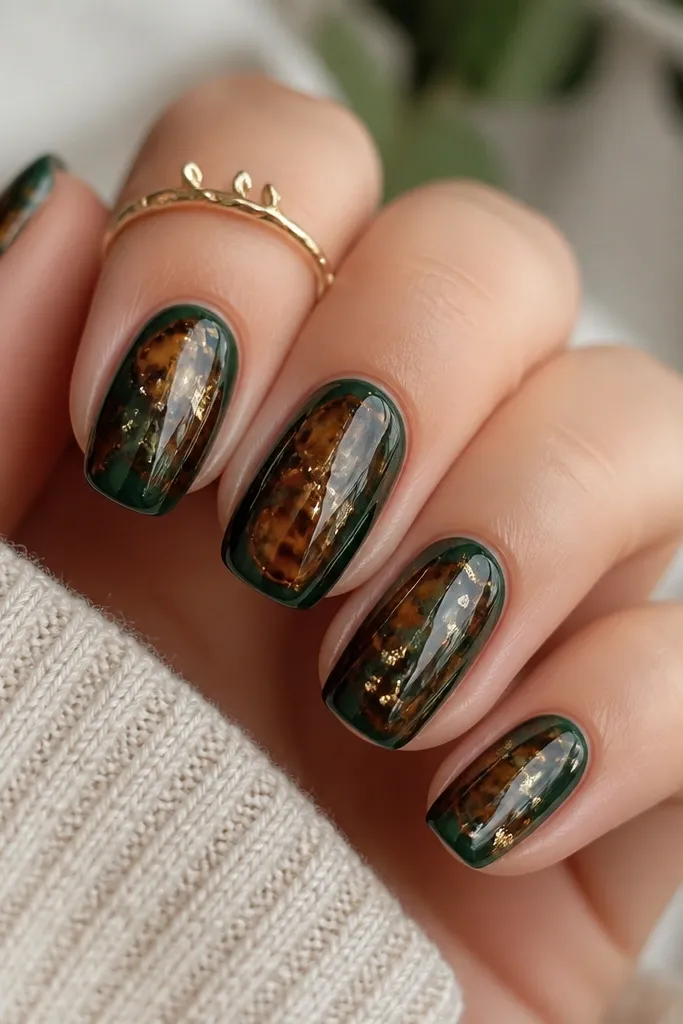
If you want green tortoiseshell that still feels special without going full bling, micro gold flecks are the answer. The gold doesn’t sit on top like chunky glitter; it looks like light trapped in the shell. I’ve worn this with simple hoop earrings and it looks like I did more than I actually did. It flatters most skin tones because gold warms the brown-green palette. For parties, it reads festive, and for everyday wear, it stays tasteful because the flecks are small.
Step 1: Apply two coats of forest green jelly base, cure, then add tortoiseshell marbling using caramel and dark brown-black in thin, irregular streaks. Step 2: Before curing the final marbling layer, press a very small amount of gold micro flakes into a few sections of the shell, then cure. Step 3: Topcoat with glossy gel in two thin layers so the flakes don’t snag and the surface stays smooth. Step 4: Cap the free edge and clean around the cuticle.
Use less fleck than you think — heavy gold turns it into glitter nails instead of shell light.
Don’t apply micro flakes after the topcoat cures — they won’t lock in securely.
9. Classic Tortoiseshell on Deep Green with Thin Outline
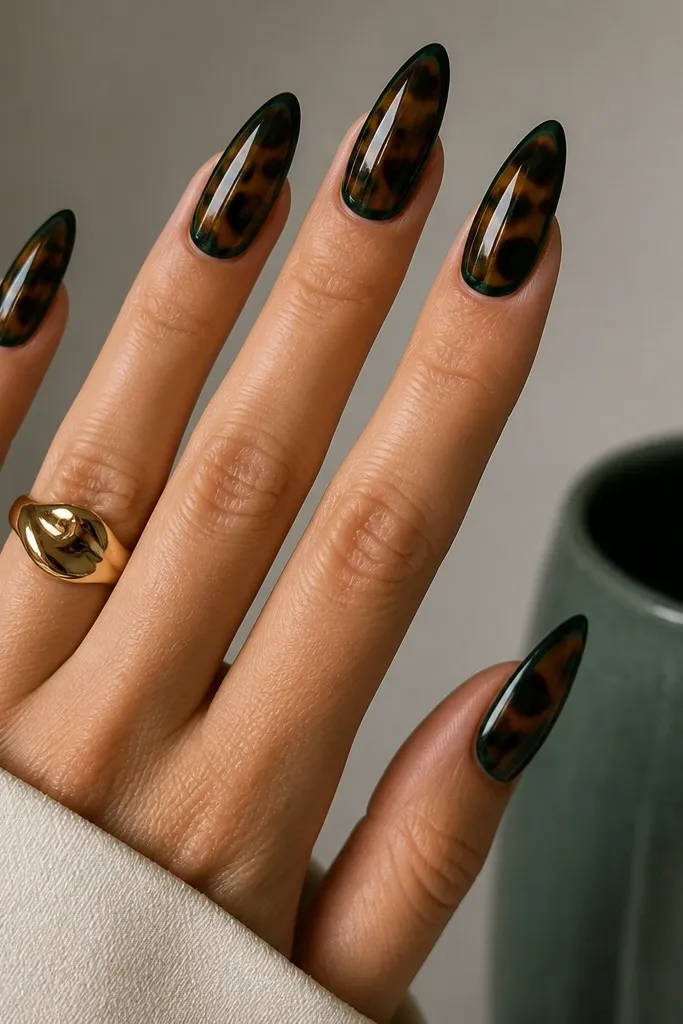
This one feels like the “clean version” of full tortoiseshell. The marbling covers the nail, but a thin dark outline keeps it crisp and prevents the pattern from bleeding visually into the skin. It’s perfect if you like bold design but hate when nail art looks messy. Deep green makes the browns look richer, and the outline gives structure that flatters longer nail shapes. I’ve done this on almond and it looks especially sharp because the outline follows the taper.
Step 1: Paint deep green base in two coats, cure. Step 2: Add full tortoiseshell marbling — start with caramel patches, then pull dark brown-black lines through them so the shell looks layered. Step 3: After curing, use a very thin liner brush to trace a narrow outline around the edges of the nail, focusing on the outer sidewalls and tip curve. Step 4: Seal with glossy topcoat and smooth the outline so it doesn’t feel raised.
Outline only the outer edge, not the entire nail — that keeps it refined.
Skip thick outlines — they look like a sticker border.
10. Green Shell Watercolor Fade from Tip to Base
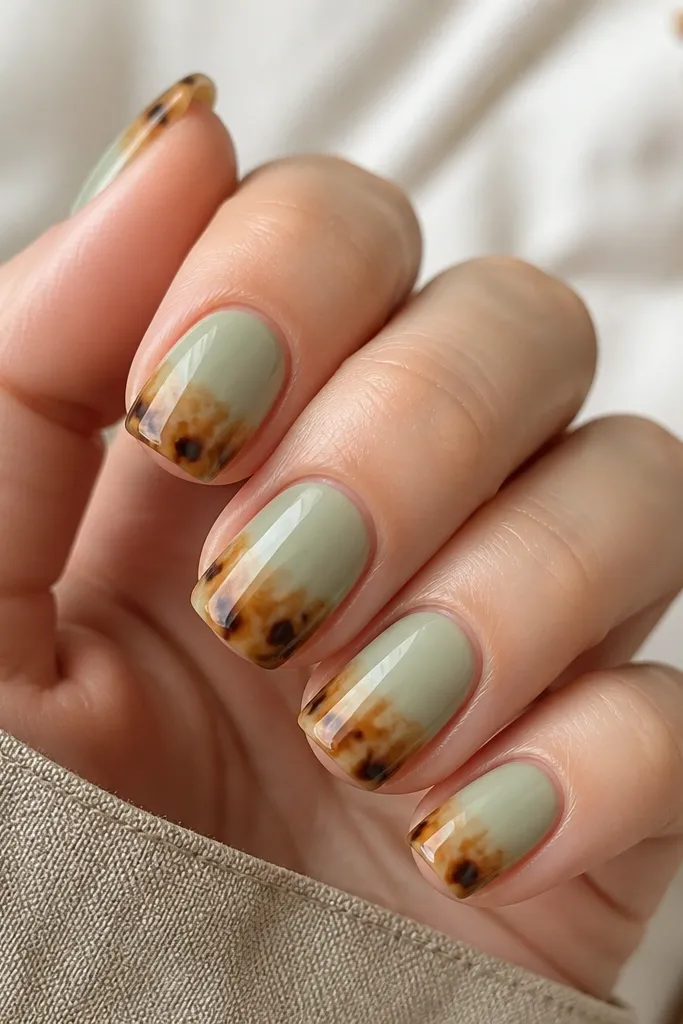
This is a softer take that looks expensive because it’s not blocky. The watercolor fade makes the shell feel like it’s blooming from the tip, not sitting on top. It flatters nails that are prone to looking too shiny or too dark, because the milky base keeps things bright. I like it on short squoval because the gentle fade prevents the design from making the nail look shorter. This set also looks great with minimal rings since the nails already have movement.
Step 1: Apply a milky green base (almost like a pale jelly with white tint), cure. Step 2: At the tip, dab caramel and dark brown-black shell gel with a sponge or stamping sponge in small amounts, then lightly blend downward with a clean brush. Step 3: While it’s still workable, drag a couple of thin shell lines through the smudge so it reads as tortoiseshell, not random brown. Step 4: Cure and apply glossy topcoat to smooth the watercolor texture.
Use a sponge for the fade — brush-only blending usually leaves streaks.
Don’t overwork the fade after it starts to set — it turns muddy.
11. Reverse French: Shell Cuticle Arc on Green
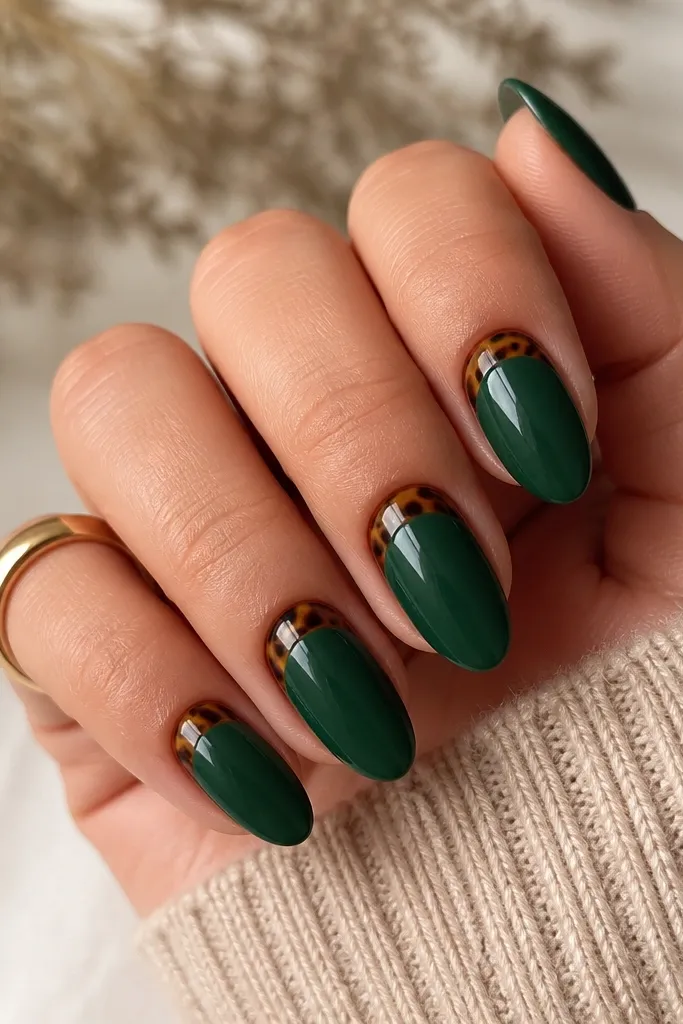
Reverse French is the easiest way to look “done” when you only want art at one spot. The shell arc at the cuticle draws the eye upward, which makes the nail bed look longer. I use deep green for the base because it makes the tortoiseshell arc pop without needing extra colors. This flatters hands with visible nail ridges because the solid base evens out the look, and the arc hides the center where you’d notice texture. It’s also great for short nails because the design is compact.
Step 1: Paint deep green in two coats, cure. Step 2: Using a small curved brush or freehand a stencil arc, draw a half-circle at the cuticle and fill it with tortoiseshell colors: caramel first, then thin dark lines and tiny flecks. Step 3: Keep the arc edges crisp by cleaning the brush with alcohol and re-tracing the outer boundary if needed. Step 4: Cure and apply glossy topcoat over the entire nail, making sure the arc area is sealed and smooth.
Editor's noteAngle your brush so the arc looks higher on the sides — it lifts the whole nail visually.
Skip thisSkip a thick arc — wide shell at the cuticle can look bulky.
12. Green Shell Diagonal French with Micro Negative Space
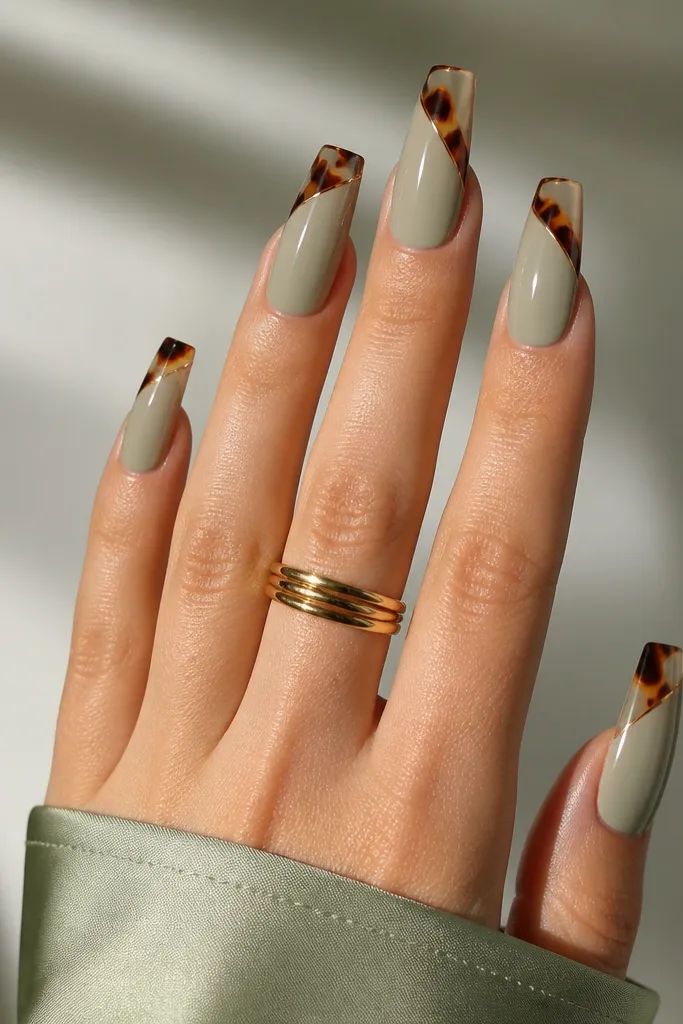
This design looks fresh because it breaks the usual straight French line. The diagonal tip feels fashion-forward, and the micro negative space keeps it from looking heavy or too “full coverage.” It flatters long coffin shapes perfectly because the diagonal line follows the nail’s geometry. I’ve also worn it on medium length and it still looks sharp — just keep the diagonal narrower. The nude-green base makes the green read soft and the shell read warm.
Step 1: Apply two coats of pale nude-green jelly, cure, and ensure the surface is smooth. Step 2: Mask or freehand a diagonal tip section, leaving a few tiny windows of nude-green unpainted inside the shell area. Step 3: Fill the diagonal section with caramel and dark brown-black shell bands, then drag a few thin lines to create marbling. Step 4: Cure, remove any masking, clean the edges, and topcoat glossy in two thin layers.
Leave the negative space near the center of the diagonal so it reads intentional, not accidental.
Don’t fill every gap — full coverage diagonal tips look chunky.
13. Tortoise Shell Half-Topcoat Shine Effect
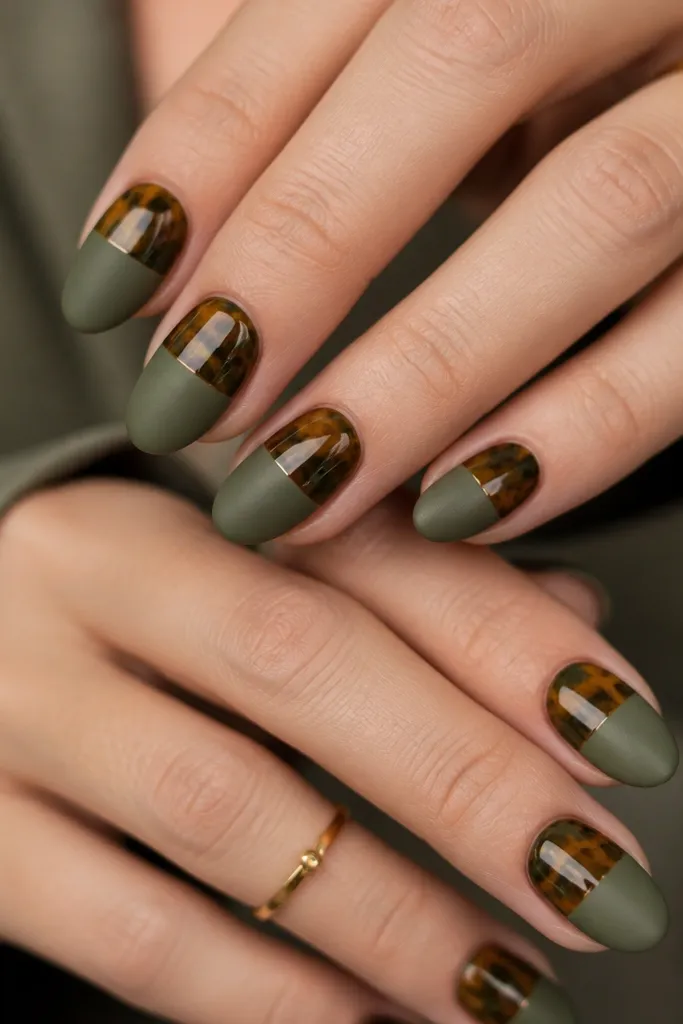
This split finish is a trick I learned after I got bored of one-note glossy nails. The top half tortoiseshell stays shiny so the shell lines catch light, and the bottom half matte green calms the look. It’s a great option when you want something graphic but still wearable. It flatters small nail beds because the design has a clear division and doesn’t crowd the cuticle. Warm brown shell against matte green also makes your hands look more styled in photos.
Step 1: Paint the entire nail matte green by applying two coats of green base, curing, then matte topcoat and curing. Step 2: Create a straight horizontal line at the mid-nail using tape as a guide, then paint tortoiseshell marbling above the line with caramel and dark brown-black on top of the matte area. Step 3: Cure and apply glossy topcoat only over the shell section, keeping the matte below untouched. Step 4: Remove tape carefully, then clean the line with a small brush and alcohol.
Editor's noteUse tape for the midline — freehand lines usually look wobbly at this size.
Skip thisDon’t accidentally brush glossy topcoat onto the matte side — it turns the matte look uneven.
14. Green Tortoise Shell with Tiny Crystal Cuticle Dots
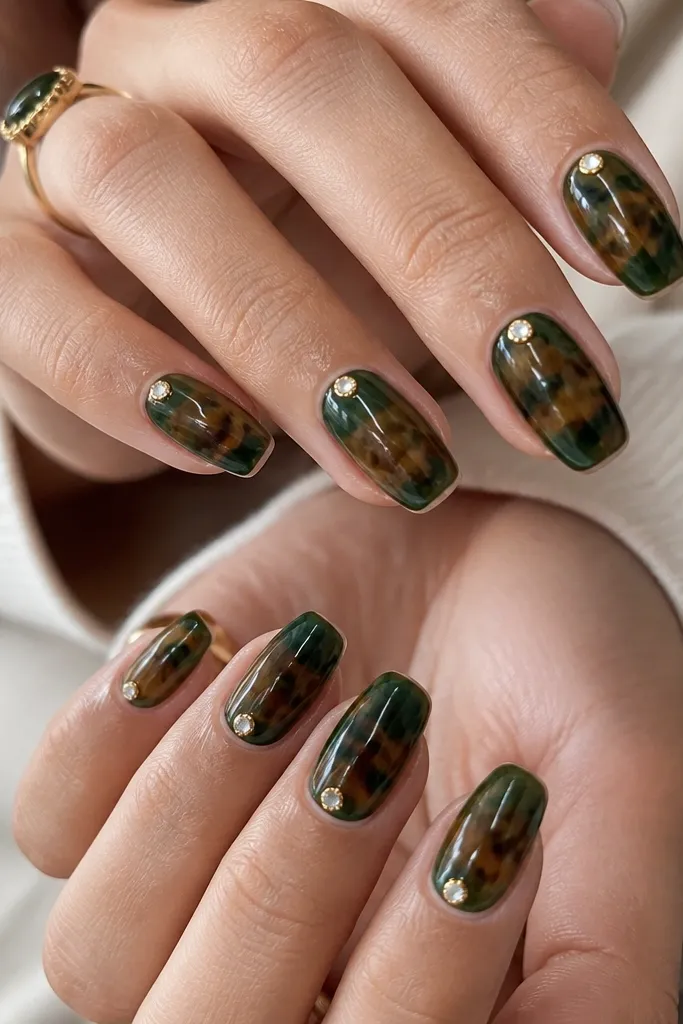
This set keeps the tortoiseshell as the star and adds just a little sparkle where it looks flattering — at the cuticle center. The crystal dots catch warm light and make the shell look even richer, especially with deep green. It’s excellent for date nights, bridal events, and holiday dinners when you want something that still feels classy. It flatters hands with shorter nail beds because the crystals draw attention to the cuticle without needing long length. If you hate heavy rhinestone clusters, this is the controlled version.
Step 1: Apply deep green base in two coats, cure, then paint tortoiseshell marbling over it using caramel patches and dark brown-black lines. Step 2: After curing, dot a tiny amount of clear crystal gel at the cuticle center and place one small crystal per nail, then cure. Step 3: Seal everything with glossy topcoat, but keep the coat thin so the crystal edges don’t flood. Step 4: Cap the free edge and clean around the cuticle for a sharp look.
Editor's notePick crystals in the 1.0-1.5 mm range — anything bigger starts to look chunky next to tortoiseshell.
Skip thisSkip full rhinestone rows — they overwhelm the shell pattern.
15. Satin Green Shell with Soft Brown Haze
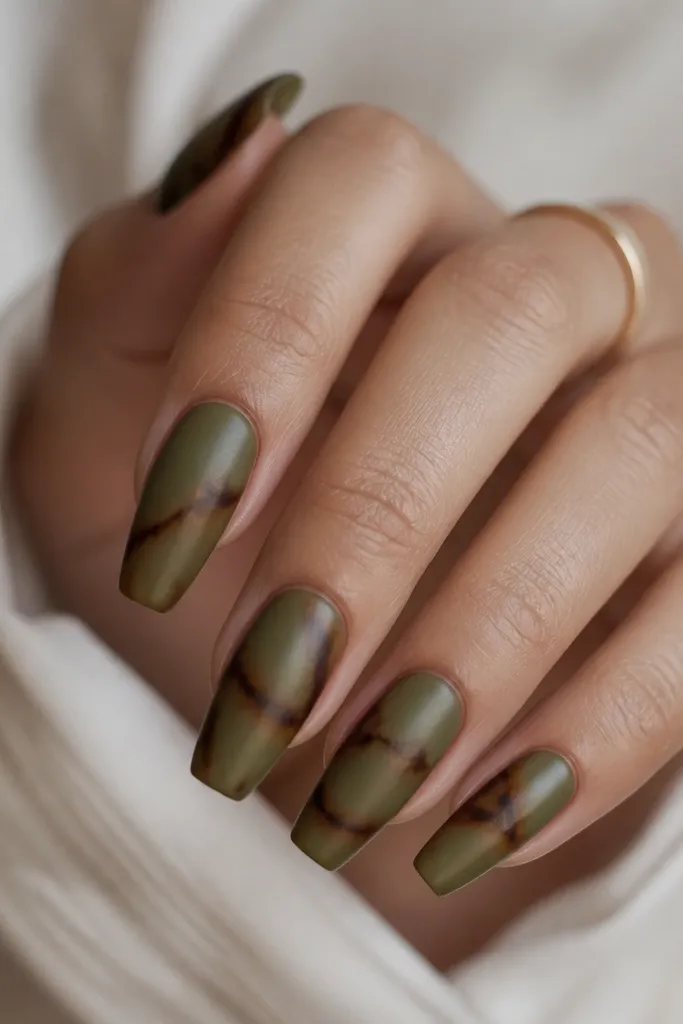
Muted finishes make tortoiseshell feel more modern. The satin green base gives a soft glow, and the brown haze makes the shell look like it’s been blended into the gel rather than painted thick. This flatters skin tones that look better with softer contrast because the design isn’t stark. It also works well if you wear lots of neutrals or browns because the shell haze matches that vibe. I like this for fall and early winter because it feels cozy without adding heavy decor.
Step 1: Apply satin green base using a green gel with a semi-sheer look, cure, then lightly buff if your satin finish needs it. Step 2: Add brown haze by stippling thin caramel gel with a sponge, then drag a few dark brown-black lines through the haze with a thin brush. Step 3: Cure and apply a satin topcoat if you want it to stay soft, or gloss if you want more contrast — both work. Step 4: Clean the nail edges and cap the tip with a thin layer so it stays smooth.
Stipple first, then draw lines — switching the order makes it look streaky.
Don’t use thick opaque brown — it looks like a patch instead of haze.