
1. Clear-snap storage French tips with peach center line
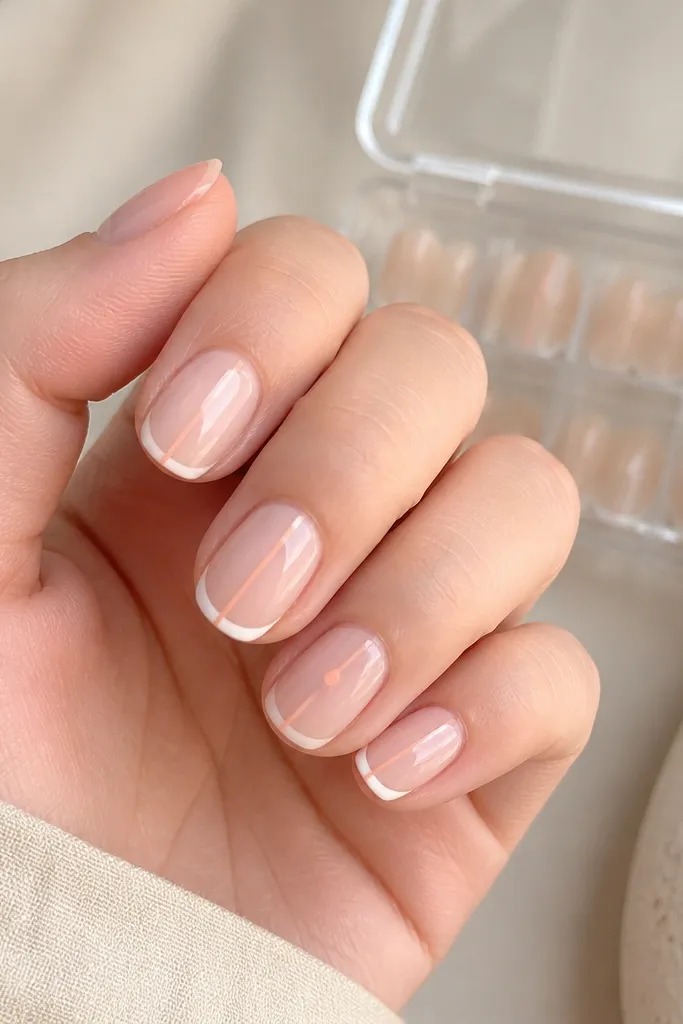
This design works because the French tip gives you that “clean and polished” look while the peach center line adds a playful focal point that doesn’t need extra length. I like a sheer nude base close to your natural nail tone, then a matte-leaning white for the smile line, finished with a high-gloss top coat so it looks fresh. Peach flatters warm undertones and neutral skin because it sits between blush and coral — not too pink, not too orange. For everyday wear, it also hides small chips better than bright solids since the base stays natural. The storage tie-in matters because you’ll want your tip case and a tiny striping brush ready — this design is fast once your tools live in one place.
Start by applying a sheer nude base in two thin coats and cure fully. With a striping brush, place a thin white French tip line so it reaches the sidewalls without flooding — keep it about 1 mm thick at the center of the smile. Then draw one straight peach line down the middle on each nail, about 0.5 mm wide, and add a single micro dot on the ring finger only. Finish with a glossy top coat, and wipe the tacky layer if your top coat requires it. Store your striping brush in a small clear case section so it doesn’t dry out — I keep mine in a zip pocket inside the tip organizer.
If your lines look wobbly, rest your pinky on the table and pull the brush in one slow stroke instead of going back and forth.
Don’t make the French tip too thick — on short oval nails it turns into a blunt cap and looks heavy.
2. Micro-dot constellation on a nude gel base (with organizer wheel)
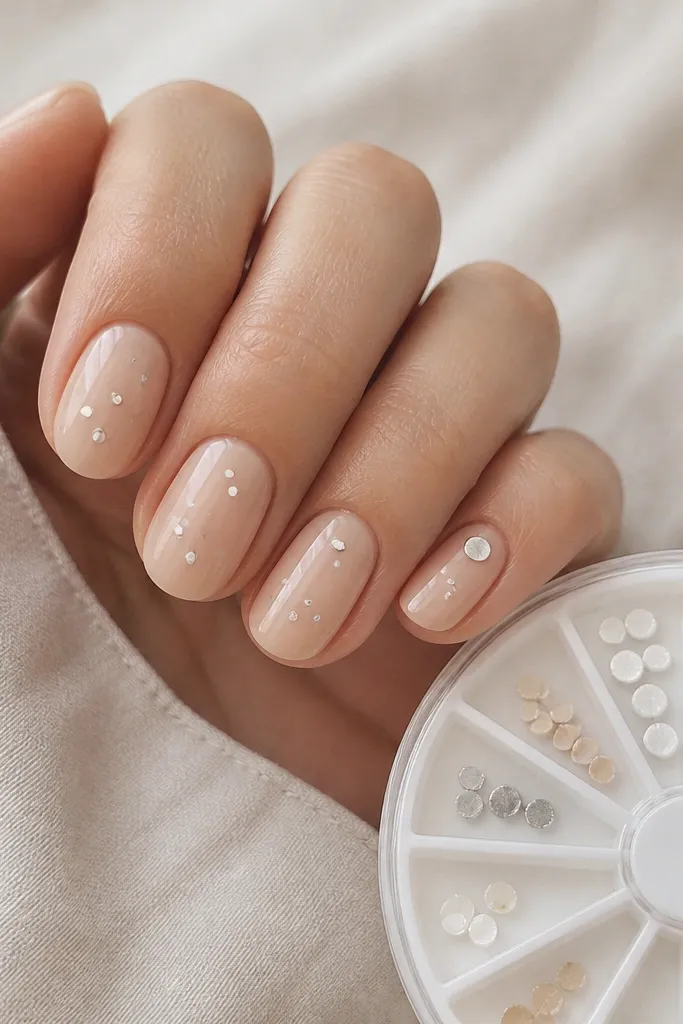
Micro-dot art looks surprisingly sharp on short oval nails because the dots create sparkle without needing long lines. I use a creamy nude base so the dots show up but don’t scream, and the silver dots catch light when you move your hands. This flatters most skin tones because you’re relying on contrast between nude and white/silver, not a single bold color. It also works for work because the pattern is tiny and controlled. I like this with storage that’s easy to spin — the rotating wheel keeps the exact white and silver gels in view, so I don’t grab the wrong shade mid-manicure.
Apply two thin coats of nude gel and cure. Use a dotting tool or toothpick tip to place tiny white dots first, keeping them clustered near the center and leaving breathing room near the cuticle. Add 1-2 silver dots on top for depth, then cure again. Finish with glossy top coat, and clean the edges with a small brush dipped in gel cleanser. For storage, put your dotting tool in the same organizer compartment as the silver gel — I’ve learned it’s faster than hunting for it later.
Dip the dotting tool lightly and wipe once on a lint-free wipe so the dot lands crisp instead of smeared.
Avoid placing dots right against the sidewalls — it makes the nail look wider than it is.
3. Olive-gold half-moon with magnetic tool strip
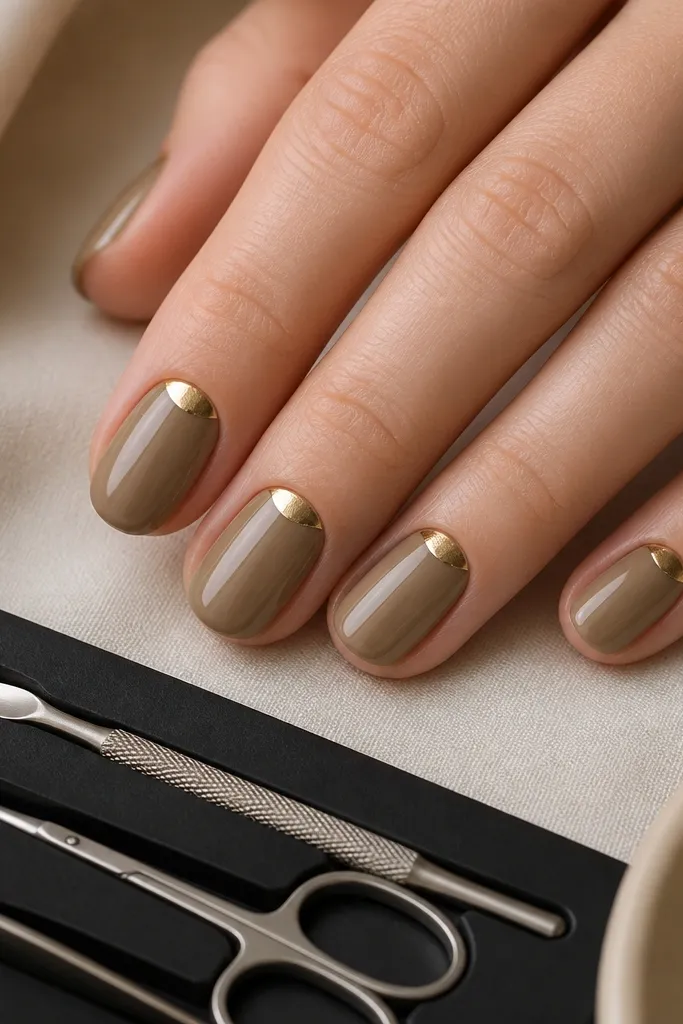
Half-moon designs look clean on short oval nails because they frame the cuticle and make the nail bed look longer. The olive nude base gives a modern, wearable tone that still looks professional, and the metallic gold arc adds glow without needing length. Olive-gold is gorgeous on deep and medium skin tones, but it also works on fair skin if you keep the olive sheer instead of opaque. This set looks best with a glossy top coat so the gold doesn’t look dull. I pair it with a magnetic tool strip because half-moon work needs steady tools — you’ll want your pusher and small liner brush right next to the lamp.
Start with a sheer olive base in two coats, curing between each. Use a small liner brush to paint a smooth gold half-moon arc at the cuticle, leaving a tiny gap so it doesn’t flood into the nail bed — aim for about 1/3 of the nail width. Clean any edges with a fine brush dipped in cleanser. Cure, then seal with a high-gloss top coat in one even layer. Store the gold gel and liner brush in the same organizer section so you don’t open five items while the gel is ready to use.
Editor's noteIf your half-moon looks crooked, place the gold arc first on the center, then adjust the left and right edges to match the curve.
Skip thisDon’t paint the gold too wide — on short nails it can cover the cuticle area and look like a thick ring.
4. Chocolate nude swirl accent on the ring finger
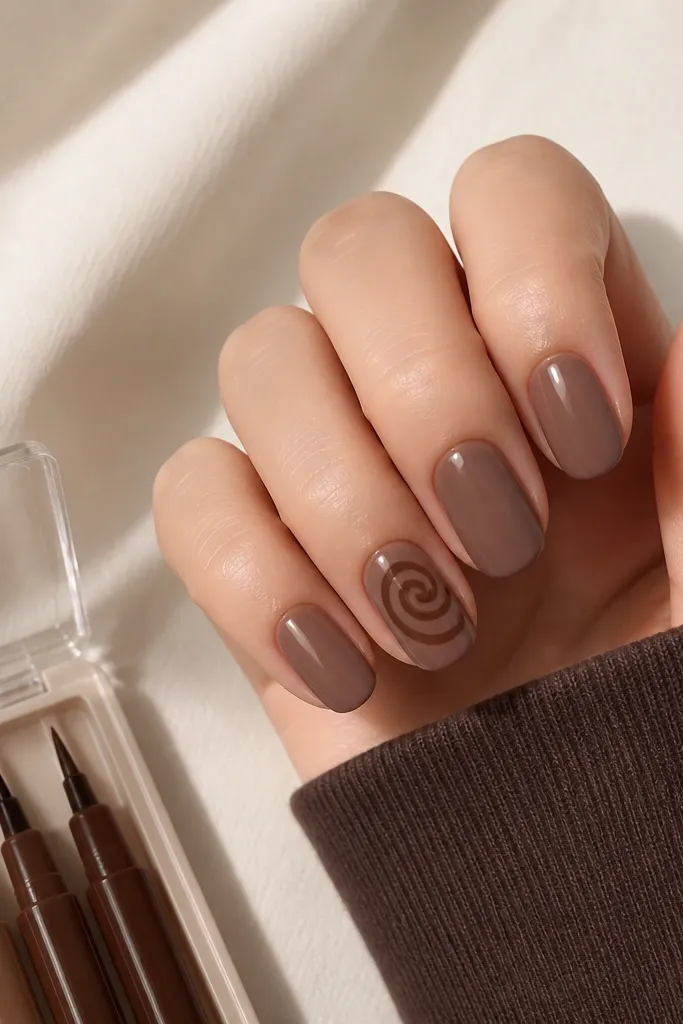
This is the design I reach for when I want something “done” without spending time on full nail art. A warm chocolate nude base flatters warm undertones and looks great on medium to deep skin, but it also works on fair skin when you keep the nude slightly deeper. The dark espresso swirl on the ring finger gives contrast and a little movement, and it doesn’t require long lines to read well. Because the accent is small, it’s forgiving if you’re still learning steady brush control. The storage piece is practical too — I keep striper pens in a snap box so the tips stay capped and you don’t end up with dried product.
Apply two coats of chocolate nude and cure until smooth. On the ring finger only, use a fine striper pen to draw a tiny S-shaped swirl, about the size of a pencil eraser, centered mid-nail. Add a second thinner line inside the swirl for dimension, then cure. Seal all nails with a glossy top coat, and wipe the edges carefully so the swirl doesn’t catch lint. Store the striper pen in the snap box right after you finish, and keep it in the same drawer as your top coat so you always grab the same set.
Use the pen tip like a pencil — press lightly and let the product flow instead of forcing thick lines.
Don’t swirl across the cuticle — it makes short nails look messy and shortens the visual length.
5. Powdery lavender gradient with clear storage drawer
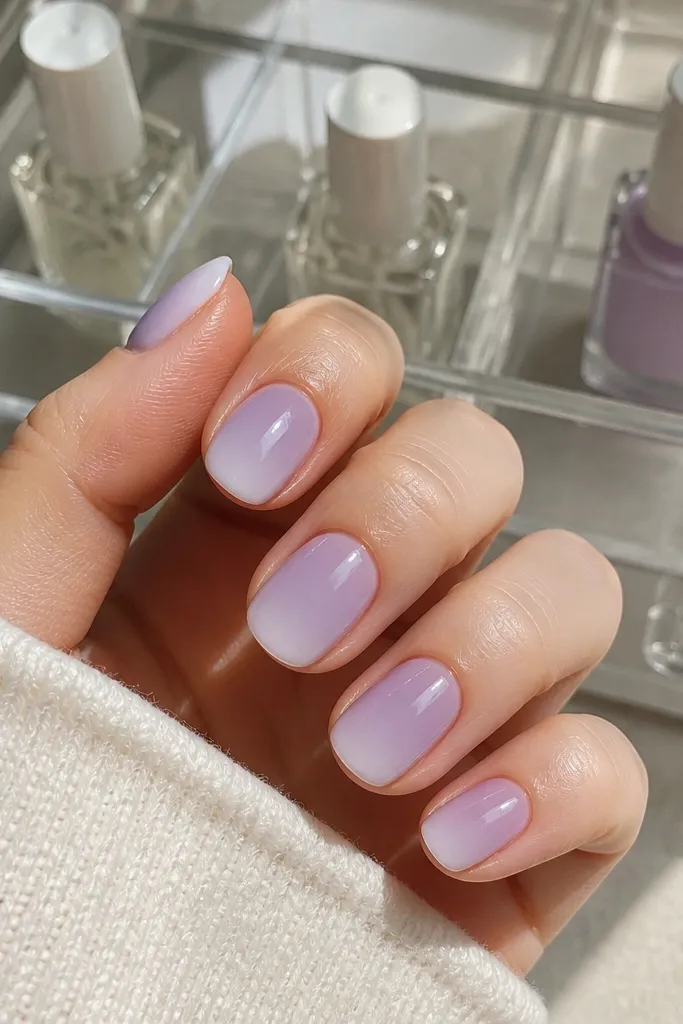
Lavender gradients look dreamy on short oval nails because the fade creates a vertical flow, making your nails look longer than they are. I keep the gradient sheer and powdery instead of opaque — opaque gradients can look chunky on short lengths. This shade flatters cool undertones and fair skin especially, and it also looks pretty on neutral skin when you keep it light. The clear storage drawer matters because gradient work goes faster when your base, sponge tools, and gel are in one view. I’ve done this with a makeup sponge cut into a tiny wedge — it’s the easiest way to avoid harsh lines.
Start with a sheer nude base and cure. Sponge lavender gel onto the nail starting at the cuticle area and blend downward using a dabbing motion, not dragging, so the fade stays soft. Build in thin layers until the color looks like a light haze, then cure. Clean the edges with a brush dipped in cleanser, add a glossy top coat, and cure again. Store your sponge wedge and lavender gel in the same clear drawer compartment so you don’t contaminate the sponge with other colors.
Editor's noteCut the sponge into a sharp triangle so you get a clean fade edge without streaks.
Skip thisAvoid loading the sponge too thick — thick gel fades into muddy stripes on short nails.
6. Jet-black glossy micro stripe set with foldable organizer
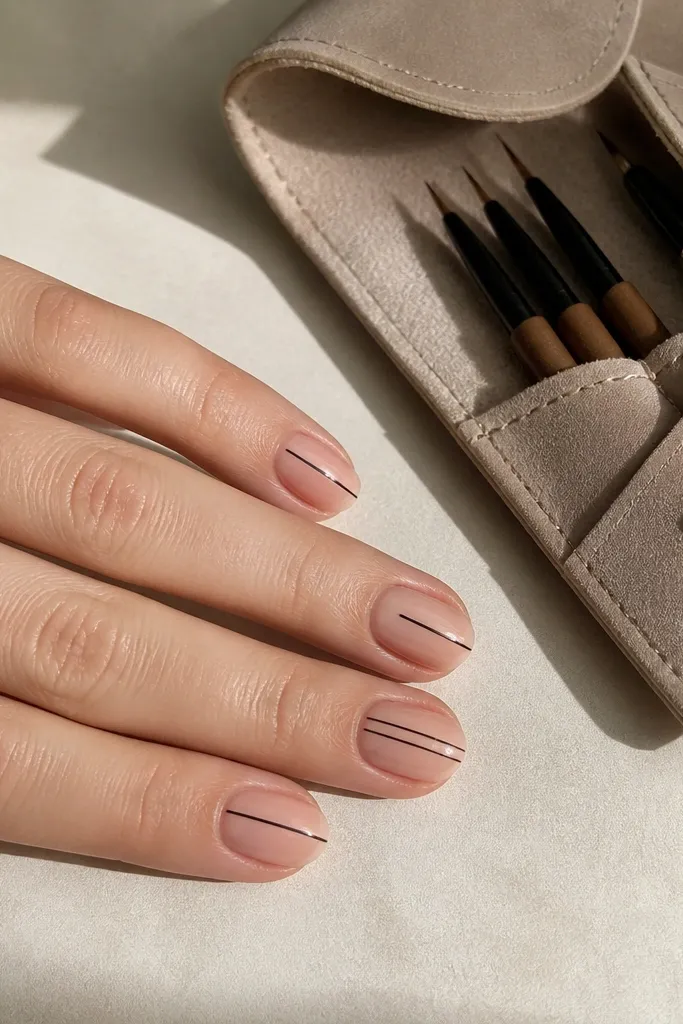
A micro vertical stripe is one of the fastest ways to make short oval nails look longer. The key is keeping the stripe thin — like a hairline — and glossy so light reflects along the nail’s center. This design looks sharp on fair, medium, and deep skin because the contrast is clean and consistent. I also like it because it hides minor imperfections in the base coat; your eye goes straight to the stripe. For storage, I use a foldable organizer pouch with separate slots for brush pens so the tips don’t dry out and you don’t mix up black vs brown.
Apply a sheer nude base in two thin coats, cure, and make sure the surface is smooth. Use a micro striping brush with jet-black gel to paint one vertical line from near the cuticle to the tip center, keeping it about 0.3-0.4 mm wide. Add a second line on the ring finger only, spaced about 1 mm apart. Cure, then seal with a thick glossy top coat to level the stripe. Store the striping brush upright in a slot so the gel residue doesn’t pool at the tip.
Editor's noteIf you mess up a line, wipe it immediately with a gel brush cleaner before curing — once cured, it’s a full redo.
Skip thisSkip thick stripes — they make short nails look stubby and heavy.
7. Burgundy velvet matte with clear tip case for extras
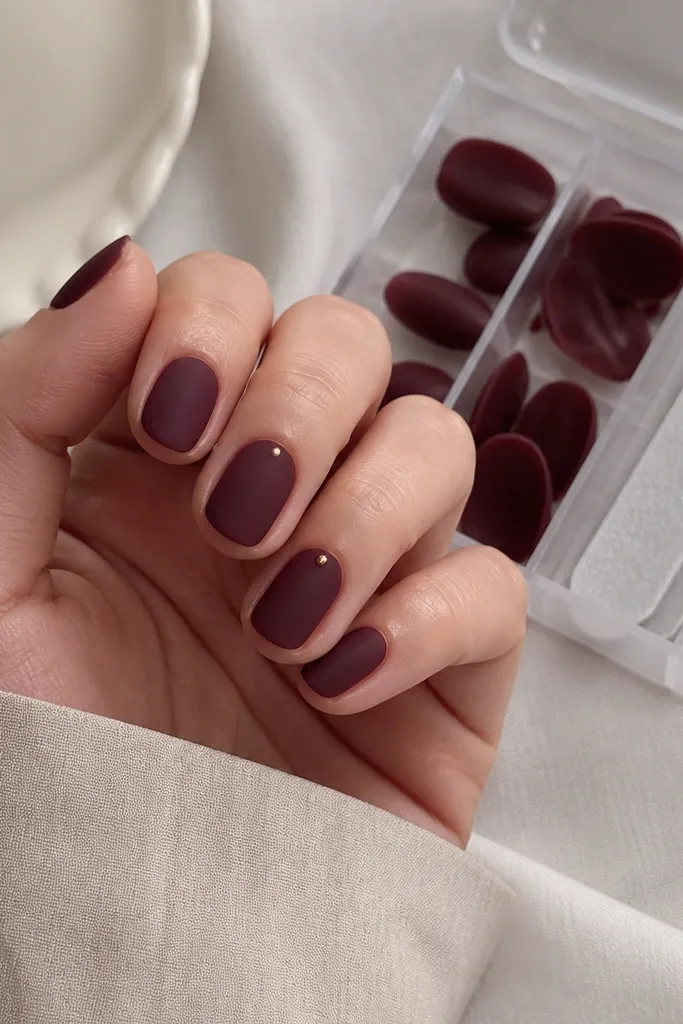
Matte burgundy on short oval nails is a mood, and it looks expensive when the shape is clean. The velvet-matte finish hides small surface ridges, so even if your base coat isn’t perfectly level, it still looks smooth. Burgundy flatters most skin tones, but it’s especially flattering on warm and medium skin because it warms the hand. The tiny gold dot near the cuticle adds a “jewelry” feel without making the nail look longer. I pair this with a tip case for extras because matte sets scratch less if you keep spare tips and a tiny file ready for quick repairs.
Start with a smooth base coat and cure, then apply two coats of burgundy gel. Cure fully and skip glossy top coat — instead use a matte top coat and cure again. Add one tiny gold dot on the ring finger only, placing it about 1 mm below the cuticle line. If you want more depth, use a slightly darker burgundy on the center of the nail with a sponge, then blend softly. Store the matte top coat and gold dot tool in the same tip case compartment so you don’t hunt when you’re doing touch-ups.
After curing matte top coat, avoid touching it with oily fingers — it can change the texture.
Don’t apply matte top coat over glitter that’s meant to stay glossy — it can mute the shine you want.
8. Milky pink base with holographic edge flick
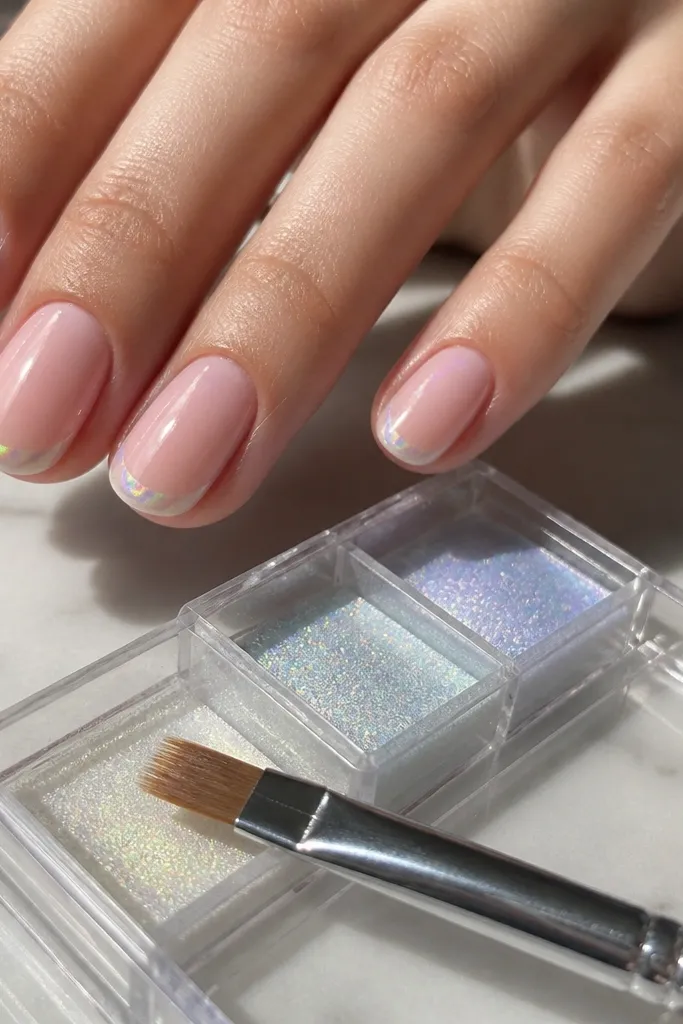
Milky pink is my go-to when I want short oval nails to look soft and clean, and the holographic edge flick gives you a little “spark at the end” effect. The flick is placed right where the eye expects the tip, so it makes the nail look longer without adding length. This looks good on fair and neutral skin because milky pink keeps it airy, and it still flatters deeper skin when the milky base is slightly more opaque. You’ll get the best effect if the holographic is applied thin — like a highlight, not a full chrome blanket. Storage matters here because chrome products get everywhere; I keep chrome powder and the flat brush in a sealed compartment box with a dedicated liner so nothing contaminates other gels.
Apply two coats of milky pink gel, curing each layer until it’s opaque but still soft-looking. Use a flat micro brush to press holographic chrome powder onto a tiny strip at the tip edge, then tap off so it stays thin. Seal with a glossy top coat that matches chrome needs, cure, then check under light to make sure the flick line reads. Clean around the sidewalls with a small brush and cleanser so the chrome doesn’t smear. Store the chrome powder lid closed and brush wrapped in tissue inside the sealed compartment.
Editor's notePress the chrome with the brush, don’t swipe — swiping turns the highlight into a messy gradient.
Skip thisAvoid thick chrome on short nails — it can look like a sticker and feels rough at the edges.
9. Seafoam checker accent with magnetic palette
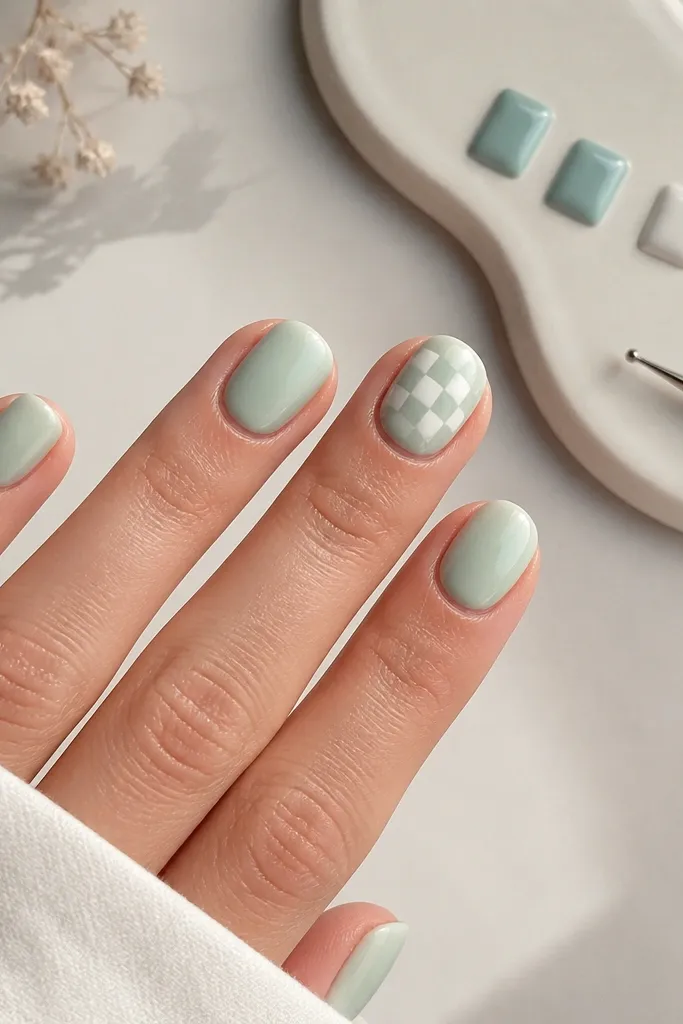
Checker patterns can look playful without getting childish when you keep the squares tiny and place them near the center. Seafoam is a flattering color because it reads fresh and cool, and the sheer base keeps your nail bed looking natural. This set is especially pretty on light to medium skin, but it also looks great on deeper skin when you keep the seafoam slightly less translucent. The ring-finger placement keeps it from overwhelming short nails. I love this with a magnetic palette because it holds tiny gel portions flat and makes it easy to pick up the right color without opening multiple jars.
Apply a sheer seafoam base coat in two thin layers and cure. On the ring finger, use white gel to paint 4-6 small squares in a grid, then add seafoam squares in alternating spots. Use a toothpick to square off the edges so the pattern looks intentional. Cure and seal with glossy top coat, then clean the cuticle line with a brush. Store your magnetic palette with the toothpick in a small holder so it doesn’t get lost under other tools.
Editor's noteUse a fresh toothpick tip for each color so the squares stay crisp.
Skip thisDon’t put checker patterns on every nail — on short oval nails it turns busy fast.
10. Satin nude with copper micro half-moons
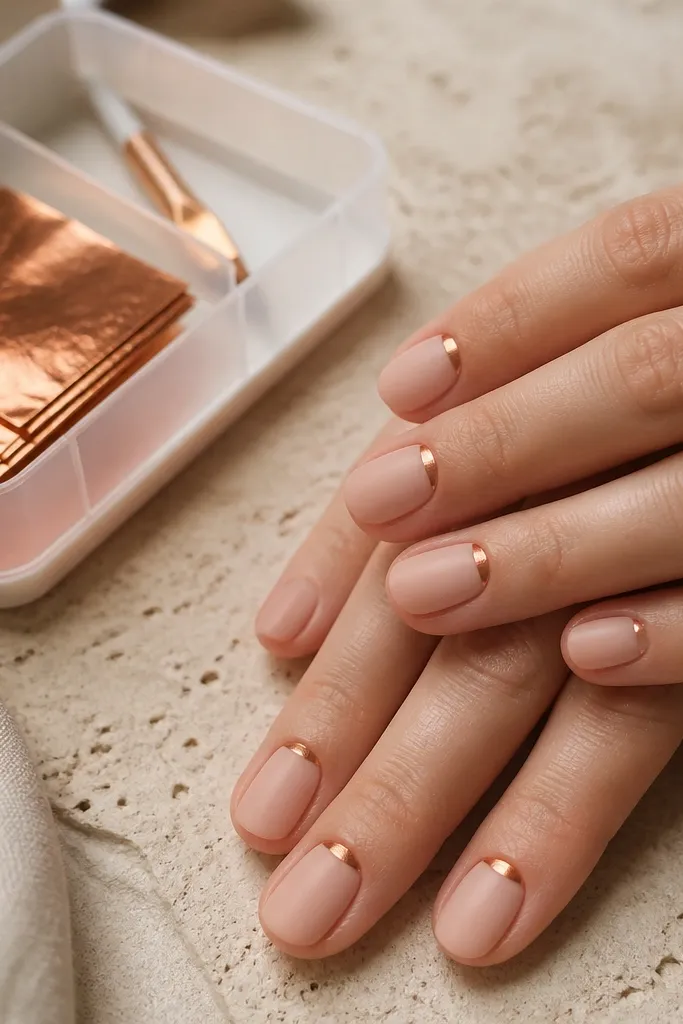
Copper micro half-moons look delicate on short oval nails because they mimic jewelry — small and reflective. The satin nude base keeps the nails looking soft and smooth, while the copper crescent adds warmth that flatters neutral and warm undertones. If you have cool undertones, keep the copper more rose-gold than orange. This design also works for hands that get dry, because the satin finish hides minor dryness texture better than super glossy layers. Storage helps because copper foil and tiny brushes are easy to misplace; I keep them together in one organizer so I can repeat the look without re-buying tools.
Start with satin-finish nude gel or a nude base plus a satin top coat, cure fully. Paint a micro copper crescent at the cuticle using a liner brush, keeping it thin like 0.5 mm — stop before it touches the sidewalls. Add a tiny copper dot on one accent nail only, place it about halfway between cuticle and center. Cure and seal lightly with satin or a thin glossy coat if you want more shine. Store copper liner brush tip cover and foil sheet in the same compartment so the metallic stays clean.
If the copper looks too bold, add one extra thin nude layer on top after curing the copper.
Avoid full copper cuticle coverage — it can swallow short nails and look heavy.
11. Storage-friendly pressed flower decal on clear tips
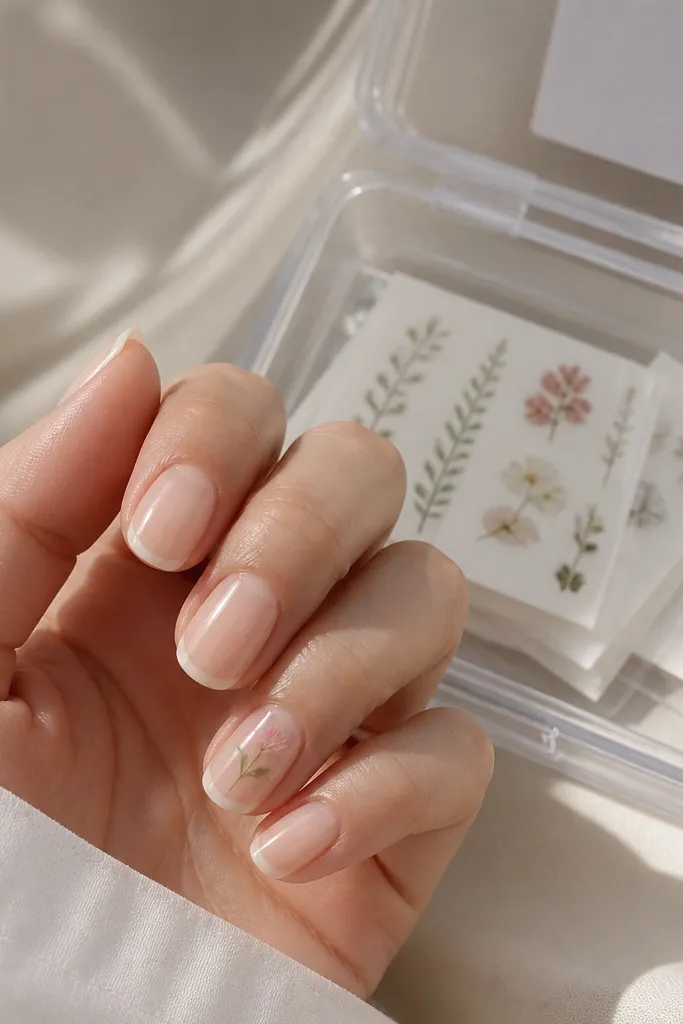
Pressed flower decals look best on short oval nails when you treat them like a tiny keepsake, not a full cover. Clear-tipped layering makes the decal look like it’s floating, and the sheer base keeps it from looking bulky. This is flattering on fair to medium skin because the pale petal colors show up, and it’s also gorgeous on deeper skin when you use a cleaner sheer base instead of a dark nude. The flower on one or two nails gives you a focal point that feels special for dates, events, or just a “treat yourself” week. For storage, keep decal sheets in a flat clear box so they don’t wrinkle, and keep the top coat and brush in the same box for quick assembly.
Apply a sheer nude base and cure, then place clear tips or a clear builder layer on top of the nail to create a smooth window. Position the pressed flower decal on the ring finger, using tweezers, and press it flat without stretching the film. Seal over it with a thin layer of clear gel, cure, then add one more clear layer if the decal edges feel raised. Finish with glossy top coat and clean around the cuticle line. Store decal sheets flat in the clear box, and keep the tweezers in a small side pocket so you grab them fast.
Trim decals only after you’ve placed them on the nail so you don’t cut off the petal you actually want to show.
Don’t use a thick opaque base under the decal — it kills the floating effect.
12. Creamy white skittle nails with micro storage labels
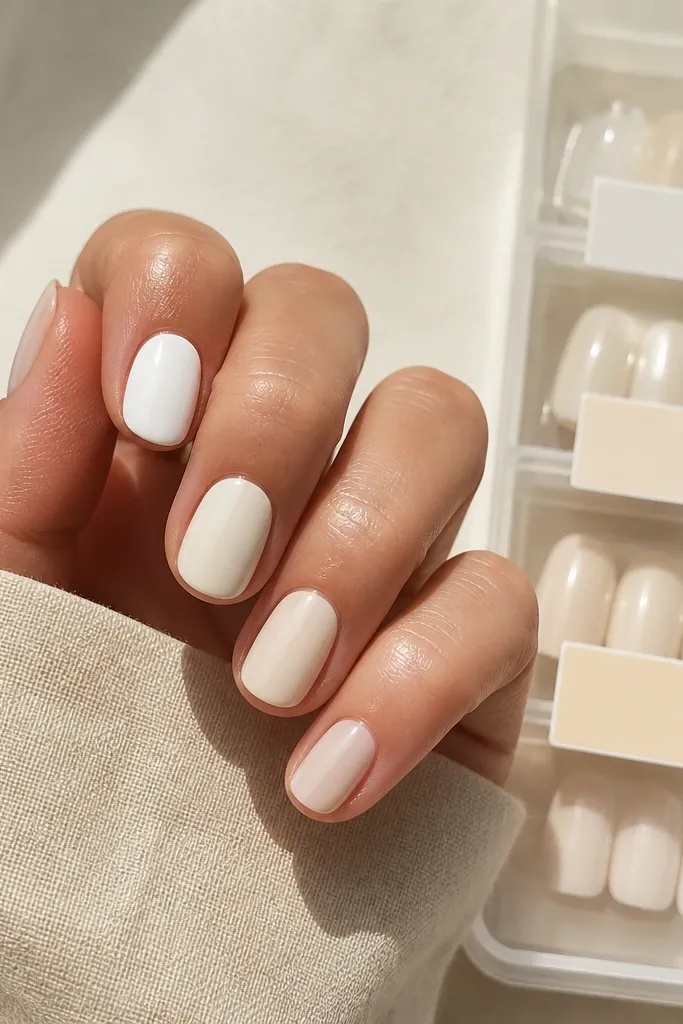
Skittle nails on short oval shapes can work if the colors are in the same family and the finish is consistent. This set uses creamy whites so your nails look coordinated instead of random, and the short length keeps it from getting too loud. Off-white shades look great on fair skin because they stay bright without washing you out, and they also flatter medium to deep skin when you choose one “warmer” cream to soften contrast. The reason it looks practical is that you can match outfits easily because it’s basically a neutral wardrobe. Storage makes it real: label your small gel pots or polish bottles by shade name so you don’t mix warm ivory with cold white when you’re tired.
Start with a sheer base coat so the whites apply smoothly. Paint each nail a different off-white — keep the ring finger slightly warmer (ivory) and the middle finger the brightest (pure white). Cure each nail fully if you’re using gel, then seal with a glossy top coat. If you’re using regular polish, let each coat dry between layers so you don’t get streaks on the short oval surface. Store the paints in a labeled organizer — I use tiny color dots on the lids and keep them in the same order every time.
Editor's noteUse the same brush direction for every nail so the finish doesn’t look different across shades.
Skip thisAvoid mixing matte and glossy in one set — it looks uneven on short oval nails.
13. Rose nude ombre with clear gel storage palette
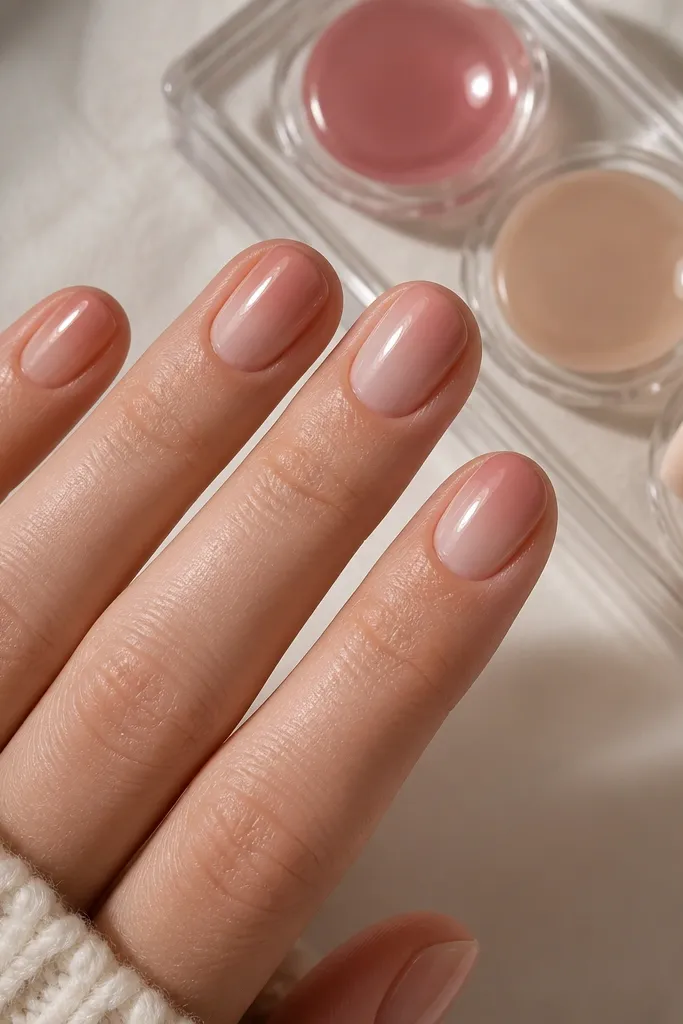
Rose nude ombre makes short oval nails look romantic and longer because the fade pulls the eye from cuticle to tip. I keep the ombre subtle — you should feel like you’re wearing your nail, just prettier, not like you’re wearing a hard color block. Rose nude flatters neutral and warm undertones, and it also works on cool undertones if the rose leans slightly mauve. The glossy finish is important here because it smooths the transition line and makes the gradient look expensive. Storage matters because blending sponge and gel colors need to stay clean and separated; I use a clear palette so I can see how much product is on the sponge before it touches my nails.
Apply a sheer rose nude base and cure, then load a tiny amount of darker rose gel onto a blending sponge. Dab the sponge at the upper third of the nail and blend downward into the lighter nude, keeping it within the oval shape so you don’t blur the sides. Work in two to three thin layers, curing between each if needed, until the fade looks smooth. Seal with glossy top coat and check the edges under a lamp. Store the blending sponge flat in the palette box so it doesn’t pick up dust from your room.
Editor's noteWipe the sponge lightly between nails so you don’t build too much pigment and turn the ombre harsh.
Skip thisDon’t blend all the way to the sidewalls — ombre that spills sideways makes short nails look wider.
14. Gold foil confetti on nude with snap-shut storage
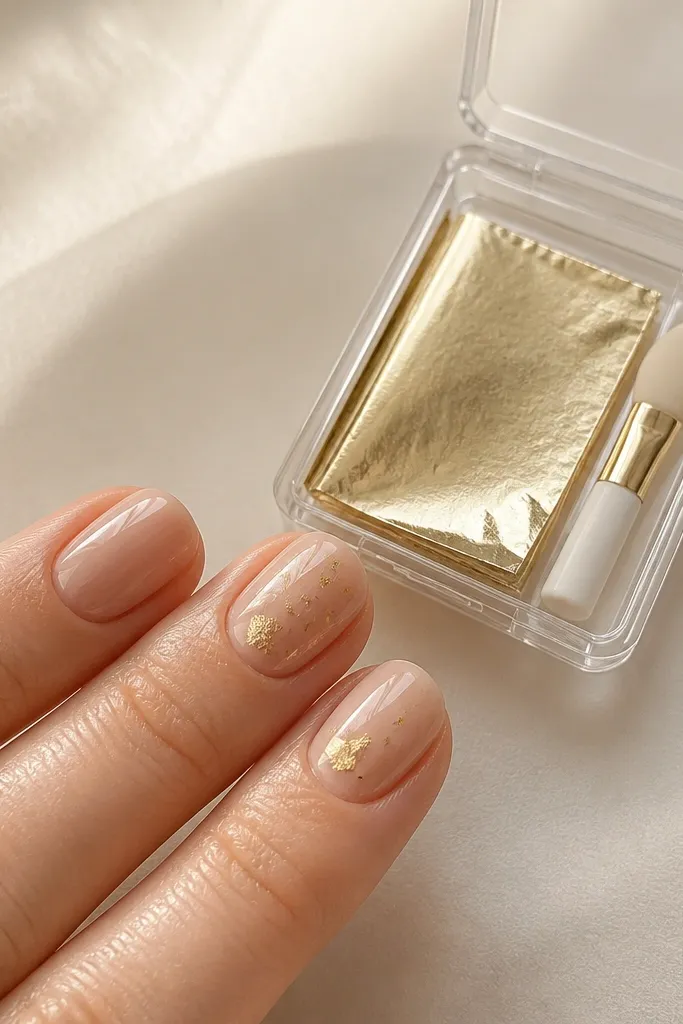
Gold foil confetti is my go-to when I want short oval nails to look “party” without adding length or big 3D charms. On short nails, tiny flakes read as sparkle instead of clutter, especially when you keep them mostly centered. Nude base keeps it wearable for day, and the gold works across skin tones — fair skin gets a bright glow, and deeper skin gets warm contrast. This design also hides minor application bumps because the flakes draw attention. Storage is the difference between easy and annoying here: foil sheets tear and stick, so I keep them in a snap-shut case with a sheet of parchment so they don’t glue themselves to everything.
Apply a nude base in two coats and cure, then seal with a slightly tacky layer if your foil technique needs it. Tear or cut tiny gold foil pieces and press them lightly onto the ring and middle fingers, placing most pieces around the center and leaving breathing room near the cuticle. Seal with a gel top coat, cure, and add a second thin top coat if any flakes feel sharp. Keep the rest of the nails plain nude and glossy so the confetti stays the focal point. Store the foil transfer tool and foil sheets in the snap-shut case — I keep it next to my lamp so I don’t forget it mid-set.
Press with the flat end of a foil tool for 2-3 seconds per flake so it bonds without smearing.
Avoid covering the entire nail in foil — it looks thick and makes short oval nails feel rough.
15. Teal micro-grid with clear-lid organizer for striping tape
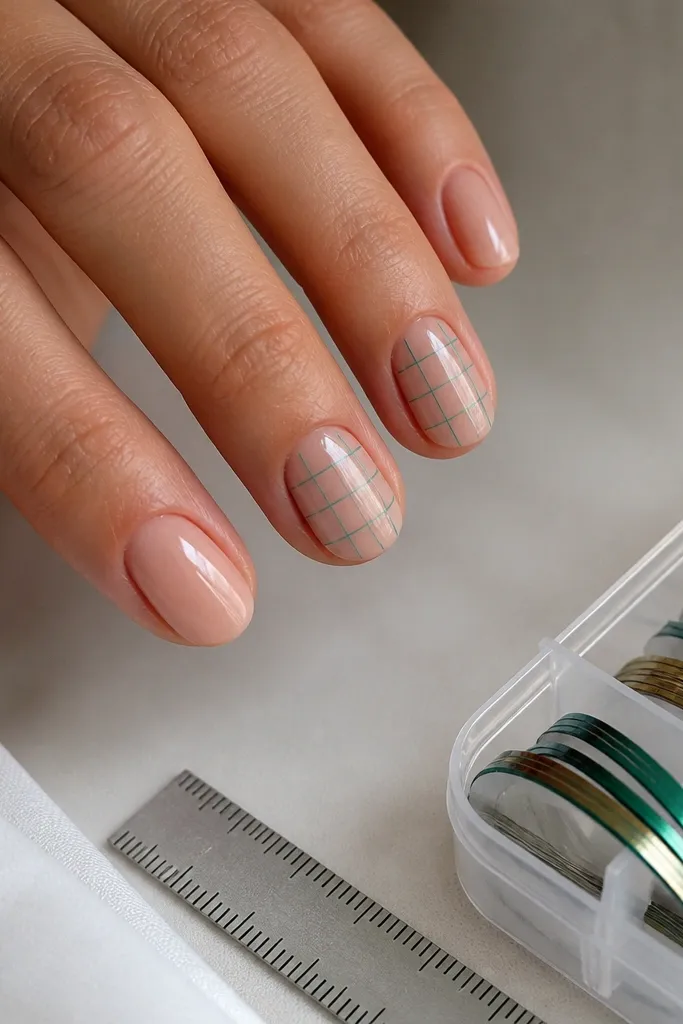
A micro grid gives short oval nails a graphic look that still feels clean, not chaotic. The grid works because the lines are thin and evenly spaced, and the nude base keeps it from feeling heavy on short length. Teal flatters cool undertones and makes neutral skin look brighter, and it looks striking on fair skin without needing dark shades. I keep the grid on two nails only so the pattern reads, not shouts. Storage matters because striping tape and line tools need to stay straight and accessible; I use a clear-lid organizer so I can grab the exact width tape without measuring every time.
Start with a sheer nude base, cure, and top it with a slightly tacky layer if needed for tape. Apply thin teal striping tape lines horizontally across the nail center, then place matching vertical lines to form a grid, keeping spacing consistent at about 1-2 mm. Paint over the grid with teal gel or polish, then carefully remove tape while it’s still workable if your method supports it. Cure and seal with glossy top coat. Store striping tape flat in the clear-lid organizer, and keep a small ruler inside so you can eyeball spacing quickly.
Use tape for the first nail to set your spacing, then replicate that spacing on the second nail by matching the lines to the first one.
Don’t use thick tape lines — they create raised edges that snag on short nails.



