
1. Rosy Jelly Nude With Cuticle Glow Lights
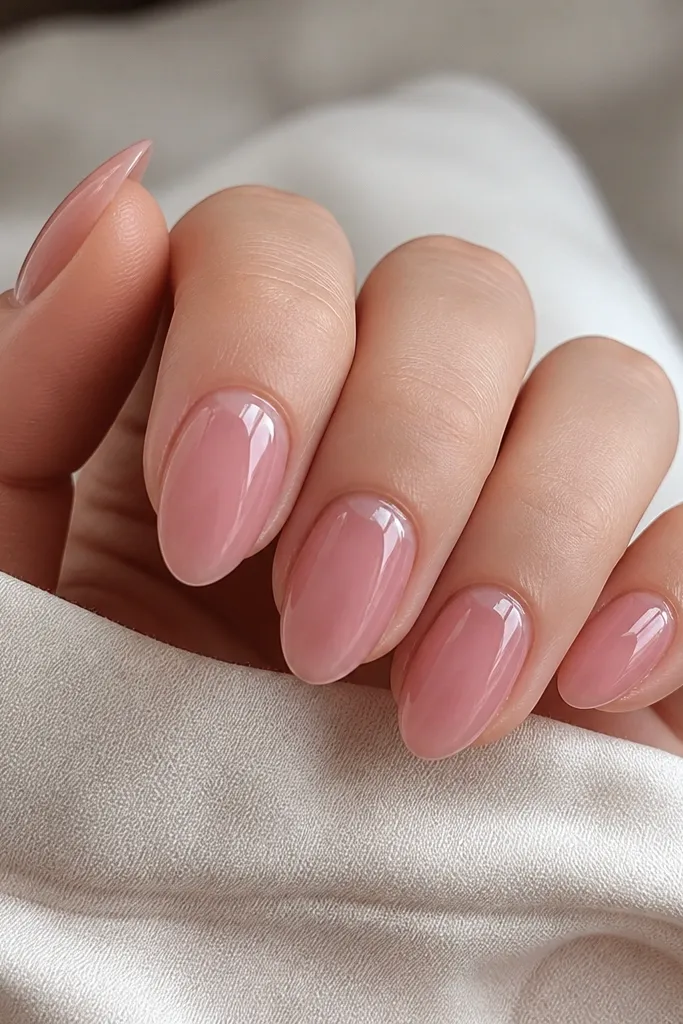
This look is my go-to when you want “natural but expensive.” The base is a sheer rosy jelly pink so the nail still looks like your real nail, just cleaner. The cuticle highlight is done in a slightly brighter pink, kept narrow so it reads like a glow rather than a stripe. Under storage lights, that glossy crescent catches the LED tab and makes your cuticles look sharply finished even from across the table. I like it on fair to medium skin tones because the rosy undertone matches the natural nail bed.
Editor's noteUse a gel top coat with a high-gloss finish, not a matte or rubbery one, so the LED reflection stays crisp.
Start by prepping the cuticle area: gently push back, then buff only the shine off the top surface. Apply a sheer rosy jelly builder gel in 2 thin coats, curing fully each time. Next, paint a micro crescent at the cuticle — about 0.5 to 1 mm wide — and pull it slightly toward the sidewalls so it looks even. Seal with a thick, glossy top coat and cure, then wipe with cleanser. Finally, tap the storage lights onto your nails at different angles to check that the brightest reflection lands on the cuticle glow, not the sidewall.
Skip thisDon’t make the cuticle glow wider than 1 mm or it turns into a band that looks like a sticker.
2. Nude Pink Micro-French With Light-Reflect Arc
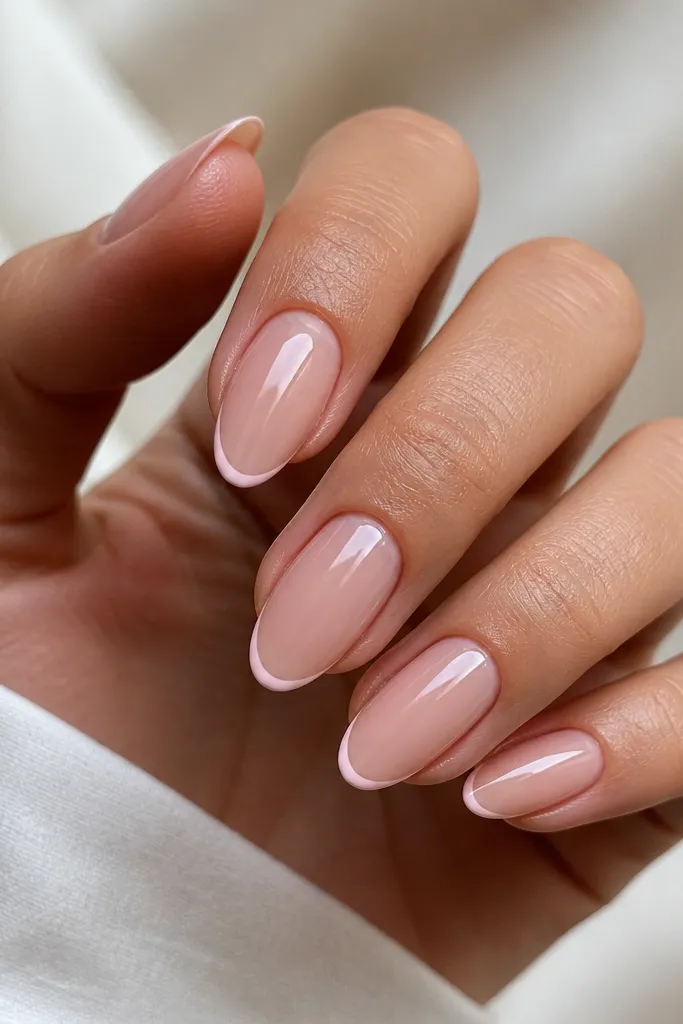
Micro-French is how you get that clean, polished look without losing the nude vibe. The base is a creamy nude pink that matches your nail bed, then the tip arc is a micro line — thin enough to look like a natural shadow. I use a white-pink mix for the arc so it doesn’t look stark under LED light. The storage lights reflect along the arc, which makes your tips look freshly shaped. This works great on medium nail beds and looks flattering on hands that have slightly longer fingers because the arc visually tightens the tip.
Editor's noteIf your arc looks uneven, fix it with a tiny brush dipped in cleanser to sharpen only the top edge, then re-top coat.
Start with one coat of nude pink sheer gel over the whole nail, then add a second thin coat for even coverage. With a liner brush, draw the micro French arc at about 1 to 2 mm from the tip edge, keeping it centered first. Cure, then add the arc color — I do a very light white-pink at the top of the curve only, leaving the inside of the arc as sheer base. Finish with a high-gloss top coat in one smooth layer. Put your storage lights tab under the tips and rotate your hand to confirm the bright reflection hits the arc evenly.
Skip thisSkip thick French tips — they look bulky on almond and block the light reflection.
3. Soft Pink Gradient Jelly Ombre
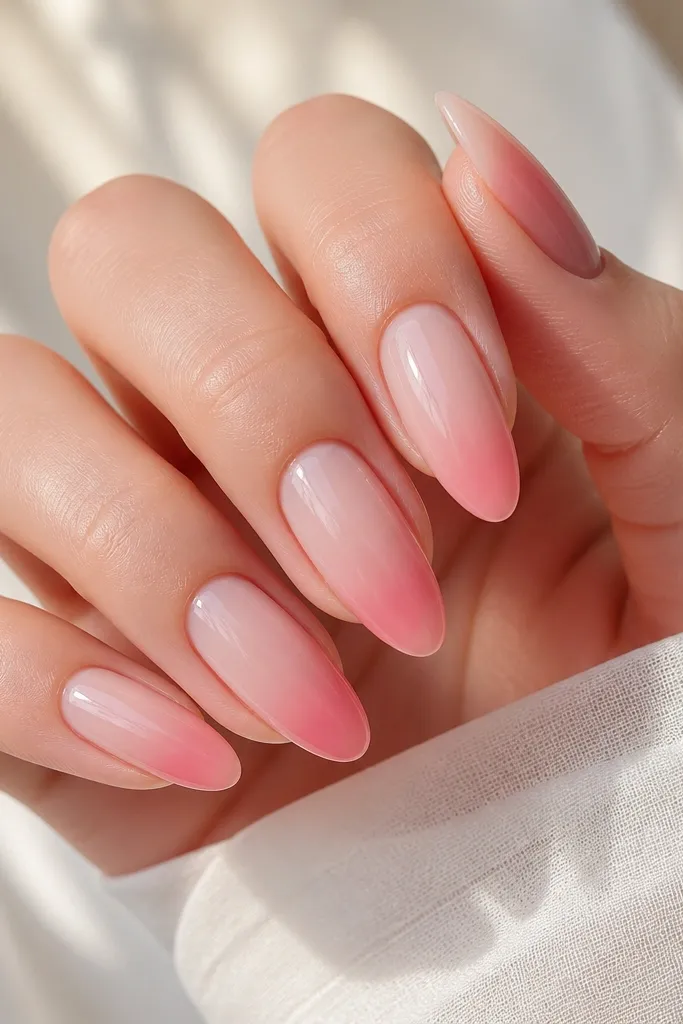
This is nude pink with actual depth. The gradient starts sheer near the cuticle so it looks like your natural nail bed, then it deepens into a soft pink at the almond tip. I keep it jelly so the light passes through and glows when the storage lights hit it. The effect is flattering on most skin tones because the transition is smooth, not patchy. If you have shorter fingers, the gradient elongates visually because the darkest color sits at the narrow tip.
Editor's noteBlend the gradient with the sponge edge, not the center — the edge gives you a softer fade.
Apply a sheer nude jelly base coat and cure. Then sponge a slightly deeper soft pink jelly onto the top half of the nail, blending downward with light pressure. Use a small makeup sponge and wipe the excess off the edges so you don’t get a hard line. Cure and repeat one more thin gradient layer if you want more tip depth. Finish with a thick glossy top coat to lock the jelly look and enhance the LED glow.
Skip thisDon’t let the gradient pool at the sidewalls or you’ll get shiny “ridges” that show under light.
4. Nude Pink With Thin Gold Thread at the Sidewall
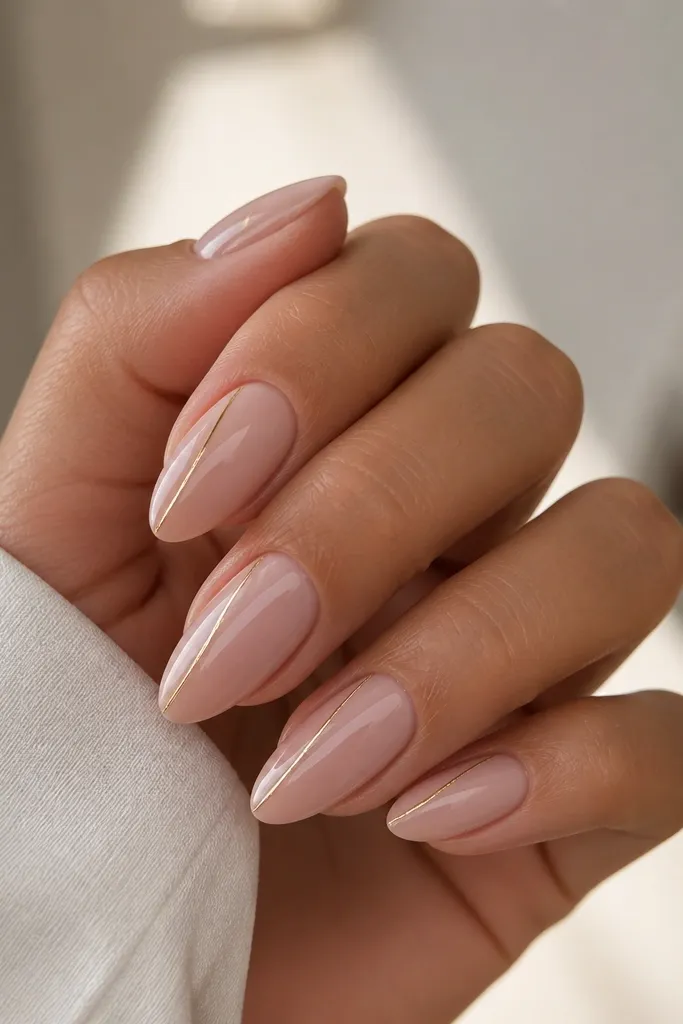
Gold thread is tiny effort with a big payoff. The base is nude pink, glossy and smooth, then the gold line sits just inside the sidewall curve so it frames the almond shape. Under storage lights, the gold line throws a bright highlight that makes the nail look sharply contoured. I like this on medium and warm undertones because the gold warms up the pink without turning it orange. It also looks good on hands with wider nail beds because the single line visually narrows the shape.
Start with two thin coats of nude pink builder gel for a level surface, then cure. Place a strip of gold foil thread or paint a fine gold line using a liner brush — keep it about 0.5 mm away from the sidewall edge. Cure if using gel gold; if using foil, press lightly and seal. Add a glossy top coat over everything so the thread looks embedded, not raised. Turn the hand under the storage lights and adjust the angle so the gold line catches the strongest reflection.
If you’re hand-painting gold, do one pass for the line, cure, then do a second pass only on the faint spots.
Avoid putting gold at the very tip — it can look like a thick border on almond.
5. Baby Pink Halo Near the Cuticle
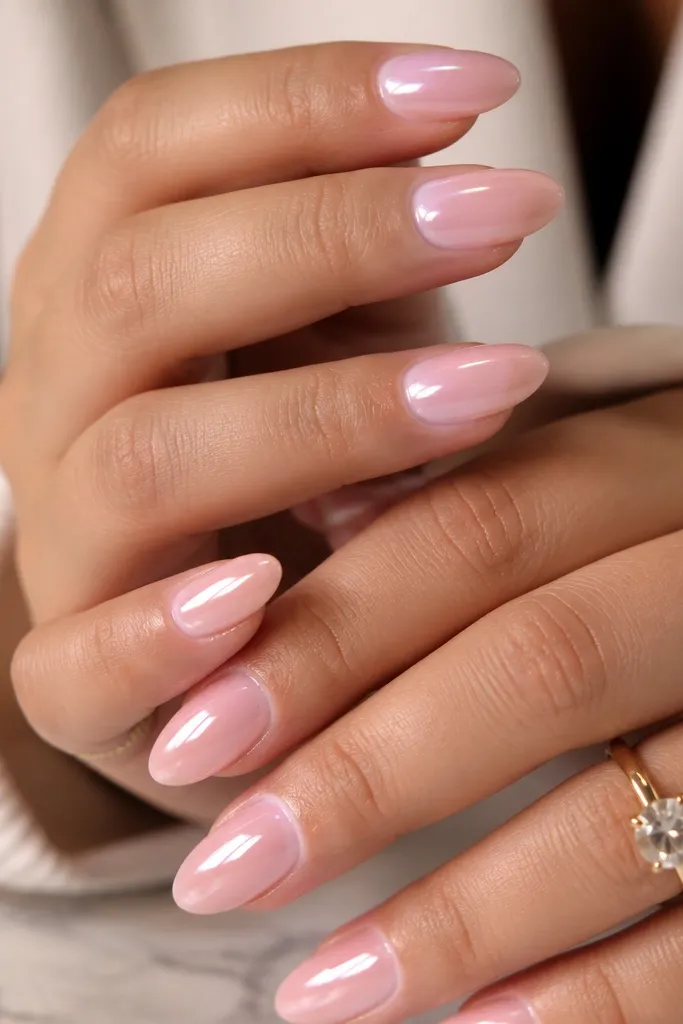
This halo look makes nude pink feel playful without getting loud. The base is baby pink sheer, then you paint a soft circular halo around the cuticle — think “blurred ring,” not a perfect coin. When you use storage lights, that brighter ring catches and makes your cuticle area look lifted and neat. It’s especially flattering if your nail beds are shorter because the halo draws attention to the top third of the nail. I’ve worn it on nights out and it still looks clean in daylight.
Editor's noteKeep the halo ring thinner than your cuticle line — about 0.5 mm — so it stays airy.
Apply a sheer baby pink layer and cure. Using a dotting tool and a slightly brighter pink gel, place a tiny dot at the center cuticle area, then drag it into a thin circle outline. Clean the edges with a small brush dipped in cleanser so the ring stays thin. Cure and top coat with a glossy layer. Check under storage lights — you want the brightest ring to sit at the center, not drifting to one side.
Skip thisDon’t over-saturate the halo color or it turns into a thick “lipstick” band.
6. Nude Pink With Micro Dot Confetti (One Accent Nail)
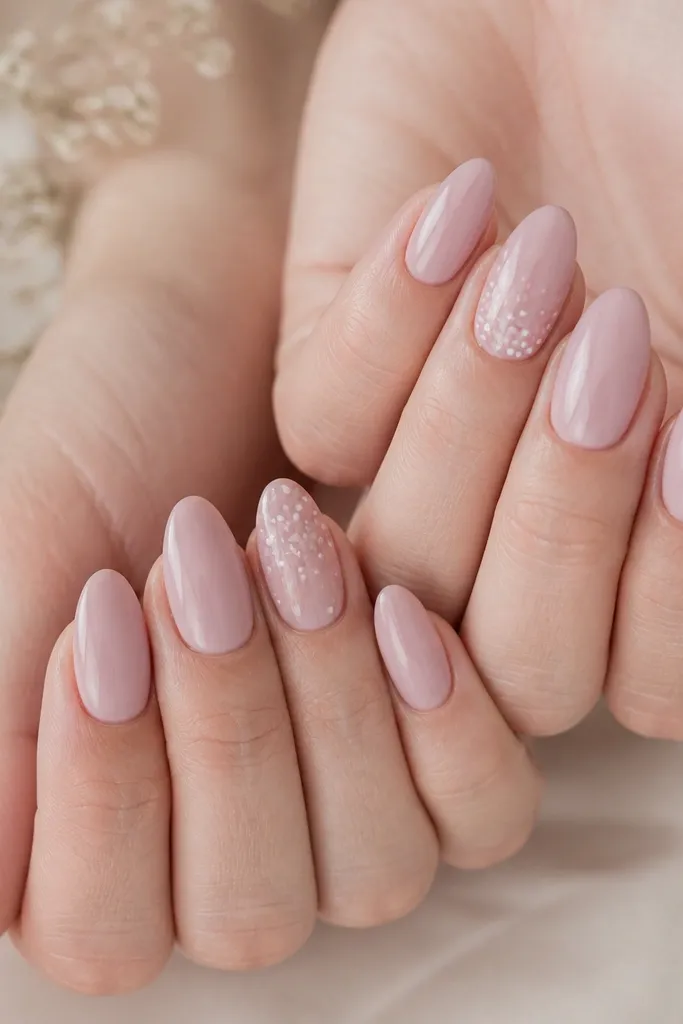
I do this when I want natural nails that still feel special. Most nails are a smooth nude pink, then one accent nail gets micro dots in pale pink and white, kept close to the cuticle. The dots catch storage lights like tiny points of reflection, so the accent pops in photos without looking like full glitter. This flatters all skin tones because the dots are light and the base stays sheer. It’s also a good choice if you hate nail art that covers the whole nail.
Start with nude pink builder gel on all nails, then cure and top coat lightly. On your accent nail, add a few micro dots — 5 to 7 dots total — about 1 to 2 mm from the cuticle line, clustered near the center. Use a dotting tool and cure after placing each color if needed. Seal with one glossy top coat, making sure you cover between dots so they don’t snag. Turn on your storage lights and hold your hand at a slight angle to see the dot sparkle pattern.
Keep the dots uneven in size by a hair — the variation looks more natural than perfect spacing.
Don’t place dots all the way to the tip or it reads like cheap confetti.
7. Rose Nude With Clear Negative Space Half-Moon
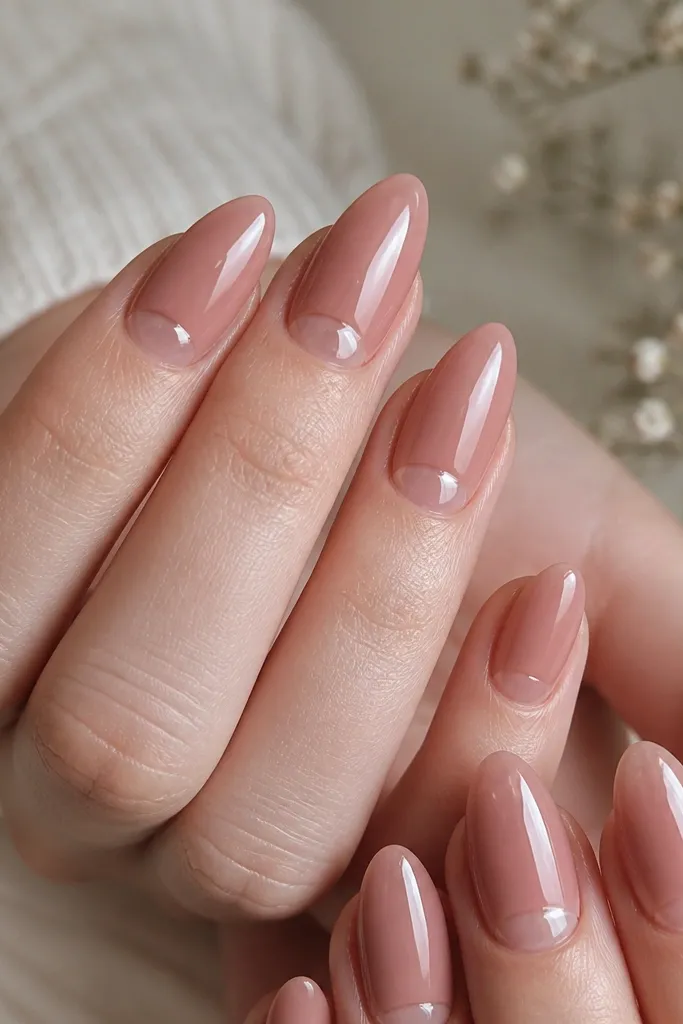
Negative space makes nude pink look modern, and the clear half-moon is the perfect place for storage lights to shine. The base is rose nude, glossy, and semi-sheer so the clear window looks intentional. The half-moon shape sits right at the cuticle — not too large — so your nail still looks long. Under LED light, the clear area reflects and makes the cuticle look neat and airy. This works best if you have healthy nails and want a design that grows out gracefully.
Editor's noteUse a striping brush for the half-moon curve — it gives you a smoother arc than a regular brush.
Apply a rose nude base gel and cure, leaving the half-moon area untouched at the cuticle. Use a clean brush to define a curved half-moon boundary about 2 mm wide from the center and taper toward the sides. If you’re using nail forms, build the base first, then carefully outline the window before curing. Add a second thin rose coat over the rest of the nail, avoiding the clear window. Seal with glossy top coat, and then check the half-moon reflection under storage lights for clean edges.
Skip thisDon’t make the half-moon too big or your nude base looks thin and patchy as it grows.
8. Nude Pink Marble Vein With Light-Catching Gloss
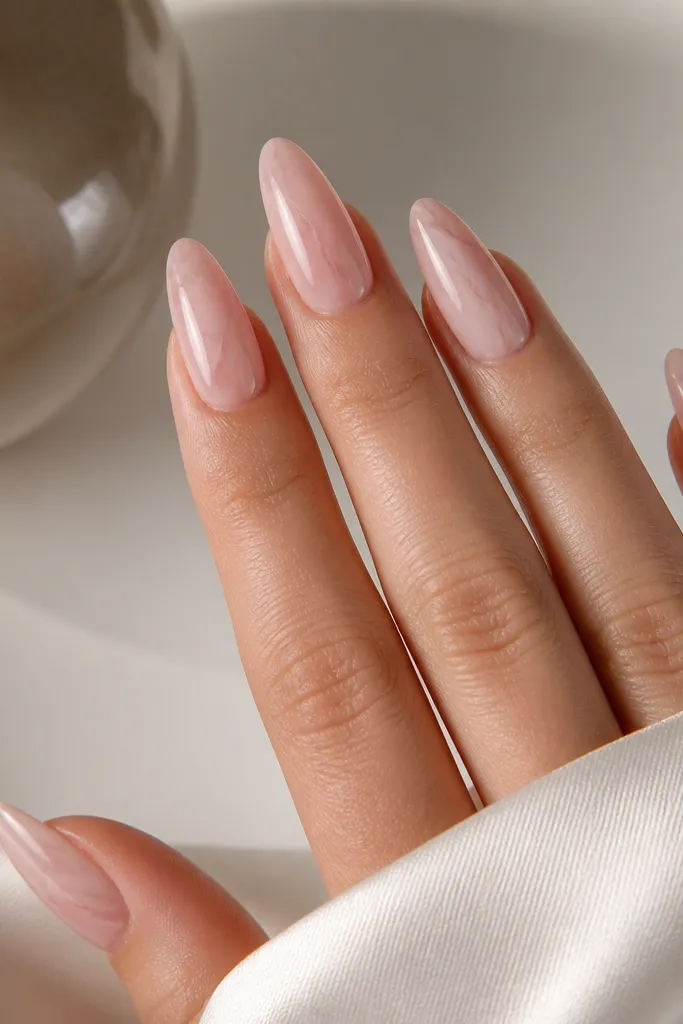
Marble on nude pink is subtle when you keep the veining thin and the base sheer. I use a gray-pink veil so it looks like natural stone, not a bold pattern. The glossy finish matters because storage lights need a smooth surface to catch the swirls. This look flatters fair skin because the gray-pink reads soft, and it also looks good on medium tones where marble can otherwise turn too dark. It’s perfect for events because it looks detailed up close but calm from a distance.
Start with a sheer nude pink base gel and cure. Mix a gray-pink gel (or dilute gray with nude gel) and use a thin liner brush to draw 2 to 3 hairline veins per nail. Pull the veins diagonally so they follow the almond shape, then soften the edges with a micro brush dipped in cleanser if needed. Cure fully and apply a glossy top coat in two thin layers to smooth the marble texture. Check under storage lights — you want the brightest reflection over the center swirls, not the edges.
Keep the veins broken and thin — marble looks real when it’s imperfect.
Skip thick lines; they turn into cartoon marble and look heavy on almond.
9. Powdery Nude Pink With Velvet Matte Top + Light Gloss Accent
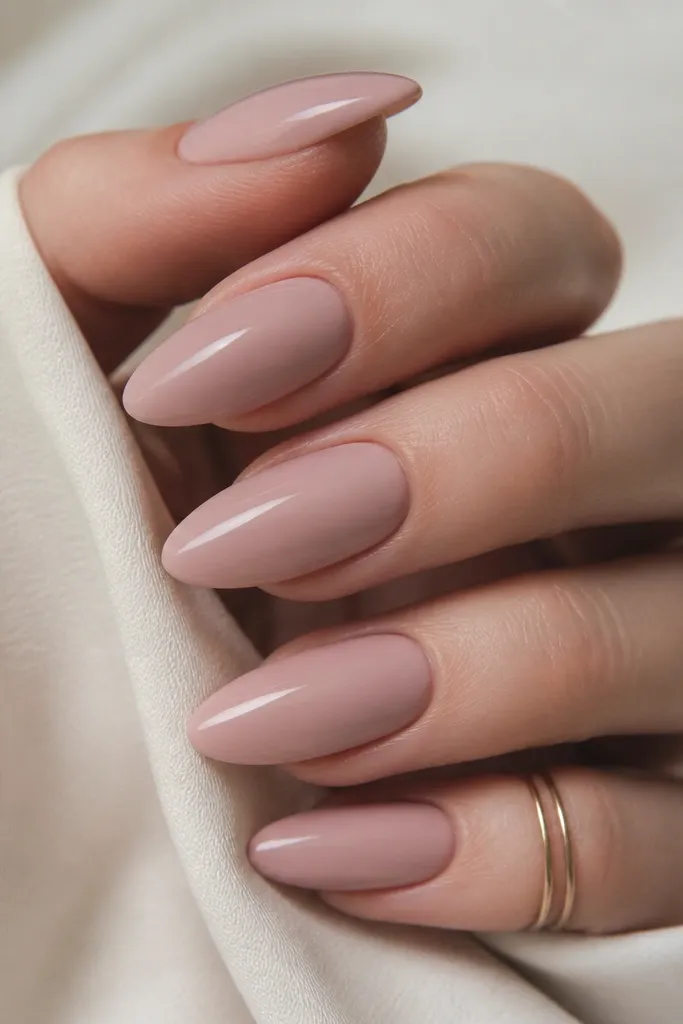
This is for the days you want something different but still wearable. The base is powdery nude pink with a matte velvet top coat, which makes the color look soft and “fabric-like.” Then I add a single glossy stripe near the cuticle or down the center so storage lights have one sharp reflection point. The contrast makes your hands look styled even when the design is minimal. It flatters most skin tones because the matte softens the pink, and the glossy line adds structure. If your nails are naturally shiny, the matte helps even out the look.
Editor's noteUse a narrow striping brush and draw the line once, then fix the edges with a cleaner-damp brush before curing.
Apply your nude pink builder gel and cure, then shape and buff lightly. Top coat with a velvet matte top and cure, wiping according to the brand instructions. Next, paint a thin glossy stripe using a regular gel top coat or glossy gel polish — keep it 0.5 to 1 mm wide. Cure again and seal around the stripe edges with a careful thin matte layer if you want the stripe to stay crisp. Turn on storage lights and tilt your hand until the glossy stripe catches the brightest highlight.
Skip thisDon’t matte the entire nail surface and then skip a glossy accent — it looks flat under LED.
10. Sweet Pink Ombré Tips With Clear Base
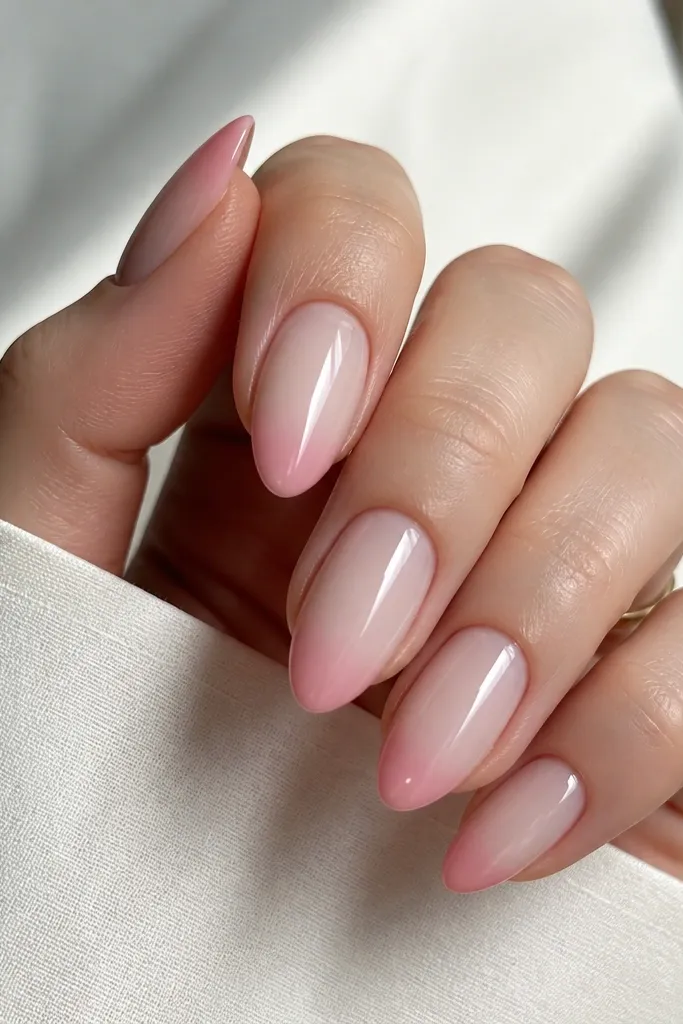
Clear base with pink tips makes your nails look airy and longer. I keep the middle mostly clear or sheer nude, then fade soft pink into the almond tip. Storage lights reflect through the clear area, so the center looks brighter while the tips look more defined. This look is flattering if you want a “clean girl” vibe without white French tips. It also works well for short nail beds because the clear base visually pushes the nail bed upward.
Apply a sheer nude or clear builder gel to the full nail and cure. Add soft pink jelly to only the top third, then sponge or brush-blend downward to create a fade, leaving the middle clear. Cure and repeat one more thin ombré layer if you want more tip color. Seal with a glossy top coat that covers the entire nail, especially over the blend line. Use storage lights to confirm the brightest reflection sits in the clear center, not at the cuticle.
Blend the ombré line with a slightly damp brush so the transition looks blurred, not painted.
Don’t cover the clear zone with pink — it defeats the airy effect.
11. Nude Pink With Tiny Heart Outline Near Tip
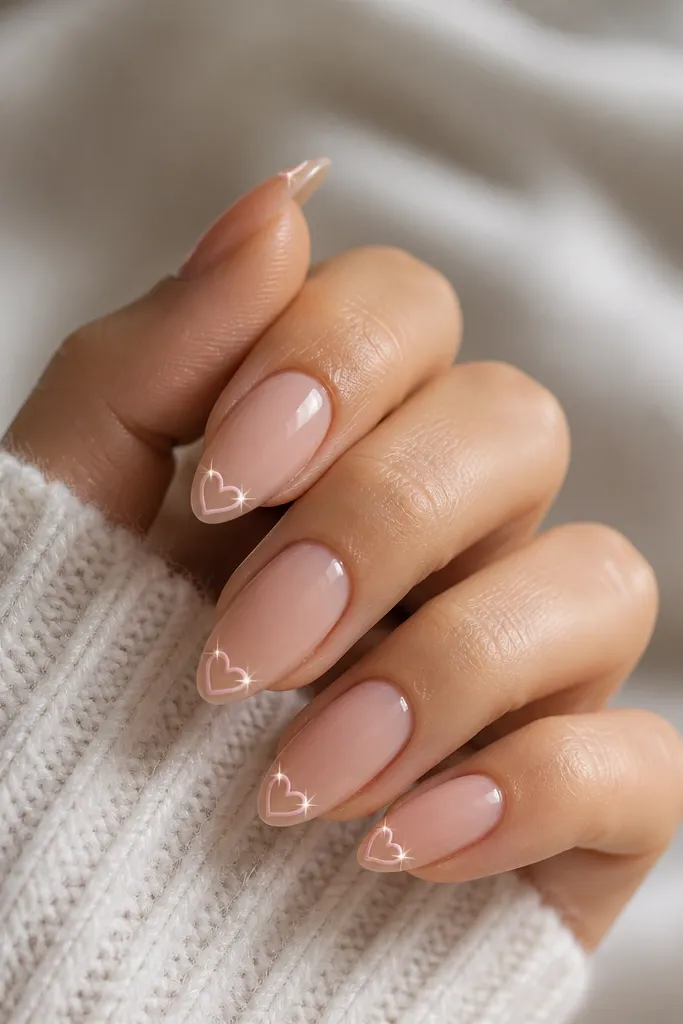
Hearts can look cheesy fast, but a tiny outlined heart stays sweet and clean. The base is nude pink with a glossy finish, and the heart outline is pale pink or white-pink, placed about 2 to 3 mm from the tip. Storage lights make the outline pop because the lines catch the LED reflection. This look flatters hands with longer fingers because the heart sits in the narrow tip area. It’s also a cute option for anniversaries, birthdays, or just because you like romance.
Editor's noteIf your heart looks too thick, wipe the brush on a lint-free pad before drawing the final outline stroke.
Start with two thin coats of nude pink gel and cure. Using a fine liner brush, draw a tiny heart outline on each nail — about the size of a grain of rice, centered horizontally. Keep the stroke thin and let the nude base do the heavy lifting. Cure and seal with a glossy top coat, making sure you don’t flood the heart and blur the outline. Turn on storage lights and rotate your hand so the brightest reflection hits the heart line.
Skip thisDon’t fill the heart solid — outlined only keeps it classy.
12. Milk Pink Nude With Subtle Chrome Edge
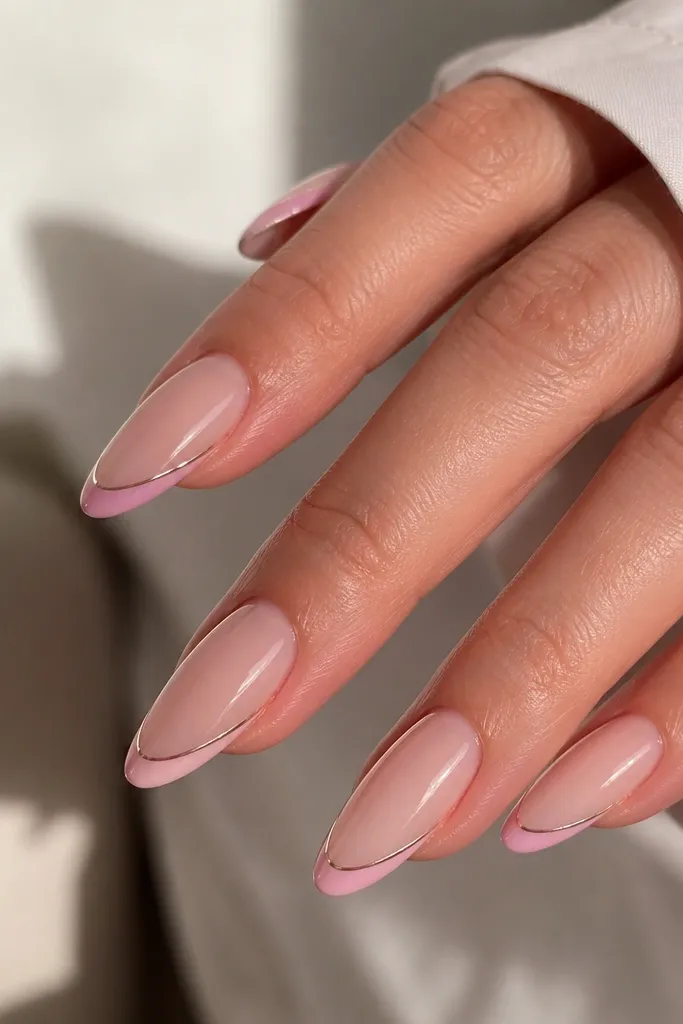
Chrome edge is one of those designs that looks like you paid more than you did. The base is milk pink sheer, and the chrome is applied as a super thin strip along the outer tip edge — not a full chrome nail. Storage lights reflect off the chrome line, giving you that “sharp” look at every angle. I like it on fair to medium skin tones because milk pink keeps the chrome from looking harsh. If your nails get dull, this edge gives you a clean, dimensional finish.
Editor's noteUse a small piece of tape as a guide to keep the chrome strip straight before you press it down.
Apply a milk pink sheer base gel and cure, then shape and buff for a smooth surface. Use a thin strip of chrome powder or chrome gel on the outer tip edge only — keep it to about 1 mm wide. Press and clean up the excess so the chrome stays crisp. Seal with a glossy top coat in two thin layers to lock the chrome without dulling it. Check under storage lights by tilting left and right — the brightest reflection should track the outer edge line.
Skip thisDon’t chrome the entire tip — it turns into a thick block and looks cheap.
13. Nude Pink With Tiny Rhinestone Dot at Side Cuticle
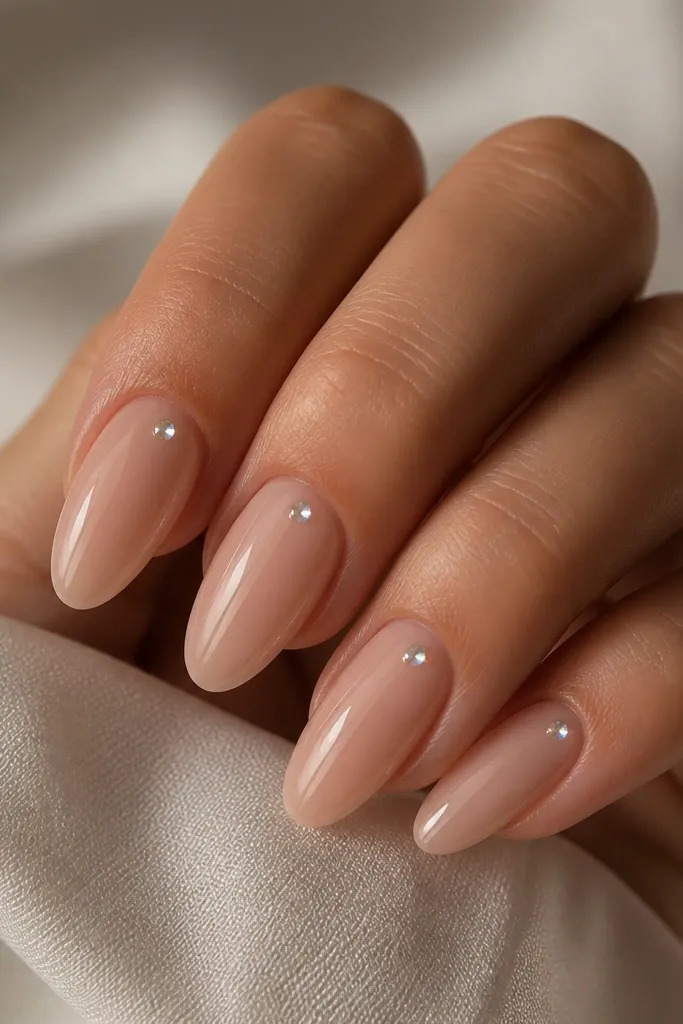
A single rhinestone can look tacky, but placed at the side cuticle it looks intentional and clean. The base is nude pink glossy, and the stone sits about 1 to 2 mm from the cuticle on one side, not centered. Under storage lights, the rhinestone throws a sharp flash that makes your nail look freshly done. This flatters hands with slim nail beds because it adds one focal point without widening the nail. It’s a great choice for nights out when you want sparkle that still matches a nude palette.
Start with nude pink gel in two thin coats, cure, then top coat lightly to create a smooth bed. Place one small rhinestone (SS3 or SS4 size) near the side cuticle using gel adhesive, pressing gently so it sits flat. Cure and then apply a thin layer of gel over the stone to lock it down. Finish with a high-gloss top coat, keeping the top coat smooth around the stone so it doesn’t snag. Turn on storage lights and check that the stone catches the light when your hand is angled slightly toward the lamp.
Press the stone with a silicone tool, not metal — it keeps the stone from shifting while curing.
Don’t glue the stone too high on the cuticle — it can lift and snag.
14. Pale Nude Pink With Double Thin Lines at the Tip
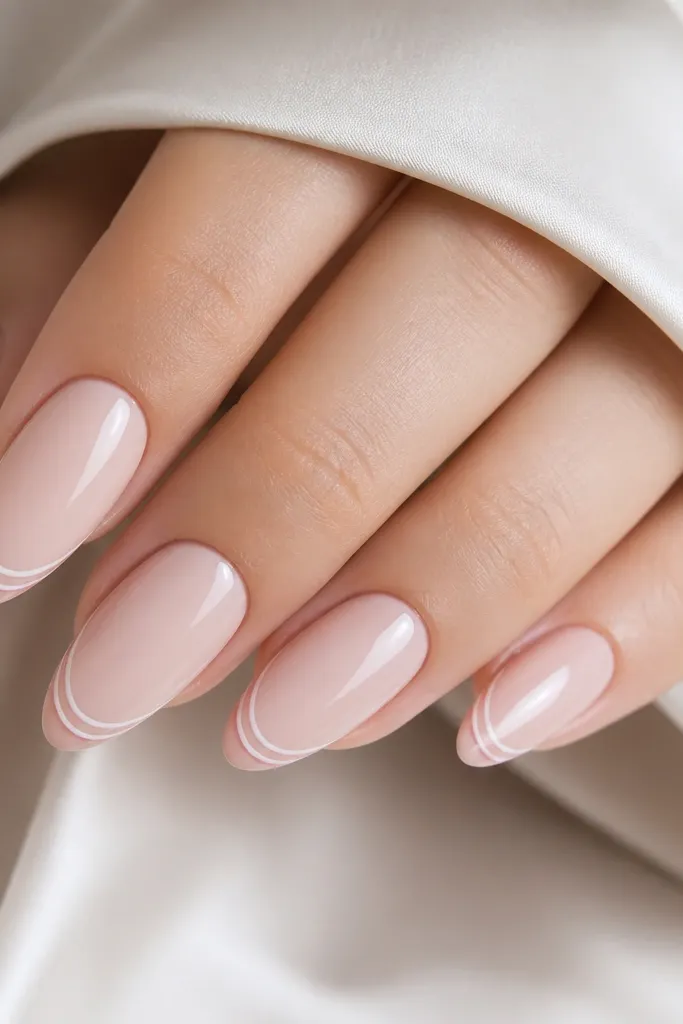
This is my “clean nails, but with personality” design. The base is pale nude pink, then you add two thin tip lines — one slightly lighter and one slightly deeper rose. The double line makes the almond tip look crisp and balanced, and storage lights reflect along both lines for a bright, photo-ready edge. It flatters most skin tones because the lines are in the same pink family, not a harsh contrast. If you hate bold nail art, this stays subtle while still feeling styled.
Editor's noteUse a steady hand by bracing your wrist on the table and pulling the brush toward the tip in one smooth motion.
Apply pale nude pink builder gel and cure, then make sure the tip is smooth and even. With a liner brush, draw the first thin line about 1 mm from the free edge — keep it straight and centered. Cure, then draw the second line just above or below the first by about 0.5 mm, using a slightly deeper rose shade. Seal with a glossy top coat, making sure you don’t flood the lines. Rotate your hand under storage lights — you should see two bright reflections that track the tip curve.
Skip thisDon’t make the lines too far apart or it looks like a cheap sticker border.
15. Nude Pink With Soft Rose Veil and No-Outline Flower
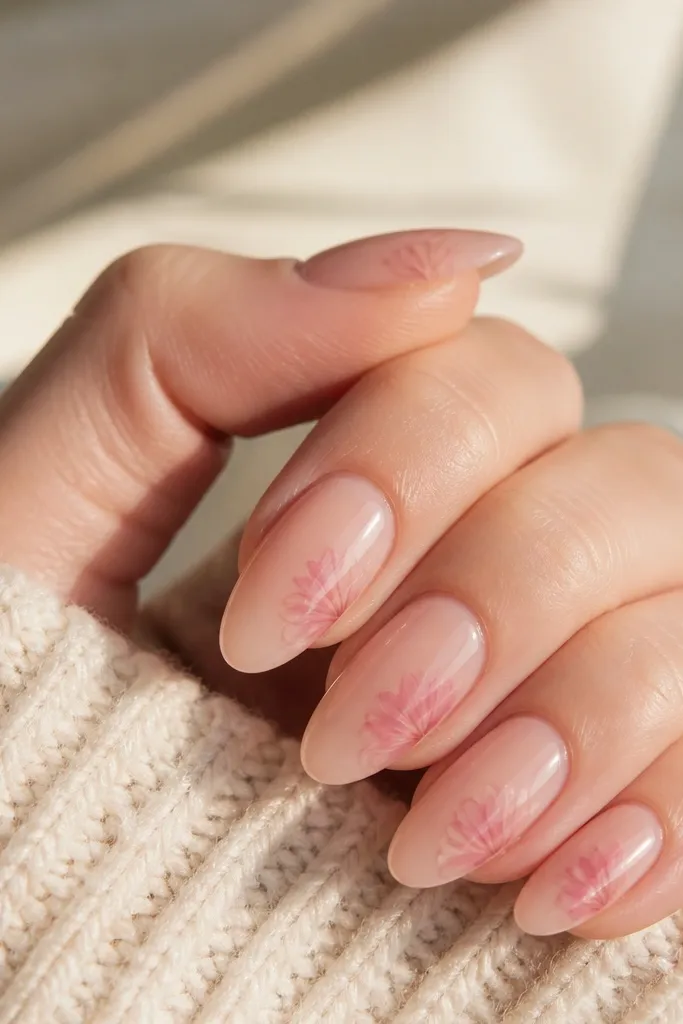
This looks like nail art you’d see on someone who always has their nails done, but it stays light enough for everyday. The flower is painted as a translucent rose veil — no heavy outline, just petal shapes blended into the nude base. Storage lights make the petals glow because the design is semi-sheer and glossy. It flatters fair and medium skin tones because the rose stays soft instead of overpowering. If your nail bed is narrow, the side placement keeps the design from squishing.
Editor's noteUse sheer gel and build the flower in layers — the second layer should make it readable without turning opaque.
Start with nude pink base gel and cure, then apply a thin top coat layer so the surface is smooth. Paint a faint petal cluster near the side of the tip — I do 3 to 5 petal strokes — using a semi-sheer rose gel so the nude shows through. Blend each petal edge with a micro brush so it fades into the base. Cure and seal with glossy top coat in one smooth pass. Turn on storage lights and angle your hand so the brightest reflection hits the translucent petals.
Skip thisAvoid outlines — a dark outline makes it look like a sticker.



