1. Evergreen French with Cream Micro-Outline
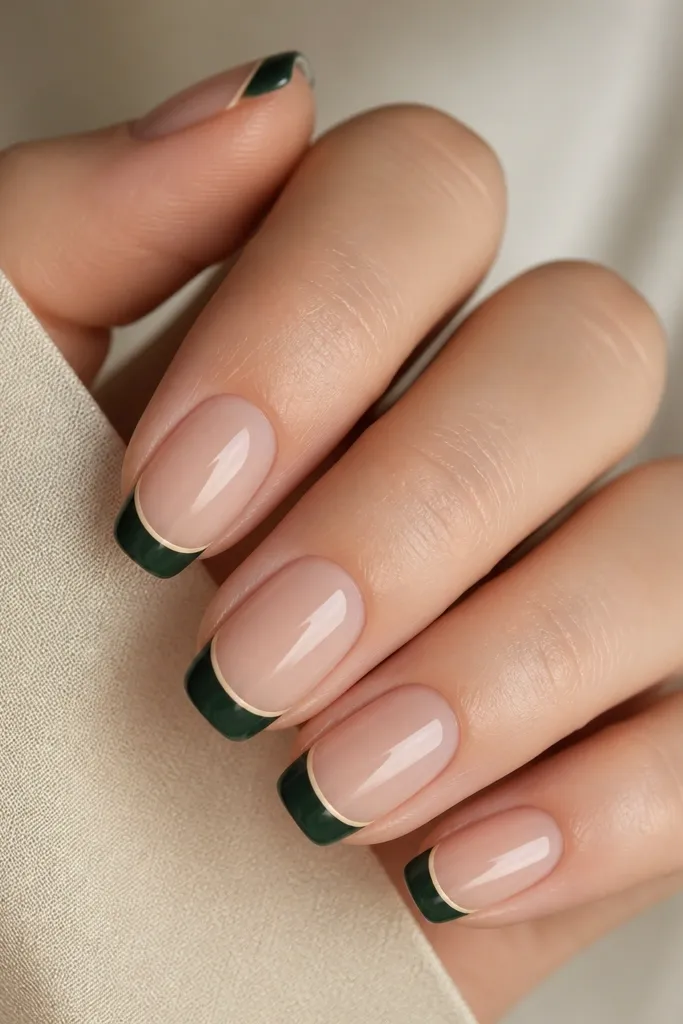
This is the green manicure I reach for when I want “fall” without leaves everywhere. The deep evergreen tips look rich against a sheer nude base, and the tiny cream outline makes the French line look sharper than a plain green tip. It flatters most skin tones because the base stays light and the contrast sits at the tip. If your nails are short or medium, the micro-outline keeps the design from shrinking your nail bed visually.
Editor's noteIf your French line gets wobbly, do the green first, cure, then add the cream outline — the second step hides small unevenness.
Start with a sheer nude or pale pink base and cure it fully. Paint the French tips in evergreen green, keeping the curve even — I use a French guide sticker for the first attempt. Then take a fine liner brush and add a cream line just inside the tip edge, filling any gaps so it looks like one clean border. Finish with a glossy top coat, and cap the free edge of each nail so the outline doesn’t lift first.
Skip thisAvoid thick cream lines — they make the tips look like sticker borders instead of a refined manicure.
2. Moss-To-Caramel Gradient with Velvet Top Coat
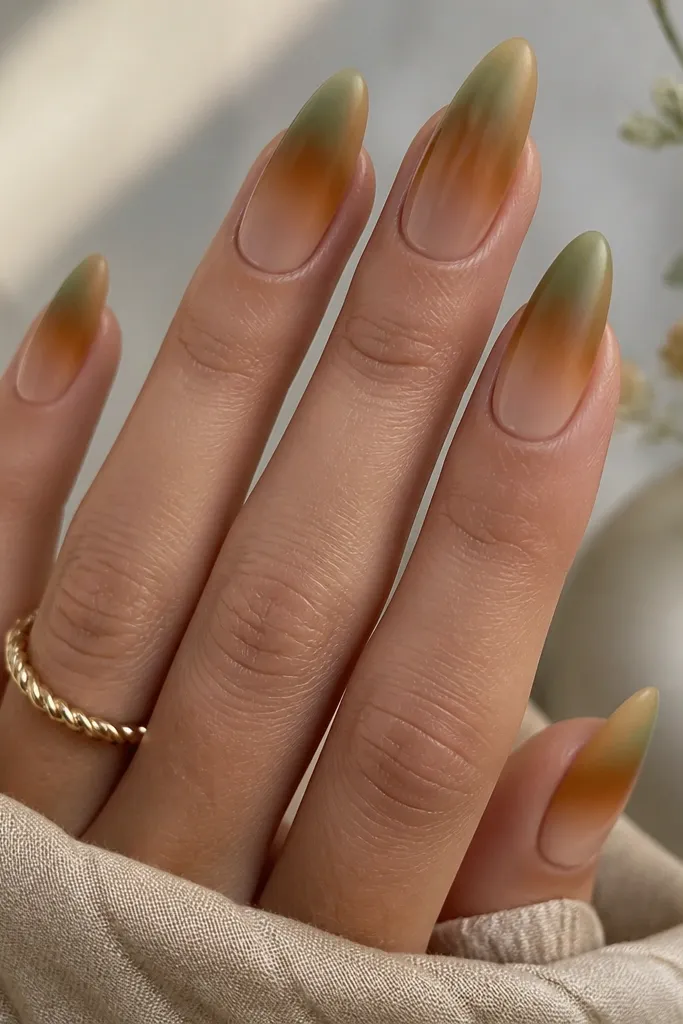
This one reads cozy because it mimics the color shift you see in nature — dark green at the base, warmer tones as light hits. The moss-to-caramel blend works on fair, medium, and deep skin because the gradient includes a warm neutral that matches fall outfits. It looks especially good on long almond nails because the blend has room to stretch. If you like green but hate sharp lines, this is your friend.
Start with a nude base and then sponge on moss green at the cuticle using a small makeup sponge, dabbing rather than swiping. Add caramel-brown only in the center third and blend it into the green with light taps until the transition looks cloudy. Keep the tip lighter by wiping the sponge onto a paper towel first. Seal with a velvet or satin top coat for that soft, sweater-like look.
Do two thin layers of the gradient instead of one heavy layer so it stays smooth and doesn’t pool at the cuticle.
Skip a super glossy top coat here — it makes the gradient look more “painted” than cozy.
3. Olive Negative Space Half-Moons
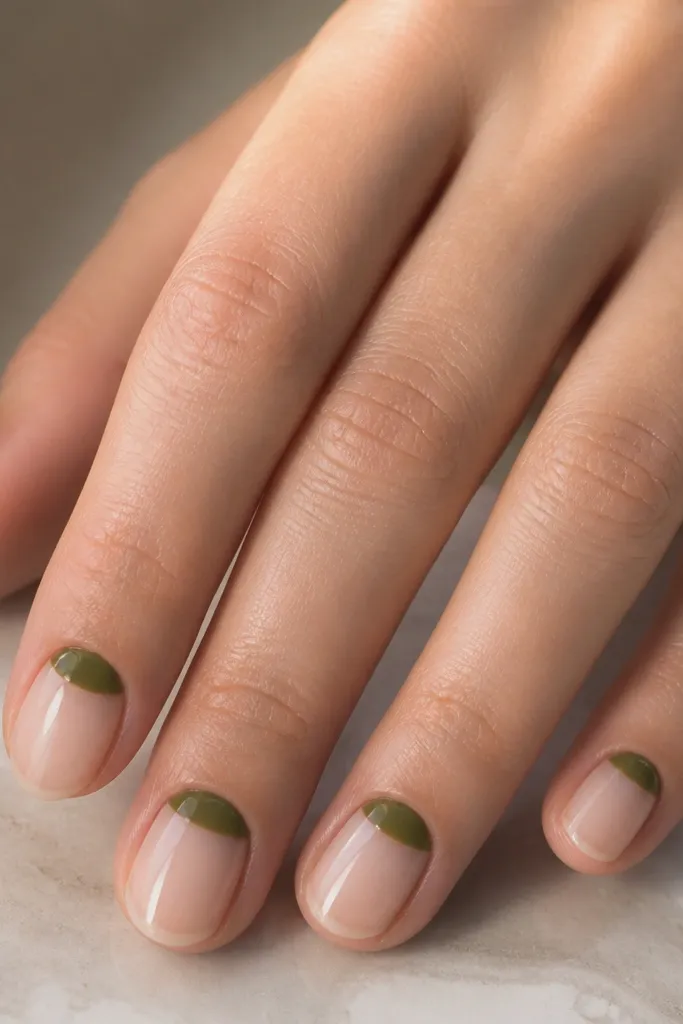
Half-moons are flattering because they visually lift the nail bed and draw attention to the cuticle area. Olive green looks warmer than emerald and gives that autumn-cozy tone without feeling like holiday glitter. This design works well on short nails because the negative space makes your nails look cleaner and longer. It’s also beginner-friendly because you’re painting a simple shape, not tiny details.
Editor's noteUse half-moon nail stencils for your first try — then remove them before top coat so you don’t smear the edges.
Start with a sheer nude base and cure. Using a small striping brush, paint an olive half-moon starting at each side of the cuticle and curving toward the center, leaving the rest of the nail clear. Keep the half-moon about one-third of the nail width so it looks balanced. Clean up the edges with a brush dipped in gel cleanser, then cure and finish with a high-gloss top coat.
Skip thisDon’t let the half-moon touch the sidewalls — if it bleeds into the side, it looks messy fast.
4. Hunter Green Leaf Accent with Matte Base
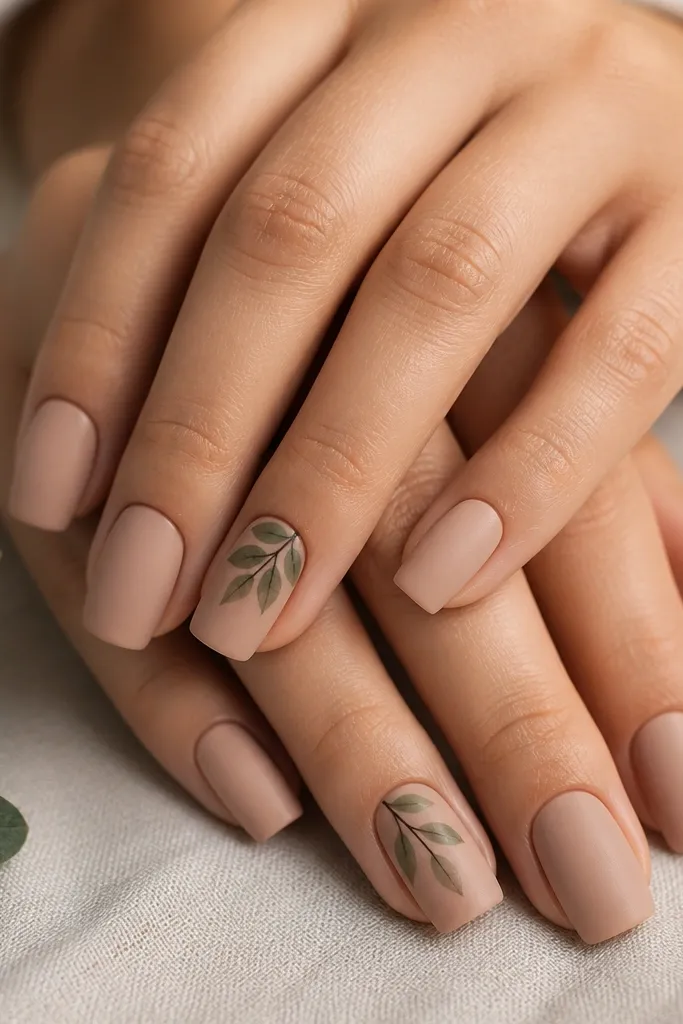
Matte + leaf is the quickest way to get that fall vibe on your hands without looking like you’re wearing costume nails. The nude matte base keeps things soft, while the hunter green leaves add depth and a slightly vintage feel. This flatters hands with shorter nail beds because matte makes the nails look even and clean. If you’re going to events, matte reads more “intentional” than shiny every time.
Editor's notePractice leaf strokes on a paper towel — the movement is light and quick once you get the wrist angle right.
Start by applying a nude base and curing. Paint all nails with a matte top coat, then cure again. On one or two accent nails, use a thin brush to place a leaf cluster near the cuticle: first lay down the green leaf shapes, then add brown veins with a liner brush. Finish the accent nails with a glossy top coat just on the leaves so they pop against the matte base.
Skip thisAvoid adding leaves on every nail — it turns into a sticker look instead of a styled accent.
5. Deep Pine Plaid on Two Accent Nails
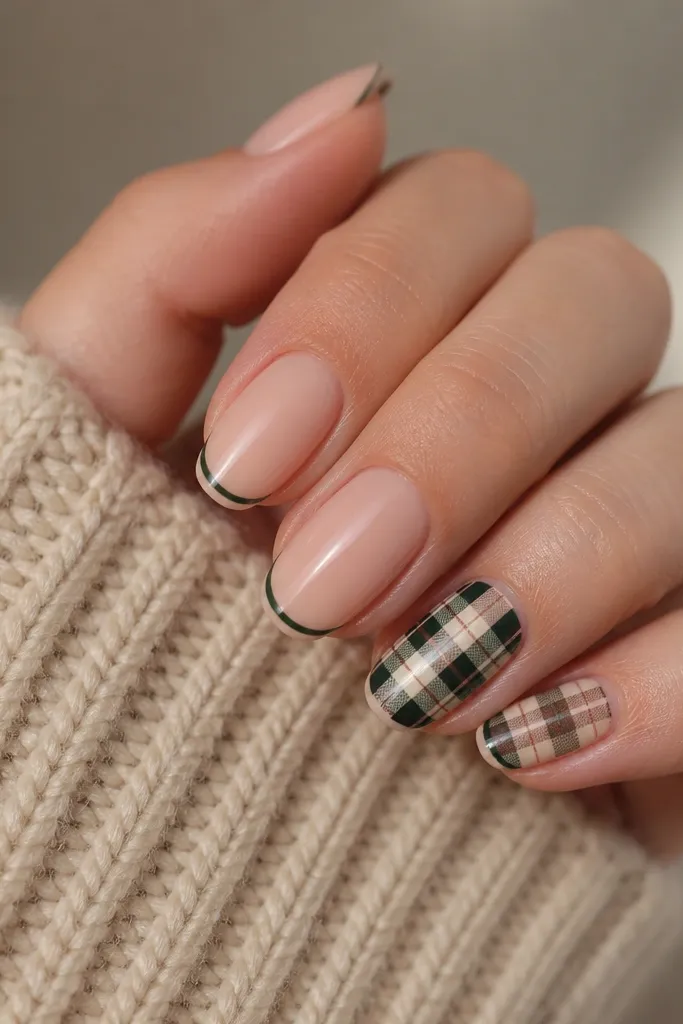
Plaid works because it’s structured — your eyes read it as cozy clothing. I like using deep pine and warm cream so it looks like autumn flannel, not Christmas. Keeping plaid on two accent nails keeps it from overwhelming your hands and still makes the manicure feel special. This design looks great on squoval and almond shapes because the lines have a clean surface to sit on.
Paint all nails with a sheer nude base and cure. Add a thin deep pine stripe near the tip on every nail, keeping it about 1-2 mm thick. On two accent nails, use cream gel first to create horizontal and vertical guide lines, cure, then layer deep pine lines crossing them. Add a thin muted cocoa line to break up the plaid grid, then top coat glossy on all nails to lock the pattern in.
Use striping tape as temporary guides — press lightly, paint, cure, then remove before top coat.
Don’t freehand plaid with a thick brush — wide lines smear and the pattern looks cheap.
6. Green Marble with Warm Vein Lines
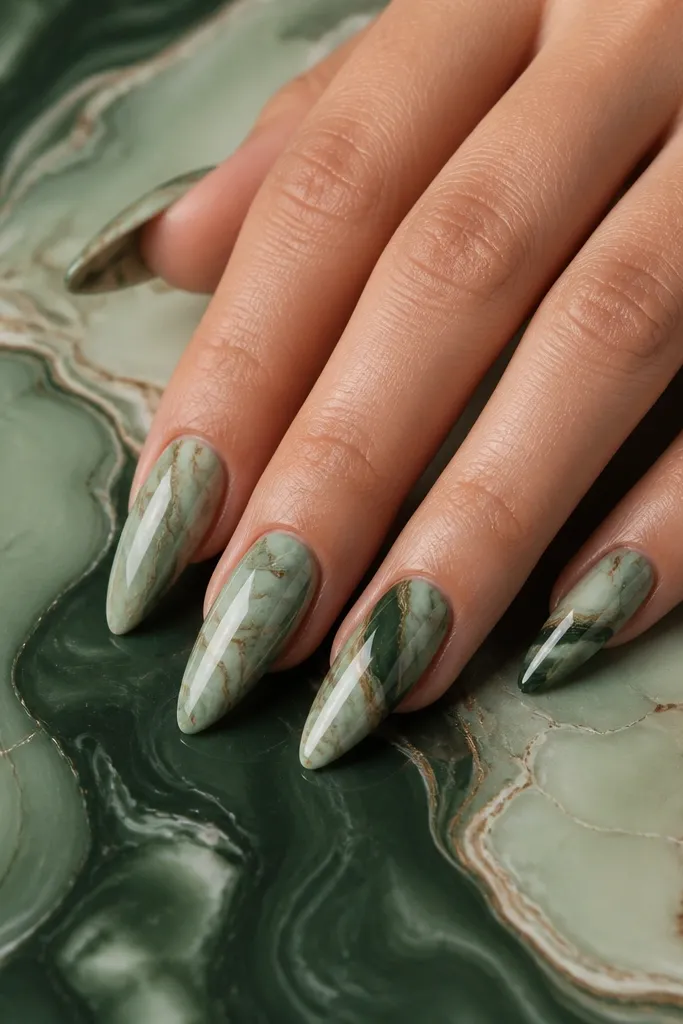
Marble makes green look expensive because it adds movement instead of solid color blocking. The warm beige and cocoa veins keep it autumn-cozy, so the greens don’t look like winter ice. This works on every skin tone because marble includes neutral tones that blend with your hands. I like it most on longer nails where the veining has room to travel.
Editor's noteFor veins, use a brush with a fine point and keep your lines continuous — broken veins look like accidental streaks.
Start with a sheer nude or very light green base and cure. Drop sage and deep green gel onto a palette, then drag a thin liner through them to create a marbling look. Press a sponge lightly onto the nail for background speckling, then use a fine brush to pull warm beige and cocoa vein lines across the nail. Cure each nail fully, then apply a glossy top coat in two thin layers so the surface looks glassy.
Skip thisSkip matte here — marble needs shine to look like stone, not like flat paint.
7. Sage Glitter Fade Over Nude
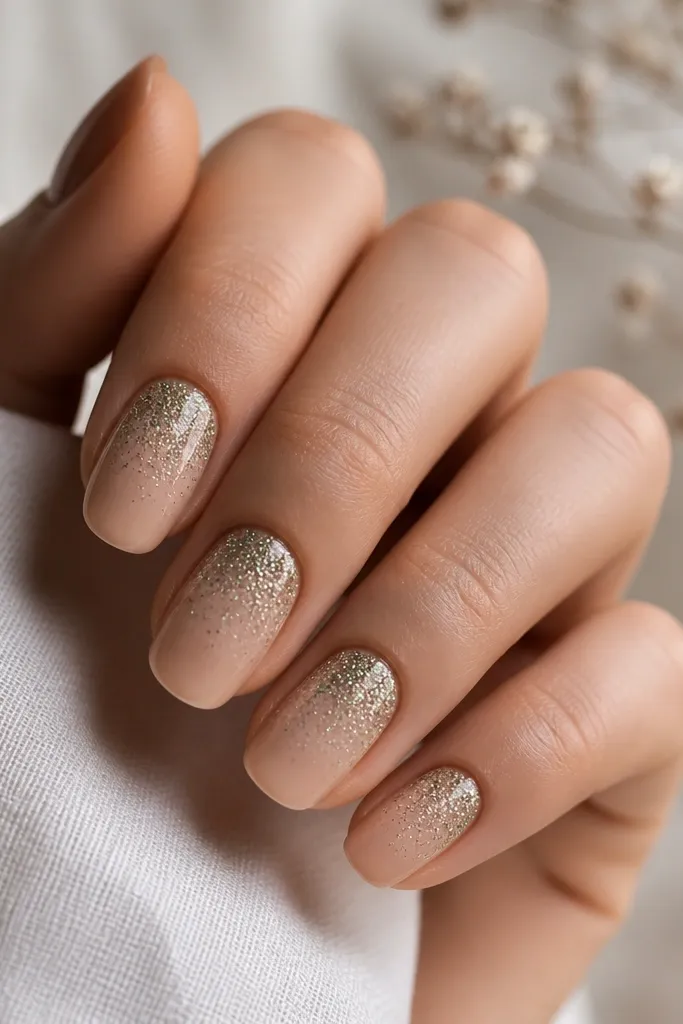
A glitter fade looks cozy when the glitter color is sage and the base stays nude. The density near the cuticle makes your nails look fuller and brighter, and the lighter tips keep it from looking too heavy. This flatters short nails because you’re not adding bulk at the very end where chips show. It’s also perfect for fall dinners because it catches warm indoor light.
Editor's noteMix one drop of clear gel with the glitter on a palette so the fade stays controlled instead of chunky.
Apply a nude base and cure. Use a thin layer of clear gel at the cuticle and press sage green micro-glitter into it with a sponge or small glitter applicator. Blend the glitter downward by lightly tapping with a clean sponge so it fades naturally. Leave the tip mostly bare, then cure and finish with a glossy top coat, making sure you cap the glitter edges.
Skip thisDon’t overload glitter at the free edge — that’s where it lifts first.
8. Cocoa Outline over Olive Cat-Eye
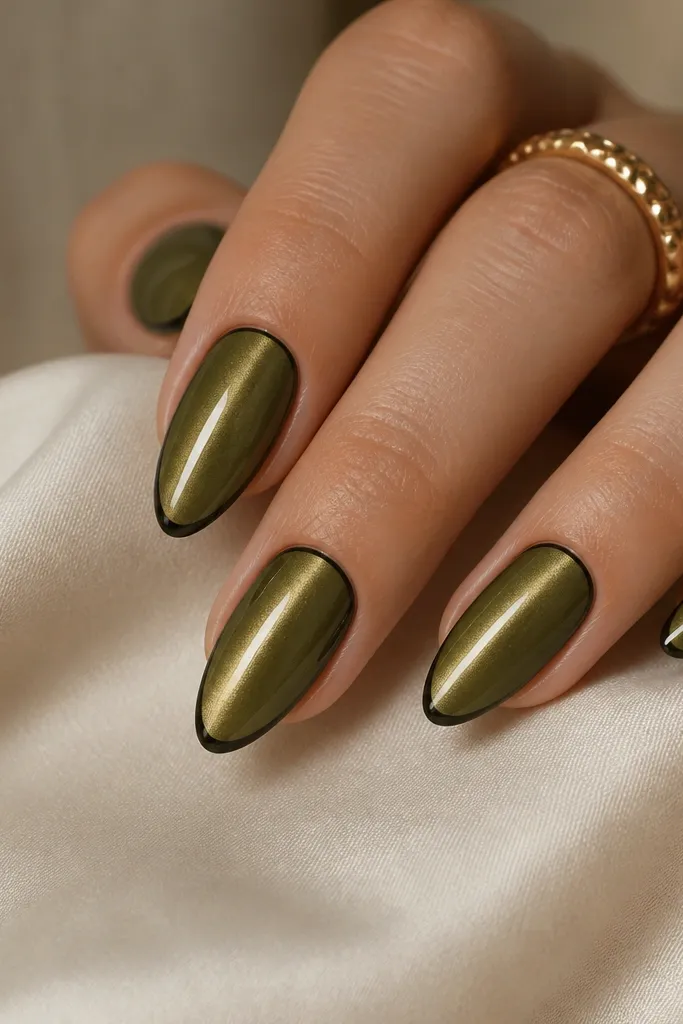
Cat-eye polish is already “wow,” but the cocoa outline makes it autumn. The olive base reads cozy and warm, while the cocoa border adds that flannel-and-coffee vibe. This looks especially good on almond nails because the cat-eye streak lines up with the nail’s length. It’s also flattering on hands that run slightly dry because gloss makes your nails look smoother.
Editor's noteMagnetize for the full recommended time — rushing makes the streak wander off-center.
Start with an olive cat-eye gel base and magnetize it so the streak sits in the center. Cure, then apply a thin cocoa gel outline around the tip area — basically a rounded frame that follows the nail curve. Keep the outline thickness under 1 mm so it stays delicate. Cure again and add a glossy top coat in two layers to keep the magnet effect strong.
Skip thisAvoid thick outlines — they turn the manicure into a border-sticker look.
9. Green Velvet Swirls with Nude Base
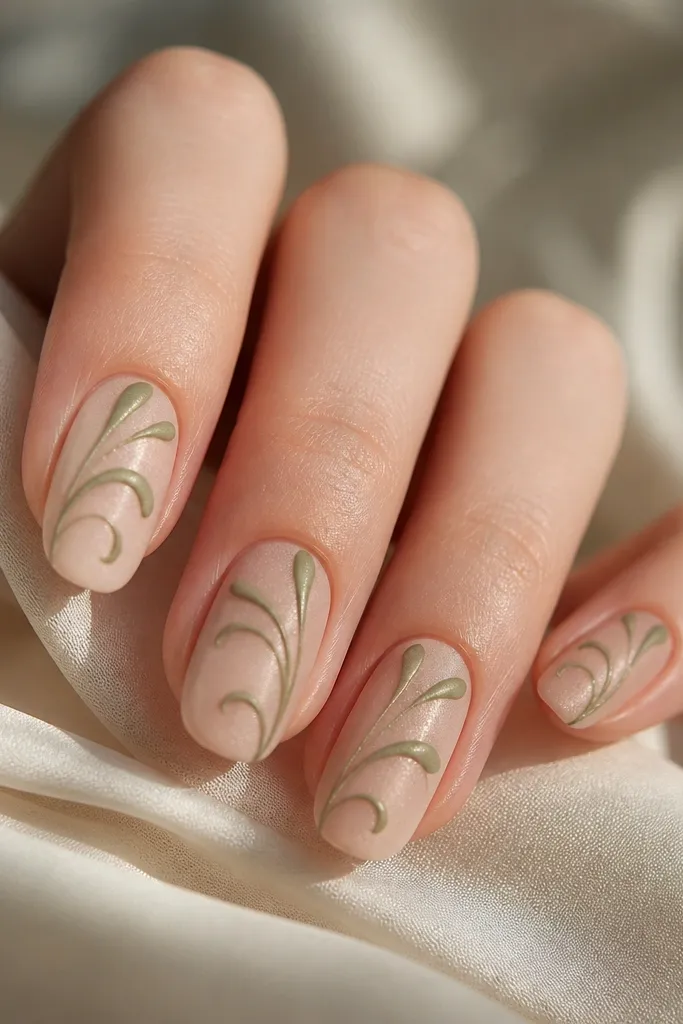
Velvet swirls look cozy because they soften the shine and give your nails a knit-sweater feel. The nude base keeps it clean and wearable, while the green swirls add movement without needing tiny leaves. This design flatters smaller nail beds because the swirls start at the cuticle and guide the eye upward. It also looks great for office days when you want fall without bold holiday glitter.
Editor's noteKeep the swirls asymmetrical — matching loops on every nail looks too “stamped.”
Apply a nude base and cure. Paint loose green swirl lines near the cuticle using a thin brush, then cure. Add a velvet or suede top coat over the entire nail, but do it in two thin coats so it doesn’t get patchy. If you want extra definition, paint the swirls again with green gel before the velvet coat, then cure and finish.
Skip thisDon’t use a glossy top coat over velvet — it kills the cozy texture effect.
10. Sage Skittle with One Deep Pine Nail
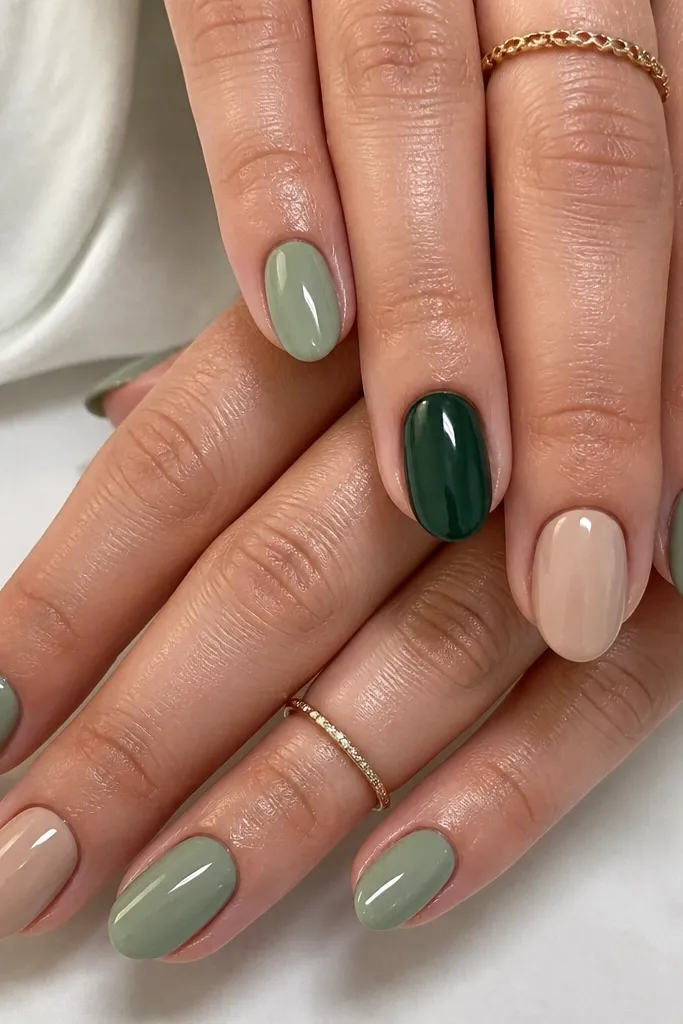
Skittle nails are my go-to when I’m tired of repeating the same pattern but I still want it to look cohesive. Using sage on most nails gives you that cozy autumn green, and one deep pine nail adds contrast that looks like layered clothing. The mix flatters almost everyone because you’re sticking to a tight color family: sage, pine, and nude. It also works on short nails because each nail has its own simple color story.
Editor's notePick one neutral accent (nude or cream) and stick to it — mixing neutrals makes the set look scattered.
Paint four nails per hand in sage green, leaving one nail on each hand for deep pine. Keep one or two nails as nude if you want your hands to look extra clean — I usually leave the ring finger nude and do a green on the rest. Cure each color fully, then add a glossy top coat to all nails. If you want extra fall warmth, add a tiny dot of caramel-brown gel on the deep pine nail near the cuticle.
Skip thisAvoid random color chaos across nails — stick to the same green family.
11. Green Foil Tips with Champagne Base
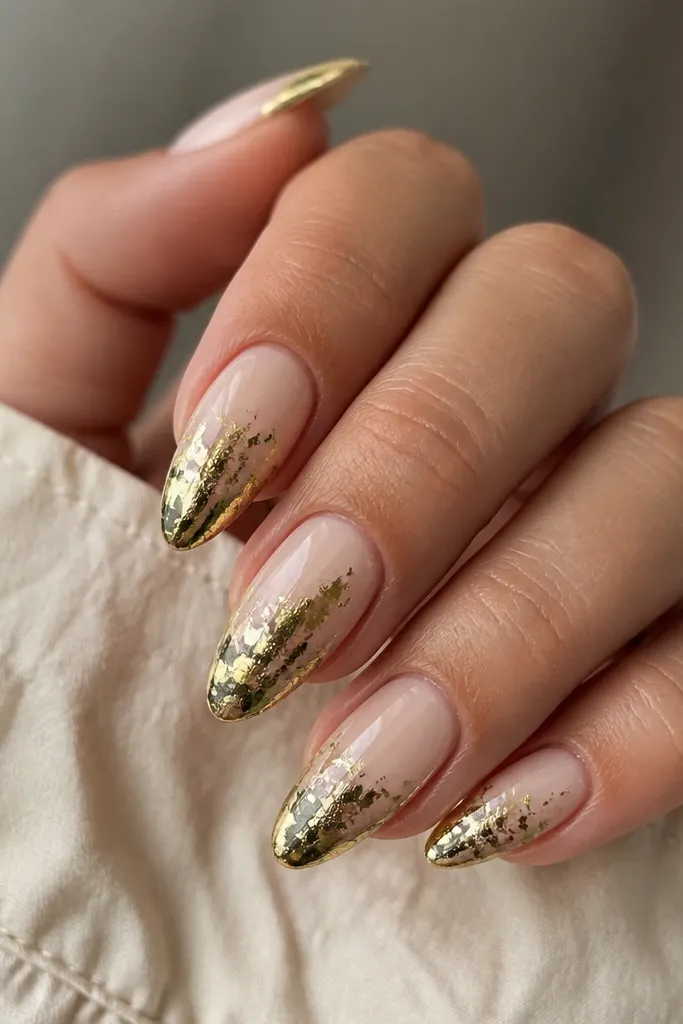
Foil tips make green look like fall light reflecting off glass. A champagne nude base keeps the overall tone warm, and the green foil adds dimension without needing detailed art. This is flattering on medium to long nails because foil reads like texture and length. For deeper skin tones, the champagne base prevents the set from looking too dark.
Start with a champagne nude base and cure. Apply a thin layer of tacky gel to only the last third of the nail and press green foil onto it in small pieces, then smooth gently with your finger. Leave some negative space between foil flakes so it looks intentional, not fully covered. Cure, then seal with a glossy top coat that fully bridges the foil edges so it doesn’t catch on sweaters.
Press foil with a folded piece of foil paper — it gives you more control than using the sheet directly.
Don’t overfill the whole nail with foil — it looks heavy and chips faster.
12. Olive Marble Half-Moons
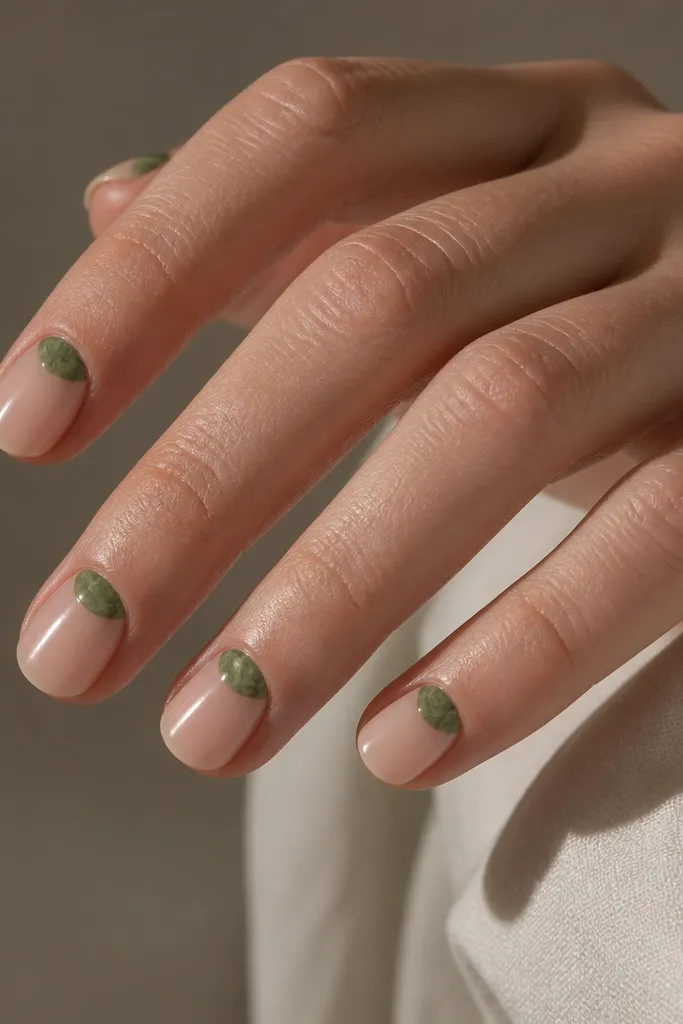
This is a softer take on half-moons that still feels autumn. The olive half-moon gives you that cozy green hit, and the marbling inside it adds depth so the design doesn’t look flat. It flatters hands with short nails because the shape stays near the cuticle and keeps the rest clean. If you like nail art but hate tiny details, this is a great compromise.
Editor's noteUse a toothpick for streaks — it gives you hair-thin lines without dragging the base too much.
Apply a sheer nude base and cure. Paint a crisp olive half-moon near the cuticle using a small brush. While the olive is still tacky, add a couple of thin sage streaks and drag them slightly with a clean toothpick for a marble effect. Cure fully, then finish with glossy top coat, focusing on sealing the half-moon edges.
Skip thisDon’t make the half-moon too large — if it takes over half the nail, it makes short nails look even shorter.
13. Deep Pine Sparkle Cuticle Halo
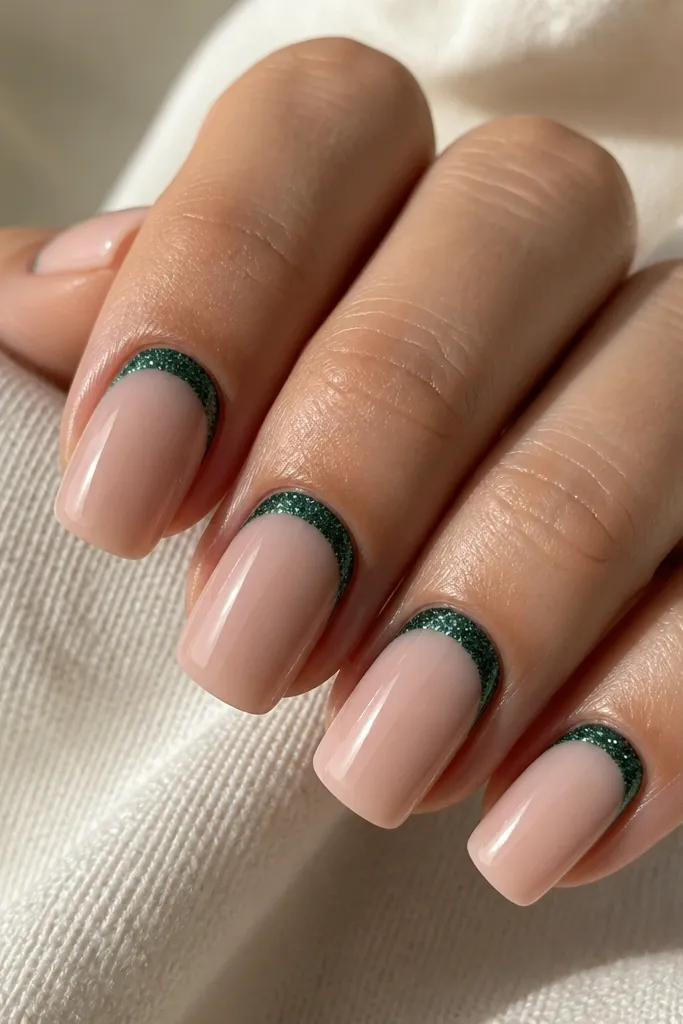
A cuticle halo makes your nails look styled even on days you don’t want full coverage polish. The deep pine glitter sits right where light hits your hand first, so it reads “fresh” longer than glitter that’s all the way at the tip. This flatters most nail lengths because it’s compact and doesn’t add bulk. If you wear rings, the halo makes your cuticle area look intentional and clean.
Editor's noteIf glitter gets on your skin, wipe with a gel-safe lint-free wipe before curing — it saves you from rough cleanup later.
Start with a nude base and cure. Add a thin line of clear gel around the cuticle in a crescent shape, keeping it centered and not touching the sidewalls. Press deep pine micro-glitter into the gel and tap off extra with a soft brush. Cure and seal with a glossy top coat that covers the halo without flooding the cuticle gap.
Skip thisAvoid placing the halo too far down the nail — it will look like a messy gradient instead of a neat crescent.
14. Green & Cream Cable Knit Lines
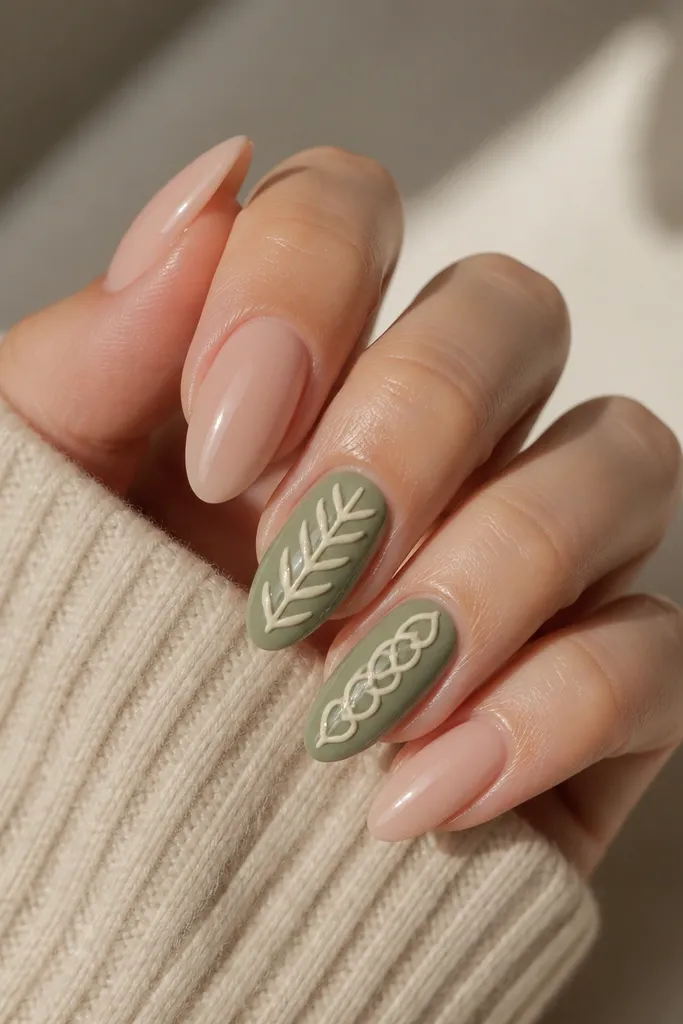
Cable knit lines look like sweaters on nails, and green makes the whole set feel fall without going straight to leaves. I like using cream lines over sage because it reads cozy and clear, especially under warm lighting. This flatters anyone who wants nail art that still looks neat — the pattern is structured and doesn’t look random. It also works well on medium almond because the lines have space to twist.
Editor's noteDo one accent nail first and perfect the line thickness before you copy it to the second nail.
Paint all nails with a nude base and cure. On two accent nails, paint the base deep sage and cure. With a striping brush, draw cream cable knit curves in the center: add two vertical “pillars,” then cross them with a short horizontal curve to mimic a twist. Finish with glossy top coat, and cap the ends of the lines so they don’t lift.
Skip thisDon’t use a thick brush for the cable lines — chunky lines look like frosting instead of knit texture.
15. Sage Leaf Ombre with Brown Veins
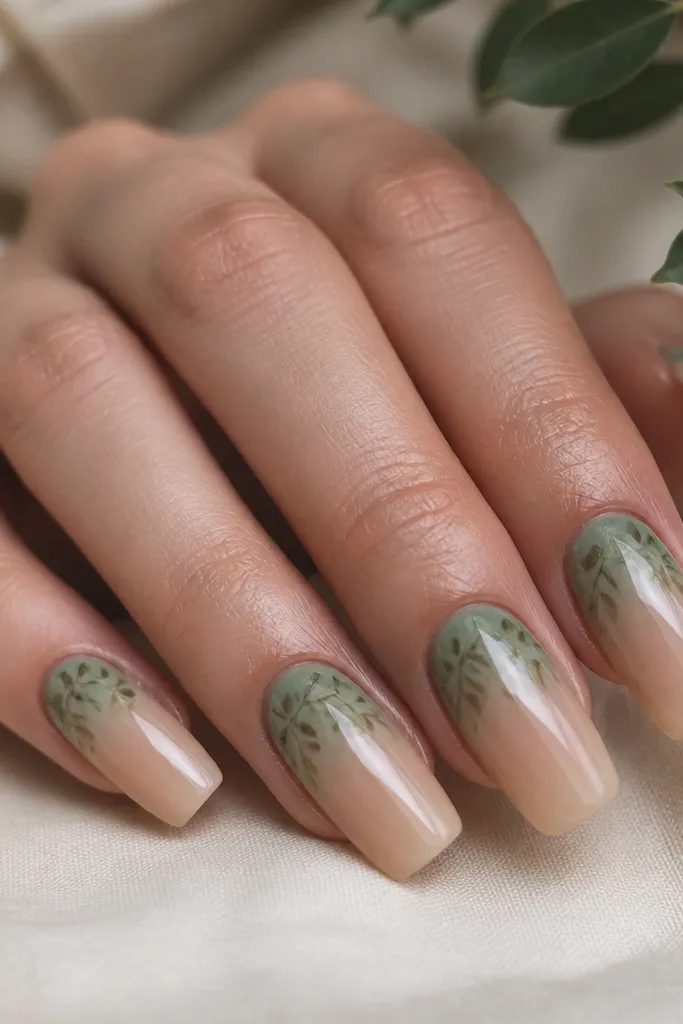
This design hits the “green cozy” sweet spot because the ombre gives warmth and the leaves give autumn identity. Sage fades into nude so your nails look airy, not heavy, and the thin brown veins make it look like real leaf skeletons. It flatters medium to long nail beds because the ombre pulls the eye upward. If you’re wearing fall boots and neutral coats, this set looks like it belongs.
Editor's noteKeep leaf sizes different across nails — variation looks more natural than perfectly matched art.
Start with a nude base and cure. Apply sage green gel near the cuticle and blend it down with a sponge so it fades softly toward the center, leaving the tip light. While it’s tacky, paint small leaf shapes in a slightly darker green and add brown veins with a liner brush. Place the leaves only on the upper half of the nail so they don’t crowd the tip. Cure and finish with glossy top coat to smooth the surface over the leaf edges.
Skip thisAvoid full-coverage leaves on the whole nail — it looks like busy wallpaper.