
1. Espresso Brown Micro-Shimmer French Tips
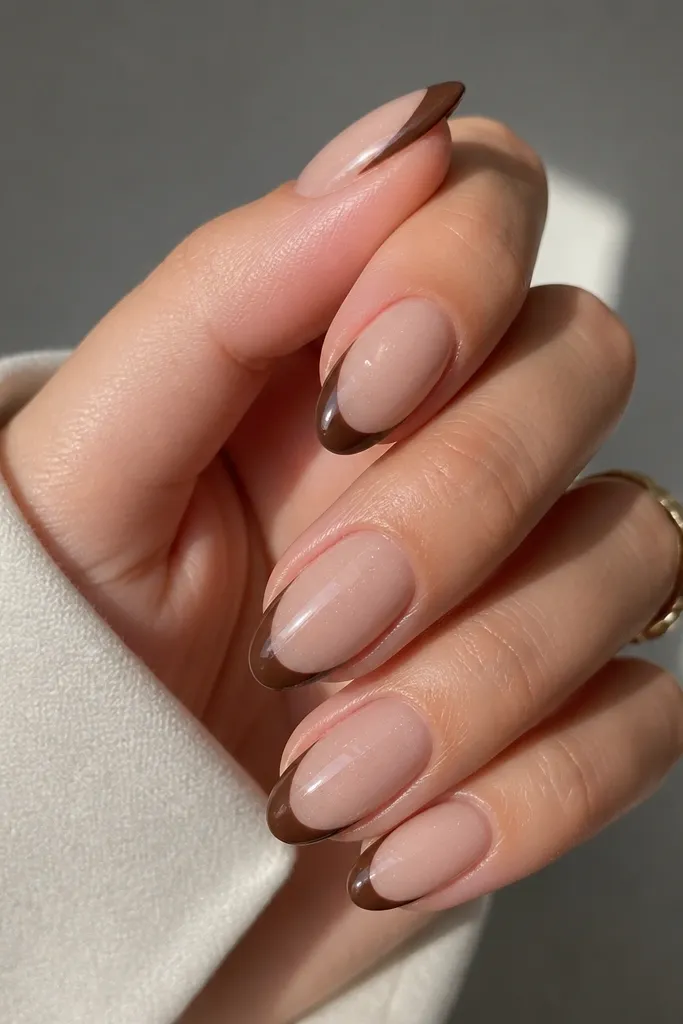
This is my go-to fall “expensive” set because the espresso French reads rich without looking heavy. Start with a sheer nude base that matches your skin tone — I like peachy-beige so the nail bed looks naturally healthy. The French tips use deep brown gel with a micro-shimmer laid only on the tip, so the light catches at the edges instead of turning the whole nail sparkly. It flatters most skin tones, especially warm undertones, because the brown sits close to caramel and cocoa. For workdays, the clean smile line makes your hands look put-together even when the design is minimal.
Start by pushing back cuticles and buffing the shine off the nail plate lightly, then cleanse with gel-safe alcohol. Apply a sheer nude base gel in thin coats and cure fully. Map the French line with a guide dot placed near each sidewall, then paint a crisp espresso-brown tip — keep it about 1.5 to 2 mm wide on short almond. Add micro-shimmer gel only inside the tip area, then cap the tip with a thin top coat. Finish with two coats of high-gloss top coat, curing each coat, and seal the free edge by running the brush along the very tip.
If your French line always wobbles, use a thin strip of nail tape as a stencil for the first pass, then remove it before curing.
Skip thick pigment layers for the tip — they look bulky and peel sooner at the smile line.
2. Oxblood Gel With Soft Halo Outline
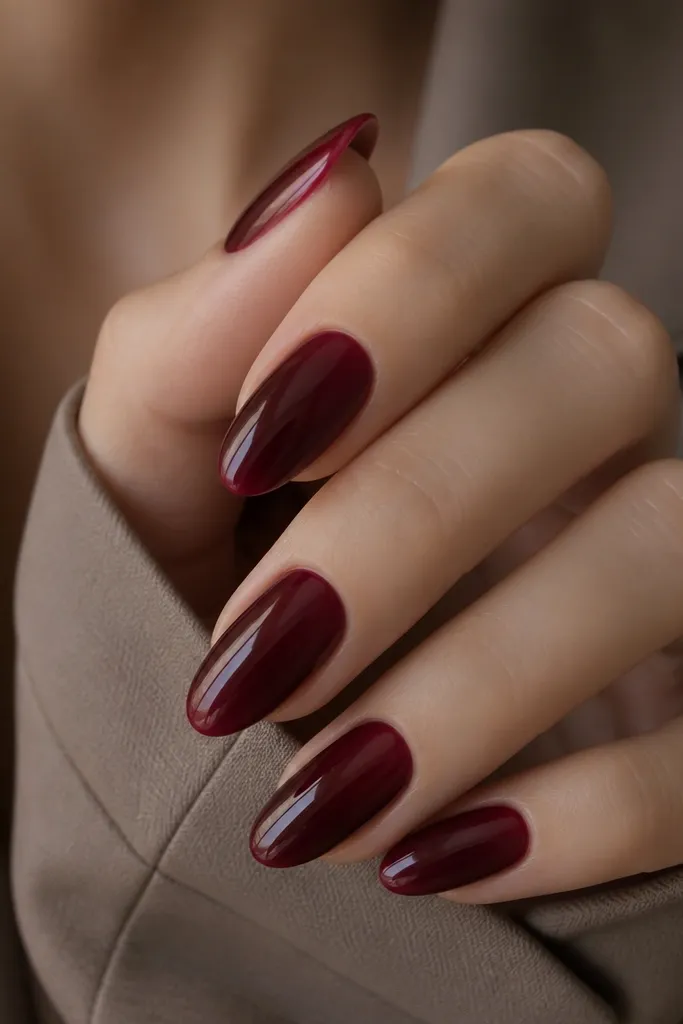
Oxblood is the fall color that looks like you planned your outfits around it. The glow halo makes it feel modern and high-end because it adds a second tone without turning into busy nail art. I use a slightly lighter maroon (think wine-red) for the halo so the center looks deeper and the nail looks longer. This design flatters fair to medium skin tones because the contrast is crisp but still warm. If you wear gold jewelry, oxblood + maroon halo looks especially expensive in photos.
Prep and apply a rubber base or your preferred base gel, then cure. Paint the entire nail with oxblood gel in two thin coats, curing each time. For the halo, place a small bead of lighter maroon gel in the center and drag it out with a fine brush into a soft ring — keep it about 1/3 down from the cuticle to avoid shrinking the nail visually. Cure carefully without flooding onto the sides. Apply top coat, then do a final thin “cap” around the halo area so the ring feels smooth under your fingertips.
Editor's noteUse a flat-toothed detail brush for the halo so the glow stays controlled and doesn’t smear into the oxblood.
Skip thisDon’t make the halo too wide — a big ring makes the nail look shorter and cheaper.
3. Smoked Cocoa Gradient With Clear Top Shine
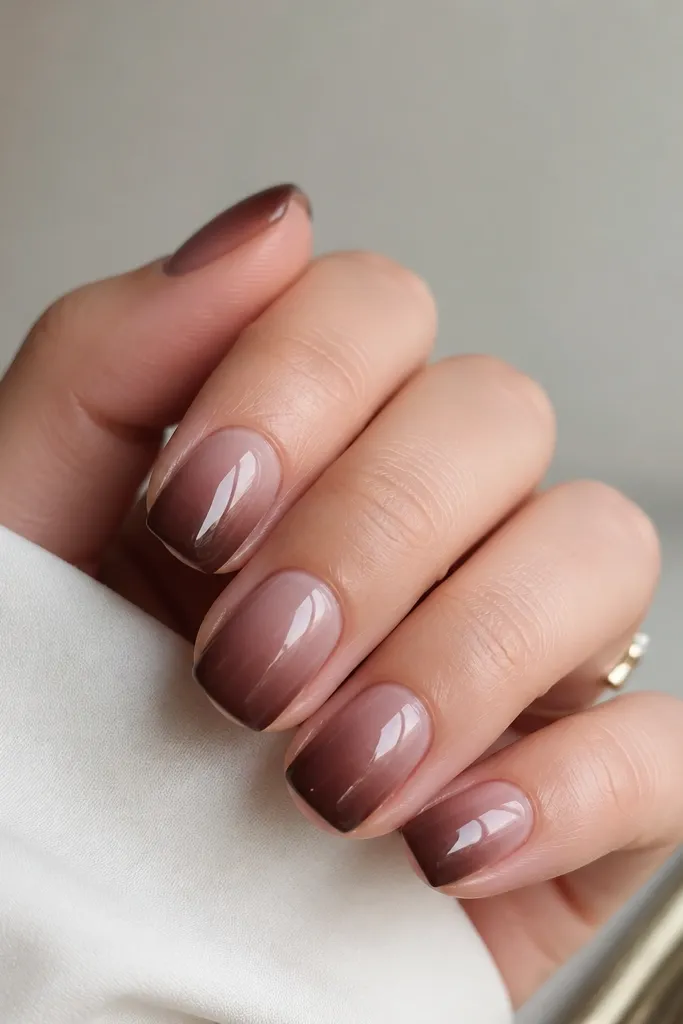
A smoked cocoa gradient is fall’s answer to “clean but not boring.” The clear-to-brown fade elongates the nail bed, and the cocoa color looks warm on both cool and warm skin tones. I like keeping the cuticle area nearly translucent because it makes the gradient look intentional, not like smudged polish. This is a flattering option for hands with shorter nail beds because the fade creates a length illusion. It also hides minor edge imperfections better than high-contrast full-color nails.
Start with a sheer nude or clear base gel close to your natural nail color, then cure. Sponge on smoked cocoa gel using a small makeup sponge: dab lightly near the tip and blend upward in thin layers until you like the fade. Wipe the sponge edge often so the gradient stays soft instead of muddy. Cure between layers if your gel system requires it; I do two to three thin gradients for a smooth result. Seal with a glossy top coat, then run a careful brush along the sidewalls to lock the gradient down.
Editor's noteWork in daylight — you’ll see the gradient banding faster under bright light and fix it before curing.
Skip thisAvoid one thick sponge layer — it dries unevenly and leaves a visible line.
4. Terracotta Clay Half-Moons With Negative Space
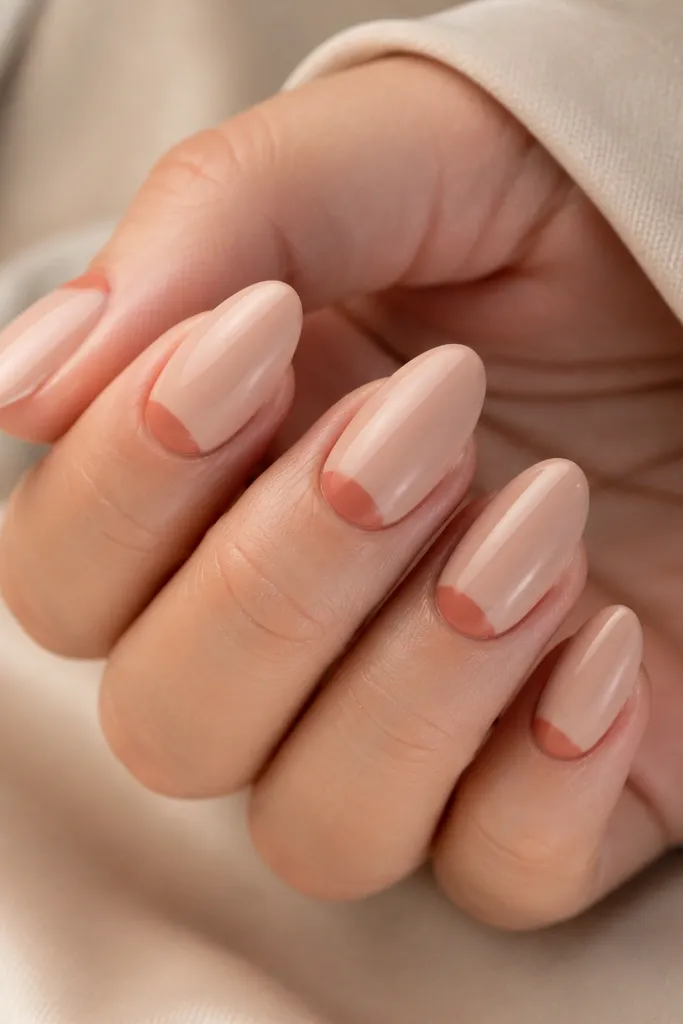
Terracotta half-moons look high-end because they play with negative space in a controlled way. The clay color gives a fall warmth that doesn’t scream “Halloween,” and the nude rest keeps it elegant. I place the half-moon so it starts right under the sidewalls and ends at the center of the cuticle — it frames the nail bed instead of shrinking it. This flatters most skin tones, especially olive and warm undertones, and it looks great with stack rings. If you want fall nails that still feel wearable for everyday, this is it.
Apply a sheer nude base gel and cure. Use a half-moon guide or a tiny brush with a straight handle to paint a terracotta arc only at the cuticle — keep it about 1 mm away from the sidewall edges so it doesn’t flood. Fill the arc with terracotta gel in one or two thin coats, curing fully. Clean up the edges with a gel-safe cleanup brush dipped in alcohol. Finish with a glossy top coat, and cap the cuticle area lightly so the half-moon stays smooth.
Editor's noteIf your half-moon always looks off-center, mark the center point with a dot using the brush tip before you paint the arc.
Skip thisSkip overfilling the half-moon — thick cuticle art lifts first and looks chunky.
5. Blackened Plum Velvet Matte With Glossy Dot Accent
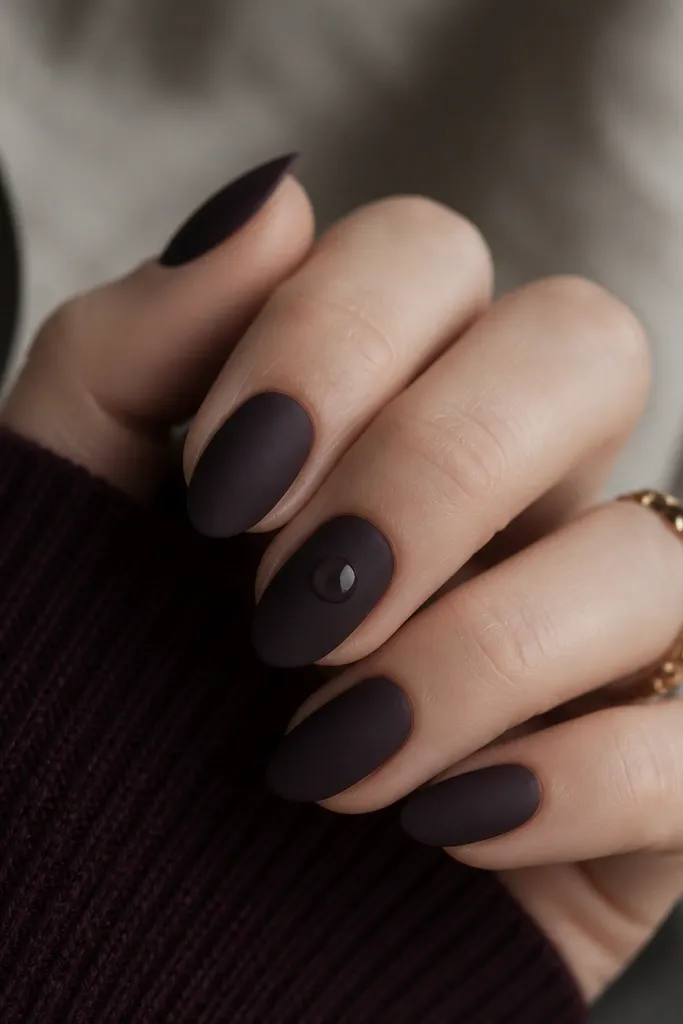
Matte fall nails read luxe when the color is deep and the accent is tiny. Blackened plum is darker than regular plum, so it looks sophisticated instead of playful. I pair it with one glossy dot because it gives a “jewel” effect without turning into a full gem situation. This works beautifully for evening events and for people who hate glitter but still want something interesting. It also hides micro-scratches better than glossy-only sets because matte finish blurs wear.
Prep and apply base gel, then cure. Paint blackened plum gel in two thin coats, curing each time. Apply velvet matte top coat on all nails and cure according to your product instructions. On one or two accent nails, put a tiny bead of clear glossy top coat in the center with a dotting tool, then cure to make it sit raised and shiny. Finally, cure again and avoid adding extra matte top over the dot so it stays reflective.
Editor's noteUse matte top coat only after your color is fully cured and cool — warm nails can cause streaks in matte.
Skip thisDon’t matte the accent dot — a matte dot looks flat and loses the luxe contrast.
6. Copper Foil Corners Over Nude Gel
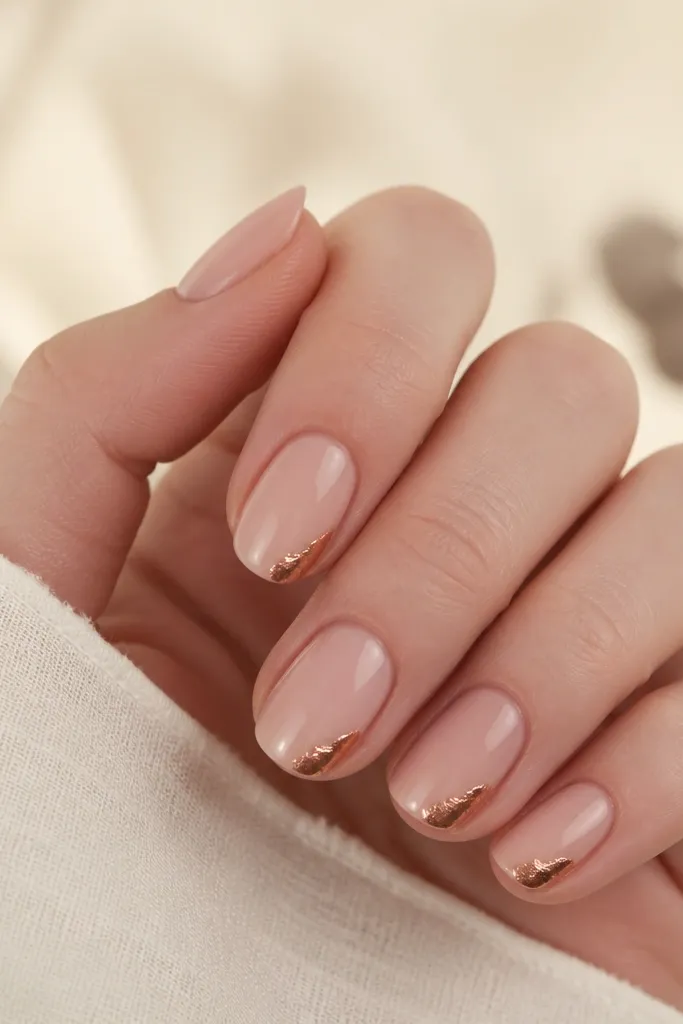
Copper foil corners are my favorite “high-end without trying” design for fall because foil looks expensive even in a small amount. The trick is placement: I keep it in the lower corners so your nail still looks clean and your hands look slimmer. A nude base makes the copper look like jewelry, not like decoration. This flatters fair to deep skin tones because copper shifts warm and works with almost any undertone. For photos, the foil catches light at angles and makes your manicure look like it has dimension.
Start with a sheer nude gel base and cure. Apply a thin layer of foil transfer gel or tacky layer where you want the corners. Tear or cut copper foil into small corner pieces so each piece covers only about 1/5 of the nail width near the tip-side area. Press the foil into place, then cure and seal with a thin top coat — I do two passes of top coat to smooth the foil texture. Keep your sidewalls clean by wiping excess foil before curing.
Editor's noteIf your foil lifts at the edges, add one extra thin top coat layer only over the foil corners and cure fully.
Skip thisSkip placing foil across the center — it makes nails look cluttered and harder to keep clean.
7. Golden Leaf Vein Lines on Dark Chocolate
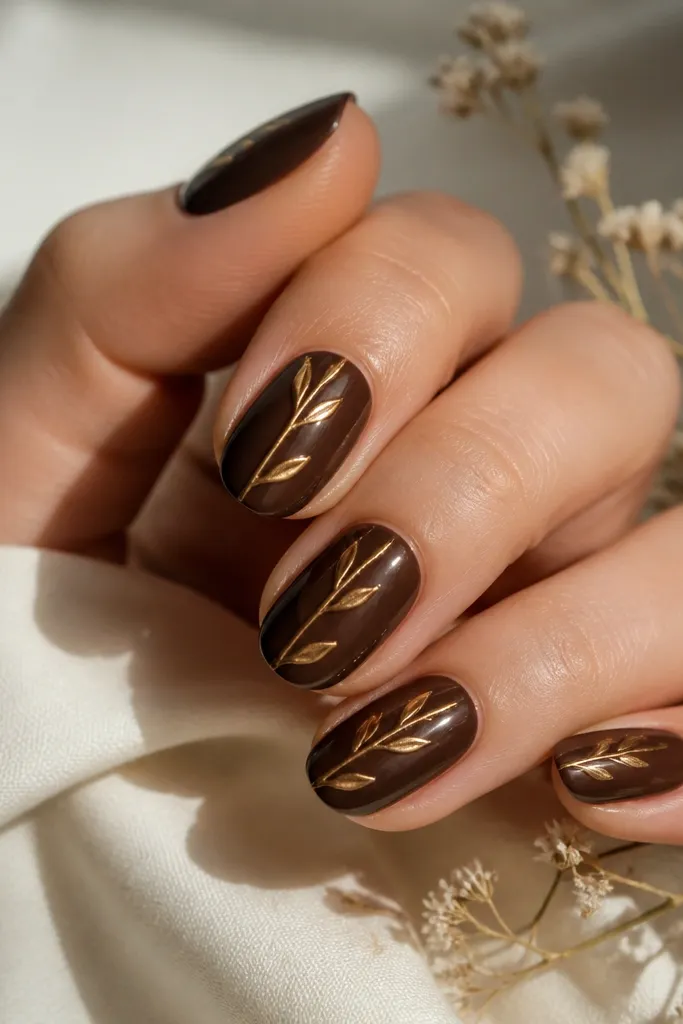
This design looks like fall meets luxury stone. The dark chocolate base gives depth, while the thin gold leaf lines mimic natural veining without covering the whole nail in gold. I keep the lines diagonal so they elongate the nail and don’t feel stuck in one spot. It flatters medium to deep skin tones especially well because the gold pops hard against the brown. It also looks great with warm-toned clothing like camel coats and rust sweaters.
Apply a dark chocolate gel base in two thin coats and cure. For the veins, use a thin liner brush and dab gold leaf gel or gold foil transfer paste — then place tiny fragments of gold leaf along the diagonal path. Keep each nail to 2-3 vein segments so it stays airy. Cure, then seal with a glossy top coat in two layers, letting the top coat wrap over the vein edges. Clean up around the sidewalls with a small brush so gold doesn’t smear onto skin.
Use a black gel liner as your guide line first, then add gold over it so the veins look intentional even if the gold is patchy.
Avoid thick gold lines — chunky leaf makes it look like costume jewelry.
8. Pumpkin Spice Ombre With Micro-Glitter Fade
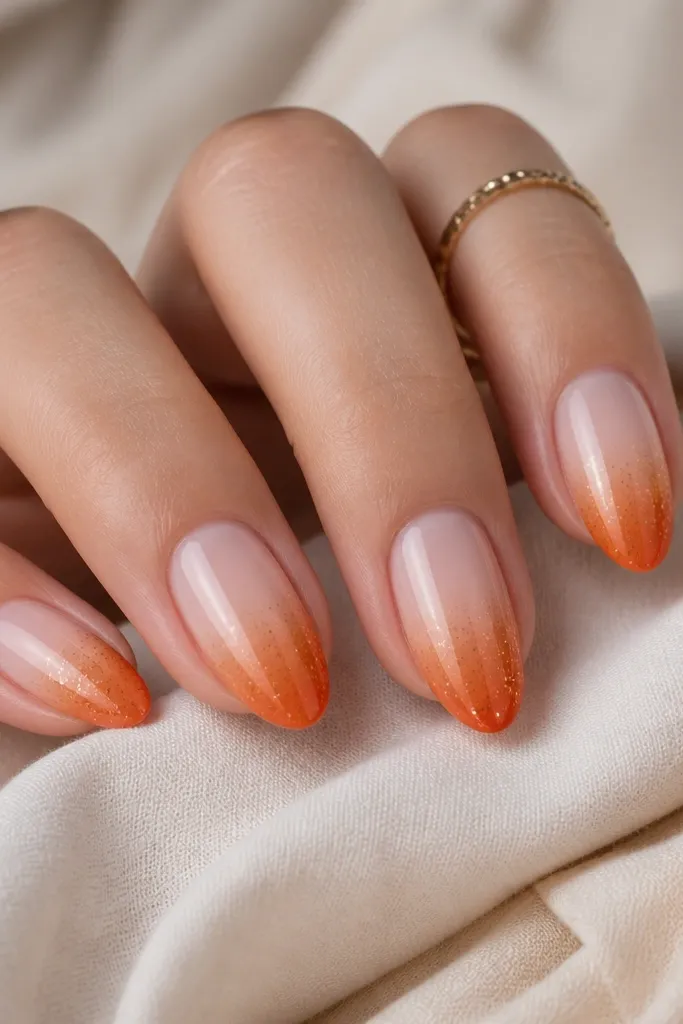
Pumpkin spice ombre is the most flattering “autumn nails” look when you keep the glitter controlled. The nude cuticle keeps it wearable and stops the orange from looking harsh. I blend pumpkin orange gel into the tip and then add micro-glitter only in the last third, so the sparkle reads like baked sugar, not like fallout. This works on fair and medium skin tones because the orange warms the nail bed. For people who love fall colors but hate loud designs, this hits the sweet spot.
Start with a sheer nude base gel and cure. Sponge or airbrush pumpkin orange gel from mid-nail down, blending upward in thin coats until it looks smooth. Add micro-glitter gel only at the lower third — use a small brush and keep it off the center so it looks like a fade. Cure and then apply one thick-ish layer of glossy top coat, focusing on smoothing the gradient. Seal the free edge so the glitter doesn’t catch on things and start lifting.
Wipe your brush on a lint-free wipe between nails so your glitter placement stays consistent.
Skip full-cover glitter — it turns the orange dull and can look gritty.
9. Forest Pine Green With Clear Glass Cuticle
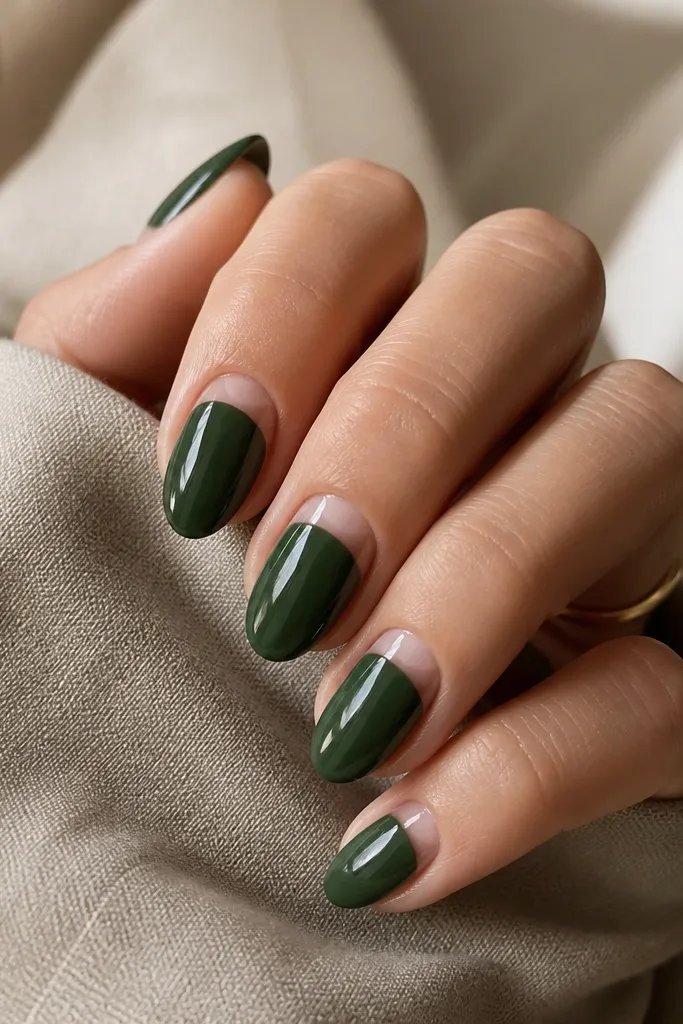
Forest pine green with a clear cuticle band looks modern and expensive because it creates a sharp contrast line. The clear band makes the nail bed look cleaner and it makes the green look deeper, like it’s under a lens. I like this on medium almond and long squoval because the clear stripe draws attention to the cuticle area in a flattering way. It suits cool undertones really well, but it also looks gorgeous on warm skin because the green is dark enough to balance. If you wear lots of black, olive, and denim, this set looks like your wardrobe already matched.
Prep and apply base gel, then cure. Paint forest pine green gel over the entire nail except the cuticle band — for a clean stripe, use a thin strip of nail tape across the cuticle line and remove it right after painting. Apply two thin coats of green, curing each time. Add a clear gel band by painting transparent builder gel or clear top coat where the stripe is, then cure. Finish with two coats of glossy top coat and cap the sides so the clear band feels smooth.
Editor's noteIf you hate taping, use a flat detail brush and stop at the cuticle line, then clean edges with a brush dipped in alcohol.
Skip thisDon’t drag green over the cuticle stripe — smearing makes the clear band look cloudy.
10. Champagne Chrome Half-Overlay on Nude
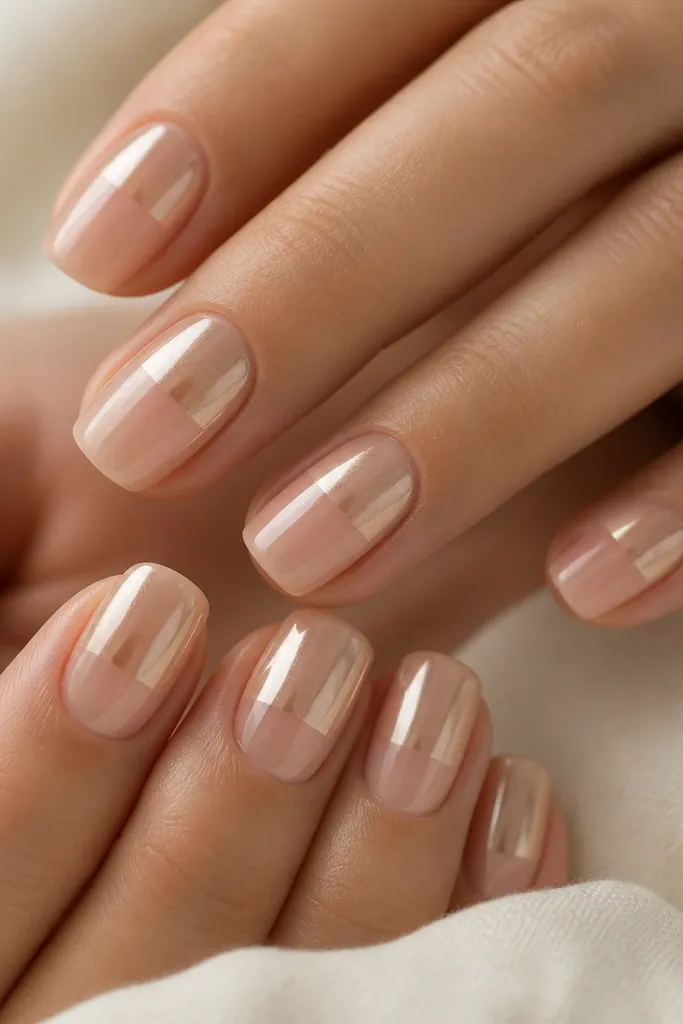
Champagne chrome half-overlay is the prettiest “high-end” fall option when you want glam without dark colors. The champagne tone sits between gold and soft beige, so it flatters every skin undertone in my chair. The half-overlay makes nails look longer and gives you a clean design line instead of scattered glitter. In daylight it looks like metallic satin; under indoor lighting it turns buttery and warm. If you’re doing a fall date night or a holiday party, this is a confident pick.
Apply a nude sheer base gel and cure, then add a thin tacky layer if your chrome system needs it. Paint the top half of each nail with a matching chrome base (often a light nude or clear tack coat depending on brand), keeping the line straight and centered. Press champagne chrome powder/foil onto the top half using an applicator sponge in small dabs until you get full coverage. Brush off excess gently and seal with a chrome-safe glossy top coat in one to two thin layers. Keep the top edge capped so the chrome doesn’t snag.
Use a black background gel under the chrome only if you want extra drama — for fall high-end, a nude base keeps it classy.
Skip thick top coat right away — it can dull chrome if it’s not compatible with your system.
11. Mocha Latte Marble With Thin White Veins
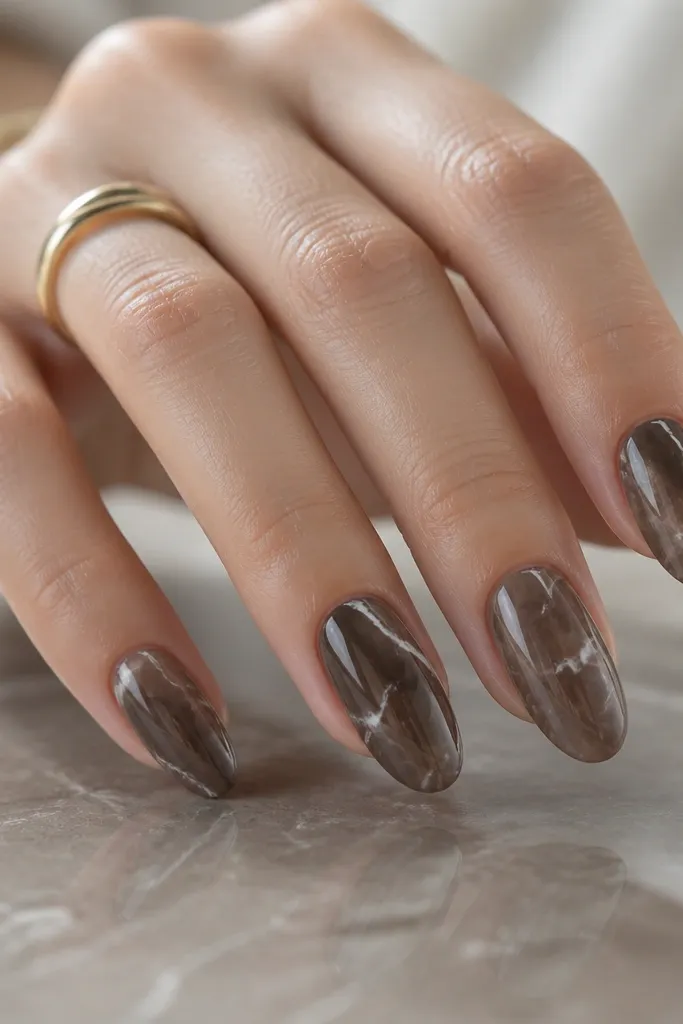
Mocha latte marble looks expensive because marble patterns read naturally detailed even when you keep them simple. The base is a warm mocha brown, and the veins are thin white — not thick, not chalky. I like this design for fall because it matches coffee tones in clothing and it looks good with both gold and silver jewelry. It flatters hands with uneven nail beds better than you’d think because the marble hides small growth lines. For office days, keep the veins thin and spaced out so it still looks refined.
Apply a warm mocha brown base gel in one or two thin coats and cure. For the marble, use a gel liner brush with diluted white gel (or white gel mixed with a clear medium) and drag thin vein lines across the nail. Add two or three small offshoots per nail, keeping the pattern mostly diagonal. Use a fine brush to soften any edges where lines feel too sharp, then cure. Seal with two glossy top coat layers, making sure the veins are fully trapped under the top so they feel smooth.
Practice on a nail tip first — vein thickness is the difference between “designer marble” and “home art.”
Avoid heavy white blobs — they look like paint and lift at the surface faster.
12. Rusty Rose Fade With Clear Outline Border
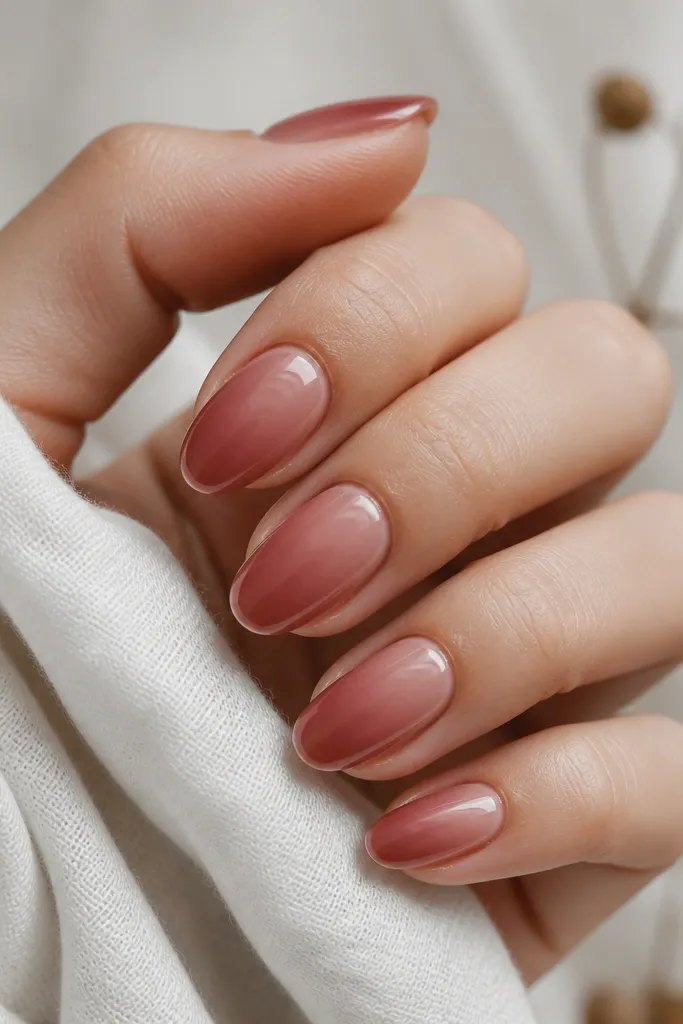
Rusty rose fade is the calm, classy fall look that still feels seasonal. The dusty rose reads warm and soft, and the clear outline border gives a high-end “framed glass” effect. I keep the outline thin and close to the edges so it doesn’t shrink the nail visually. This is a great pick for people who want fall nails that aren’t too dark, especially if you wear lighter makeup or neutral outfits. It also looks flattering on short nails because the outline adds crisp structure.
Start with a sheer nude base gel and cure. Sponge or brush on dusty rusty rose gel from mid-nail down, blending upward for a smooth fade, then cure. Take a fine detail brush dipped in clear gel or clear top coat and trace a thin border along the nail perimeter, leaving the center open. Cure again, then apply two glossy top coat layers to smooth everything and trap the border under glass. Seal the free edge so the border doesn’t catch.
Editor's noteDo the border after the color fade cures, so your outline stays clean instead of pulling the pigment.
Skip thisSkip a thick outline — it makes the nail look like it has a sticker edge.
13. Charcoal Nail Base With Burnt Orange Dot Constellations
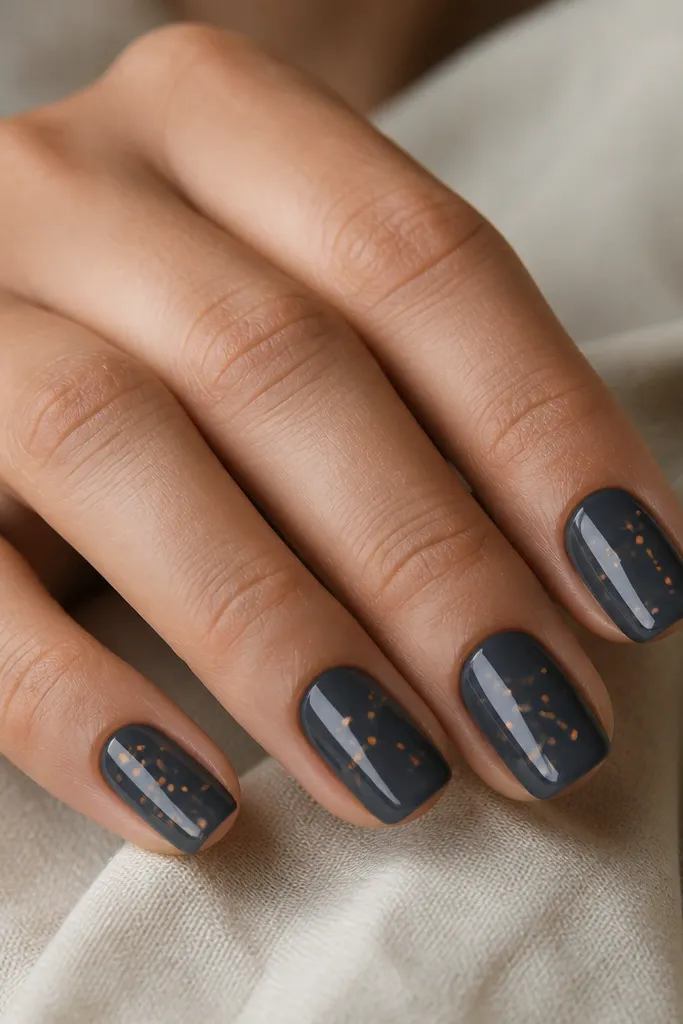
Charcoal + burnt orange looks like fall skies and sweater weather. The charcoal base grounds the color so the orange dots feel intentional, not random. I like using tiny dots because they look “high end” in close-up photos, and they don’t snag like larger decals. This flatters cool undertones because charcoal is grounding, but the burnt orange adds warmth. It’s also a fun option for people who want fall nails that still feel modern and a little edgy.
Apply a charcoal grey gel base in two thin coats and cure. Use a dotting tool loaded with burnt orange gel and place small dots in a diagonal pattern across each nail — keep the largest dot near the center and the rest smaller. Leave some space so the design breathes. Cure, then apply a glossy top coat in two layers, making sure dots are fully encapsulated so they feel smooth. Clean any dot overflow from the sidewalls before curing.
Editor's noteIf dots smear, wipe the dotting tool tip on a lint-free wipe, then reload — gel consistency changes the edge instantly.
Skip thisDon’t place dots all over the nail — too many points looks like a cheap stamp pattern.
14. Shimmer Taupe With Diagonal Gold Foil Strip
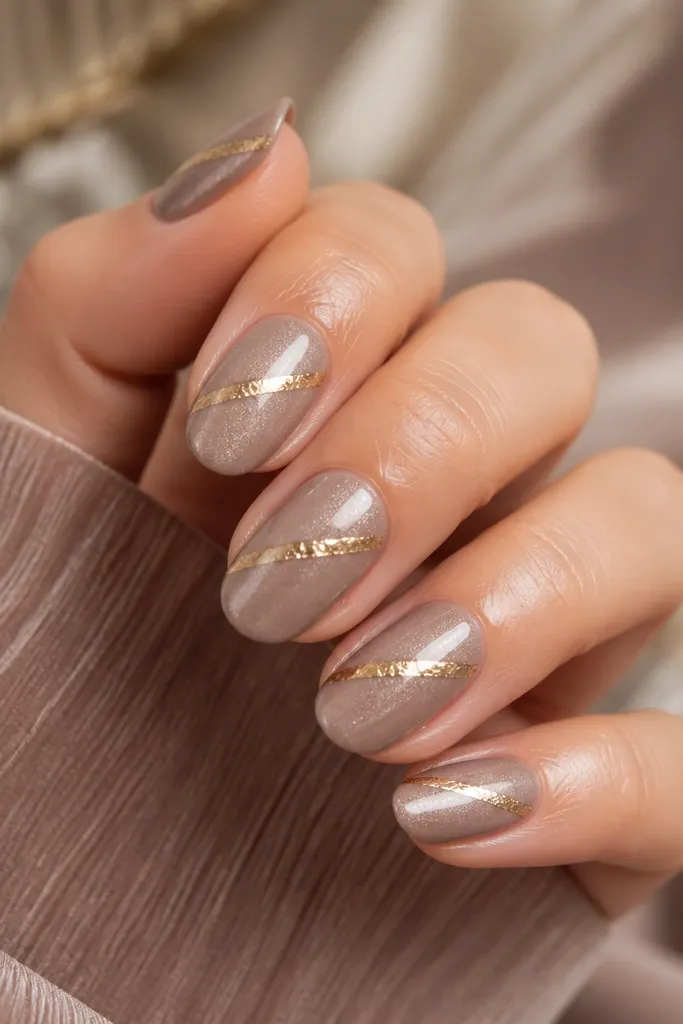
Shimmer taupe is the “neutral fall luxury” option that still looks special. The taupe gel has a fine shimmer that looks like soft lighting under glass, and the diagonal gold foil strip adds that designer detail without clutter. I keep the gold strip thin and angled because it elongates the nail and makes the shimmer look intentional. This is flattering for almost everyone because taupe sits between beige and grey — it harmonizes with both warm and cool skin tones. It also looks incredible with fall neutrals like camel, cream, and heather grey.
Apply a shimmer taupe gel base in two thin coats and cure, making sure it’s even from cuticle to tip. Place a thin diagonal line guide with nail tape or just lightly mark the start and end points with a dot. Apply foil transfer gel along the diagonal, then press gold foil onto the line — keep it narrow, about 1 mm to 1.5 mm wide on short nails. Cure and seal with two glossy top coat layers, focusing on smoothing over the foil strip so it doesn’t feel raised. Cap the free edge so the foil stays locked.
Editor's noteAngle the strip slightly steeper on short nails — it lifts the look and avoids making the nail feel chopped.
Skip thisSkip a wide foil strip — it turns shimmer taupe into something costume-like fast.
15. Plum Jam Jelly Nails With Tonal Glitter Rim
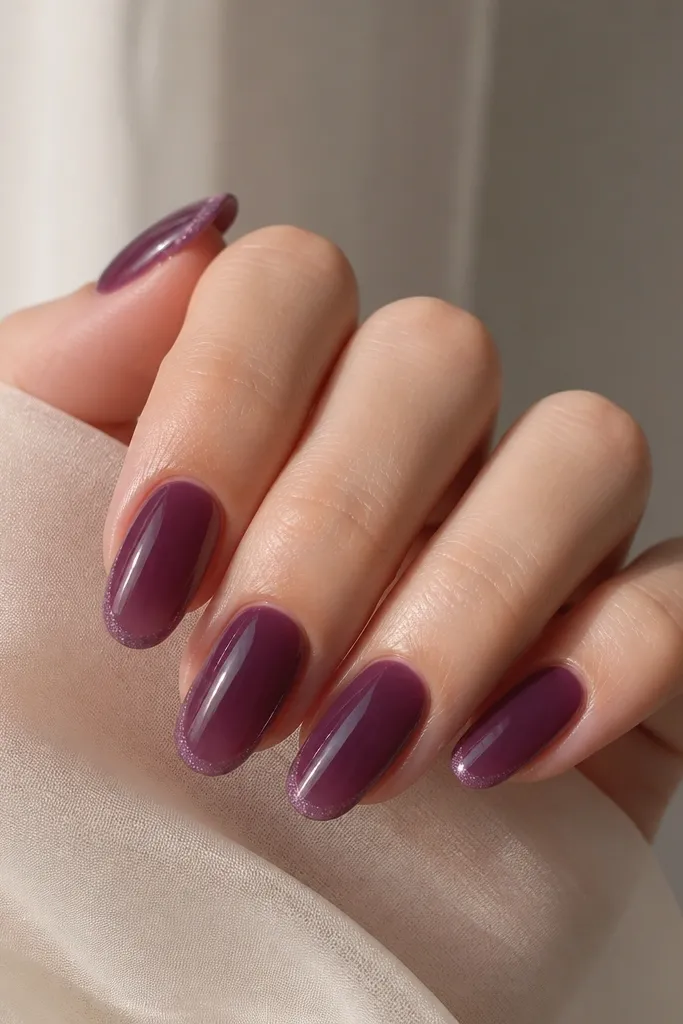
Plum jam jelly nails look high-end because the translucency makes the color look juicy, not flat. The tonal glitter rim keeps it autumn without adding heavy sparkle across the whole nail. I use a slightly lighter plum glitter so the rim looks like it’s lit from within. This design flatters hands with shorter nails because the jelly finish makes the nail bed look fuller, and the rim stays controlled. It’s also a good choice if you hate opaque, chalky fall polish.
Prep and apply a sheer base gel, then cure. Paint plum jelly gel in thin layers, building opacity only at the tip — I do two thin coats for a glossy translucent look. For the rim, use a small brush to paint a thin band of lighter plum glitter gel around the tip edge, then cure. Add one glossy top coat layer to lock the glitter, then a second glossy coat for mirror shine. Seal the free edge so the rim doesn’t wear off first.
Editor's noteKeep your jelly layers thin — thick jelly gel creates bubbles and dulls the glass effect.
Skip thisAvoid full opacity on the whole nail — it kills the jelly look and makes it feel less luxe.



