
1. Oat Milk Nude with Espresso Half-Moons
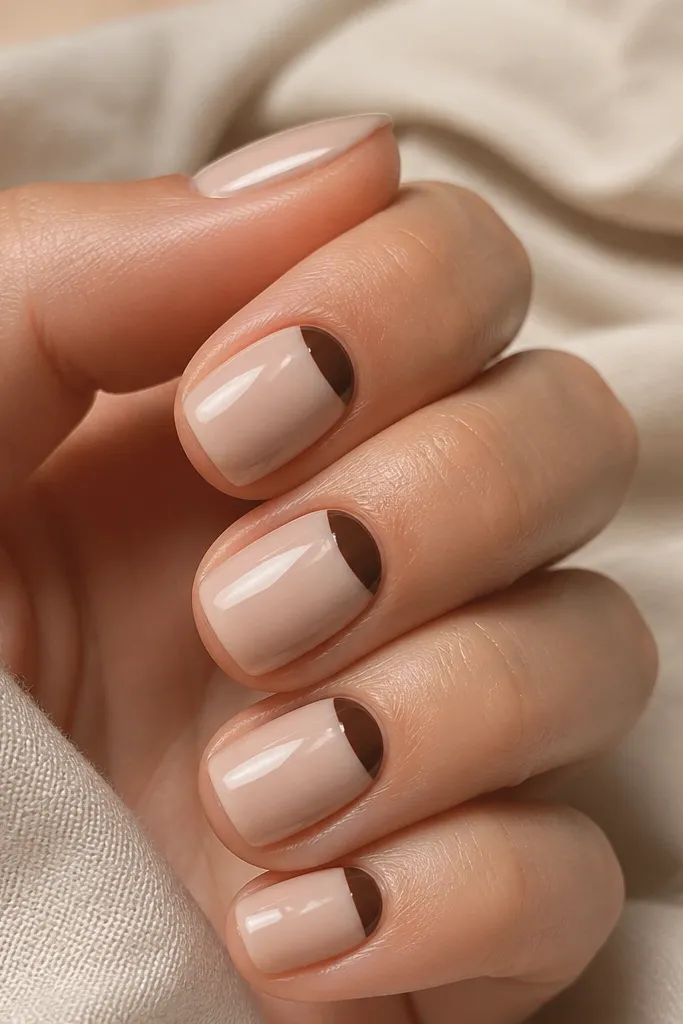
This set is my go-to when I want fall nails that still feel clean for any month. The oat milk nude reads soft and neutral, so it matches denim, workwear, and even summer outfits without looking like a costume. The espresso half-moons add that autumn depth because the brown sits only at the cuticle, where it visually lengthens rather than shrinks your nail. I like it most on medium to short nails and on skin tones from fair to deep because the nude base can be chosen to match your undertone — peachy for warm skin, pinker for cool skin.
Editor's noteIf your half-moon looks wobbly, use a thin strip of tape along one side of the cuticle curve as a guide, then remove it before curing.
Start by painting a full coat of oat-milk nude gel, then cure. Using a fine detail brush, place a small espresso half-moon at the cuticle on each nail, leaving a tiny nude gap so the curve looks intentional. Keep the half-moon about one-third of the nail width — don’t stretch it all the way to the sides. Cure again, then seal with a glossy top coat, making sure you cap the free edge. Finish by wiping the tacky layer if your top coat leaves residue.
Skip thisSkipping edge capping on the top coat is how this look chips first.
2. Rust Gradient Tips with Clear Jelly Middle
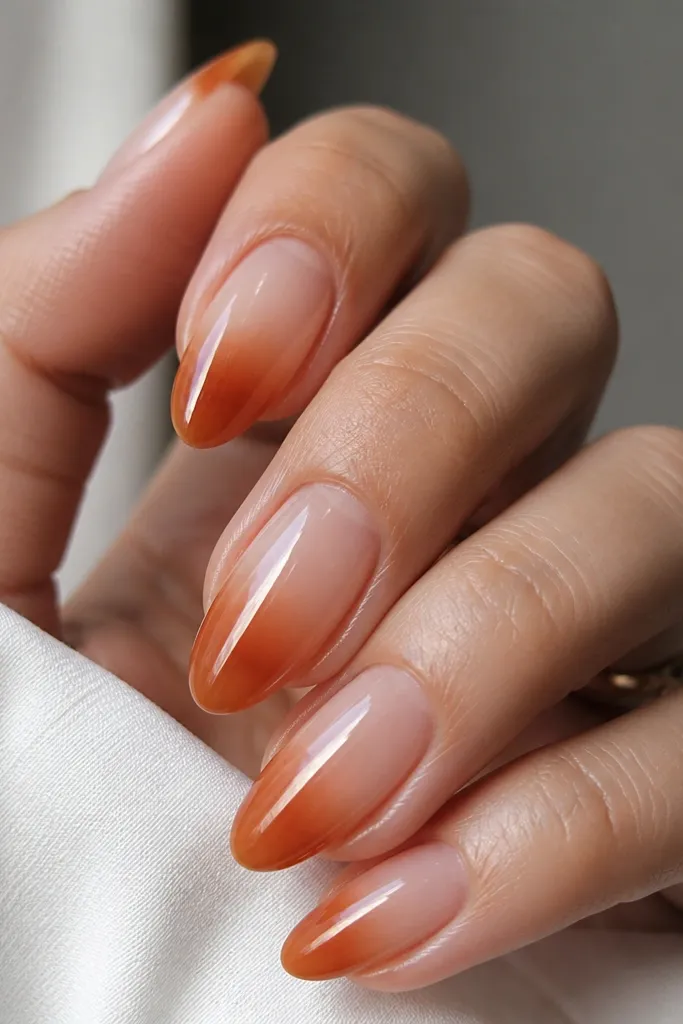
This is the autumn manicure that looks like it belongs in a sweater commercial. The clear jelly middle keeps it light, so the rust doesn’t feel heavy. I’ve worn this on my nails when I wanted warmth without dark coverage, and it still looks fresh in bright weather. The gradient placement on the tips makes fingers look longer — especially on short-to-medium nail beds. It’s flattering across skin tones because rust has a wide range, from burnt orange to terracotta, and you can pick the exact shade that matches your warmth.
Paint a sheer jelly base (almost like clear with a hint of nude) and cure. Sponge a rust-orange gel onto the outer third of each nail, then feather it inward so the center stays more transparent. Use a clean brush to blend the transition line while the gel is still workable, then cure. Add one thin layer of jelly clear over the gradient to smooth the surface. Finish with a high-gloss top coat and cap the sides and tip.
Use a makeup wedge sponge, not a nail art sponge — it gives softer edges for a true gradient.
Don’t bring the rust all the way to the center or it will look like solid fall polish instead of a modern gradient.
3. Burnt Orange Skittle with One Matte Accent
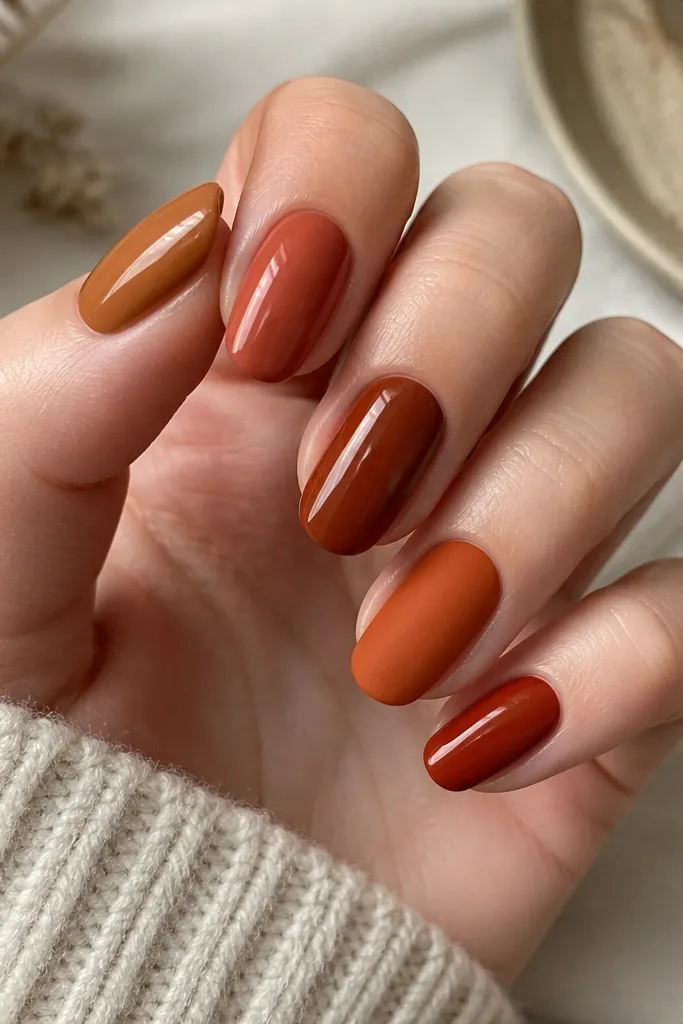
Skittle nails can look messy if the shades fight each other, but this one stays cohesive because every color lives in the burnt orange family. I love it for fall events because it looks playful, yet it still reads wearable year round since the base tones are warm neutrals, not neon. The matte accent nail adds texture so the set feels intentional even with simple polish. This looks great on short rounded nails and also works on longer shapes when you keep the colors to the same saturation level.
Start by cleaning and shaping, then apply a universal base coat. Paint each nail with one burnt-orange shade — keep coverage even, no streaks, and cure each finger under the lamp. After the last color layer, remove tacky residue if your system requires it. Choose one accent nail and apply matte top coat only to that nail, then cure fully. Seal the other four nails with glossy top coat for contrast.
Pick shades that are one step lighter or darker than each other — the closer the family, the more polished it looks.
Avoid mixing cool-toned reds with warm burnt oranges in the same set.
4. Chocolate Swirl Cuticle Detail
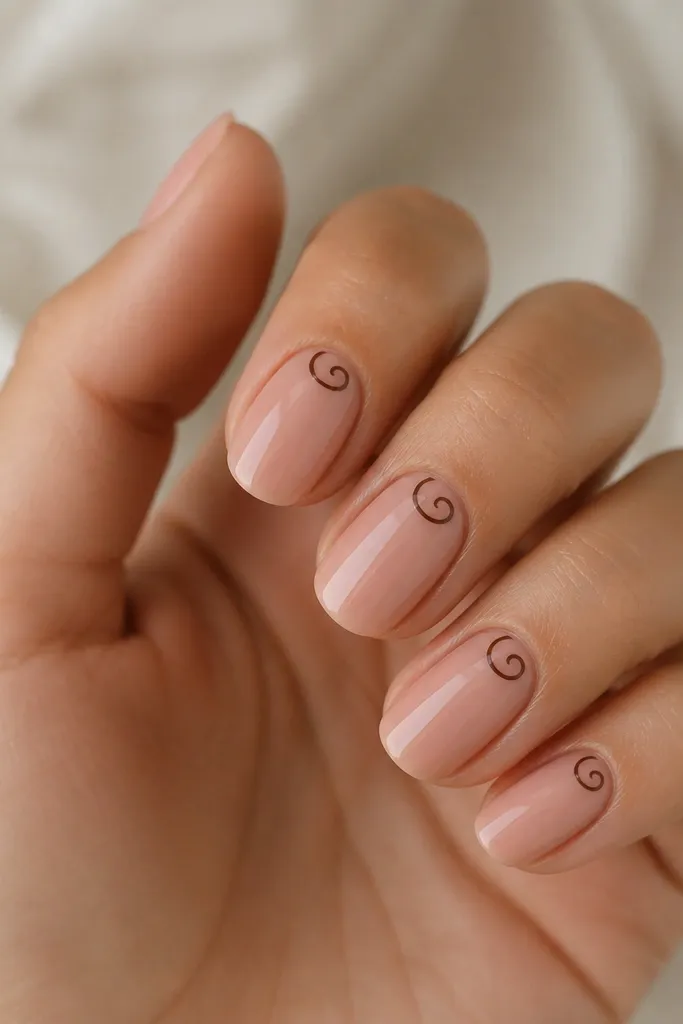
This design is subtle, but it gives you that “did you get your nails done?” feeling. The nude pink base keeps everything light, while the chocolate swirl adds an autumn mood without using heavy brown coverage. Swirls look best when they’re thin and placed at the cuticle, where they mimic the natural nail curve. I’ve seen this work on both short and medium nails because the design doesn’t need space — it’s a little accent. It flatters most skin tones because nude pink can be matched to your natural nail bed color.
Apply a nude pink gel base and cure. With a detail liner brush, draw a tiny C-shaped swirl starting at the cuticle and curling outward about a millimeter. Add a second line to make the swirl look dimensional, but keep it narrow so it doesn’t thicken the nail visually. Cure, then top coat glossy. For extra neatness, wipe the brush with acetone between nails so the lines stay crisp.
Practice the swirl on a clear plastic spoon first — you’ll learn the pressure needed for a clean taper.
Don’t make the swirl too big or it will look like a smudge instead of nail art.
5. Gold Leaf Accent over Deep Olive
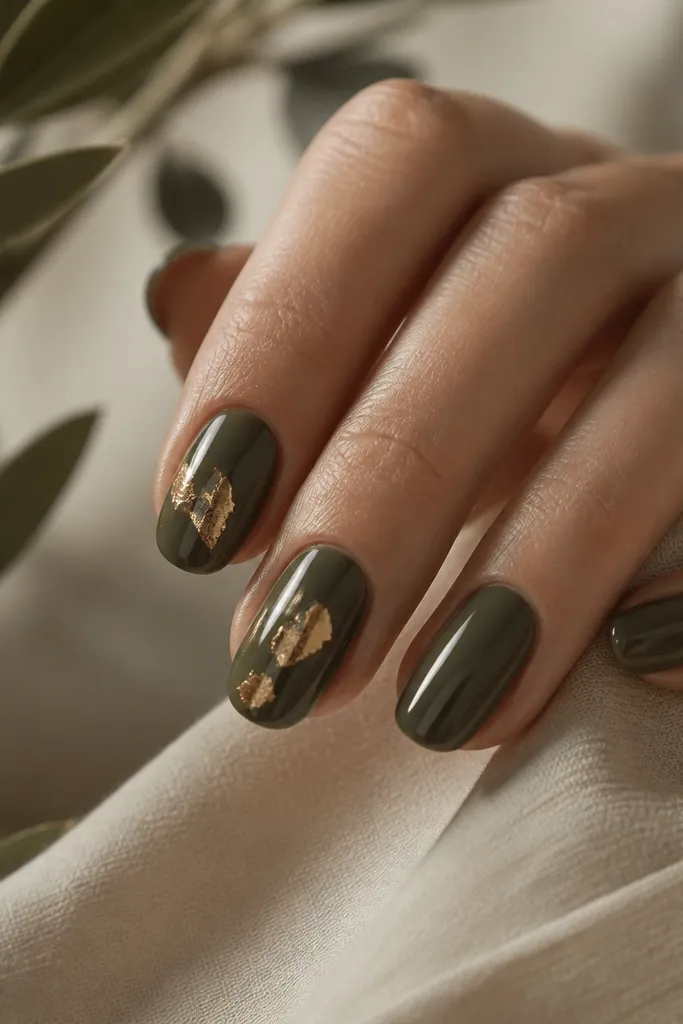
Deep olive is one of the most wearable fall colors because it reads earthy, not just “orange.” Pairing it with gold leaf makes it look dressed up without needing a full glitter coat. I’ve done this for dinners and work events because the gold catches light in photos and in real life. The accent placement keeps it modern; you’re not covering every nail in metallic. This works especially well on medium to deep skin tones, but fair skin also looks great when the olive is rich and not too gray.
Editor's noteUse a matte top coat on the olive base if you want a more autumn scarf vibe and less shine.
Paint two coats of deep olive gel and cure each layer. On your accent nails, apply a thin layer of tacky gel where you want the leaf. Press small pieces of gold leaf down with tweezers, then gently tap so it adheres. Seal with a gel top coat in thin layers, curing between coats so the leaf doesn’t lift. Finish with a glossy top coat over everything for a smooth surface.
Skip thisDon’t rub the gold leaf hard — it smears and turns patchy.
6. Cinnamon Micro-Glitter with Sheer Nude Base
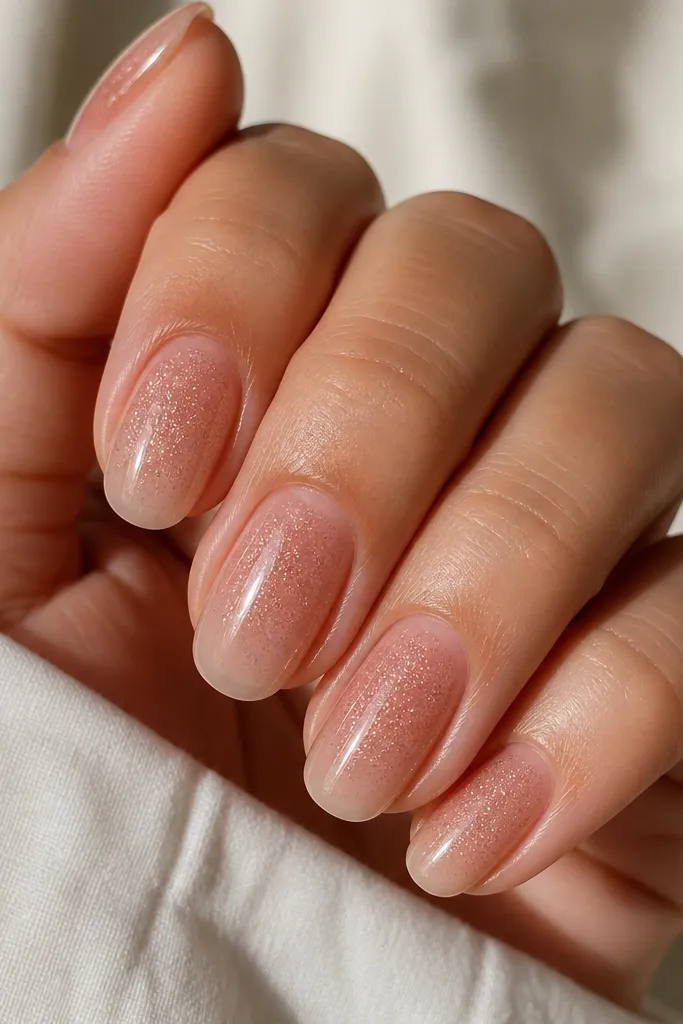
Fine micro-glitter is my favorite way to get fall sparkle without looking like you’re wearing a disco ball. The sheer nude base keeps it breathable, so it doesn’t feel heavy in spring or summer. Cinnamon tones read warm and cozy, and they look good on nails of any length because the glitter is subtle. This set flatters short nails because the fade creates an illusion of length. On longer nails, it looks like a soft ombre without needing a complicated gradient.
Editor's noteMix glitter with a clear top coat in a small dish if your glitter gel is too thick.
Apply a sheer nude base gel and cure. Dab cinnamon micro-glitter gel starting at the center of the nail and pull it slightly toward the tip, leaving the cuticle area more transparent. Use a sponge or a small flat brush to keep the glitter density controlled. Cure, then add a thin clear gel layer to smooth the texture. Top coat glossy and cap the tip.
Skip thisAvoid chunky glitter here — it will feel harsh against the sheer nude base.
7. Terracotta French with Thin White Underline
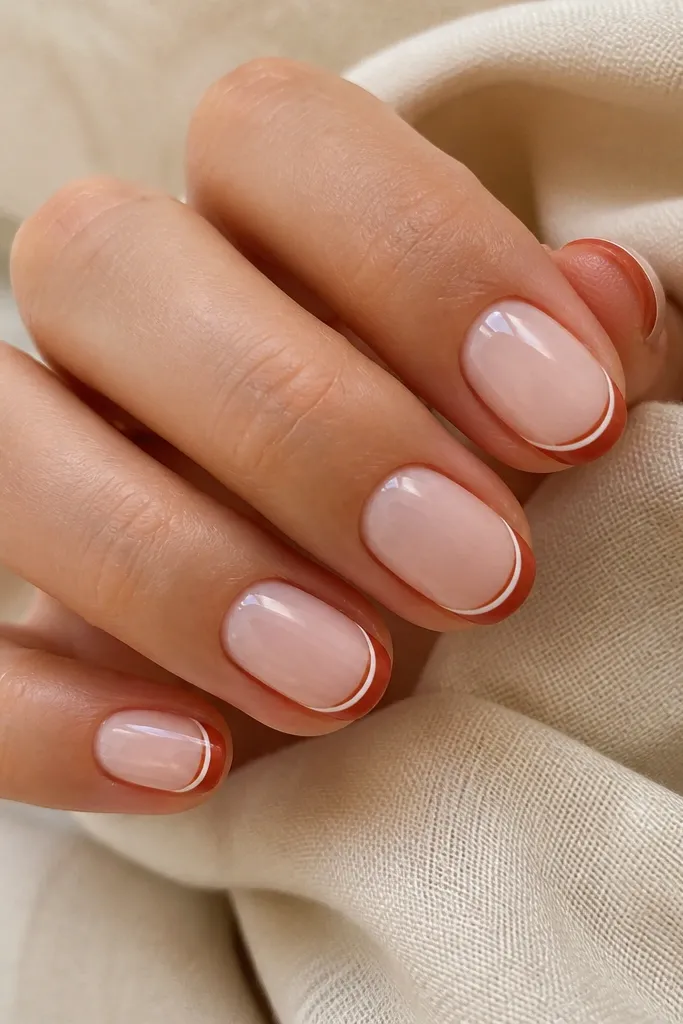
A French tip is classic, but terracotta makes it feel like real autumn. The milky nude base keeps it soft, and the thin white underline adds crisp definition so the terracotta doesn’t look muddy. I like this when I’m wearing neutral outfits because it gives one clean pop without being too loud. It flatters almost everyone because French lines create structure, and the terracotta is warm enough to complement both cool and warm skin tones. This is also great for beginners because the shapes are predictable.
Editor's noteUse a striping brush with a slightly angled tip — it makes the French curve consistent nail to nail.
Start with a milky nude base and cure. Paint the French tip in terracotta, keeping the curve about 2 mm from the sidewalls on short nails. While the terracotta is still tacky (or after it’s cured if needed), add a very thin white stripe just slightly inward from the very edge line. Cure fully and clean up any overpaint with a brush dipped in acetone. Seal with glossy top coat and cap the tip.
Skip thisDon’t make the white stripe too thick or it turns into a layered blob.
8. Mocha Marble with Clear Veining
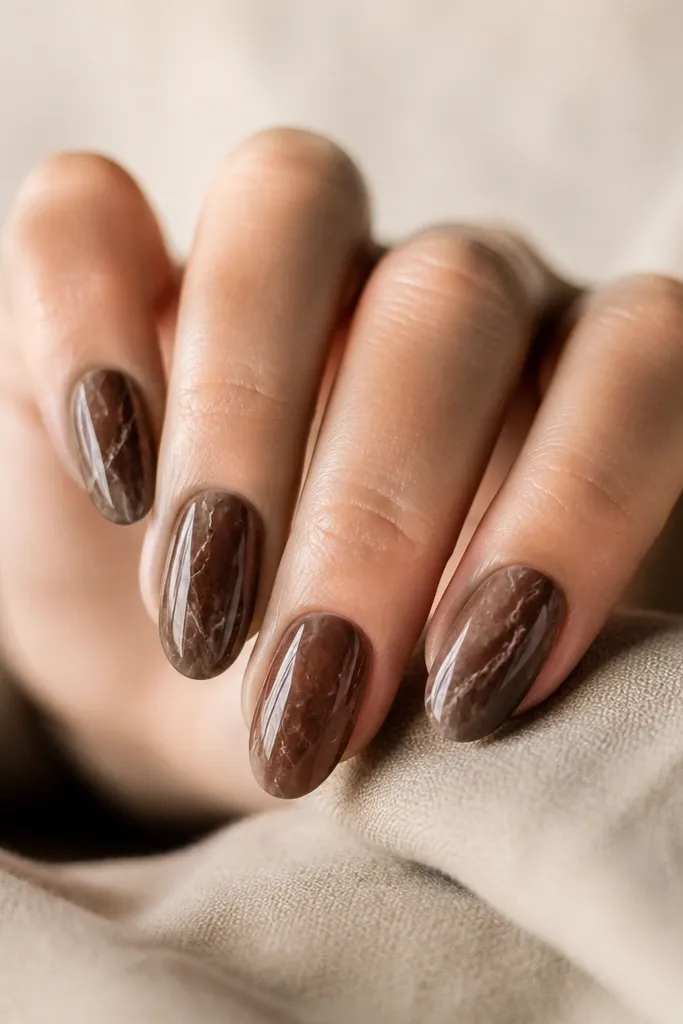
Marble nails can look expensive when you keep the movement controlled. A mocha base is autumn-friendly and looks good with warm jewelry, while the clear veining keeps the design airy instead of heavy. I’ve done this for nights out and it still looks good in daylight because the veins catch shine under a glossy top coat. Marble is flattering because it draws the eye across the nail and hides minor nail plate differences. Choose darker mocha for deeper skin tones and lighter cocoa for fair skin if you want it to look extra natural.
Editor's noteDo marble on only 2-3 nails in the set if you want the rest to feel calmer.
Paint a solid mocha-brown base gel and cure. Using a thin liner brush, draw a few random vein lines in a slightly lighter cocoa, then add a couple of clear gel lines on top for a glass effect. Drag the brush lightly through the wet gel to soften edges, but stop before it turns into a smear. Cure, then apply a thicker glossy top coat to smooth the surface and make the veins look raised. If your marble looks flat, add one more clear gel layer over the design and cure again.
Skip thisDon’t cover the entire nail in dense veins — it turns muddy.
9. Maple Leaf Accent with Nude Base and One Glitter Nail
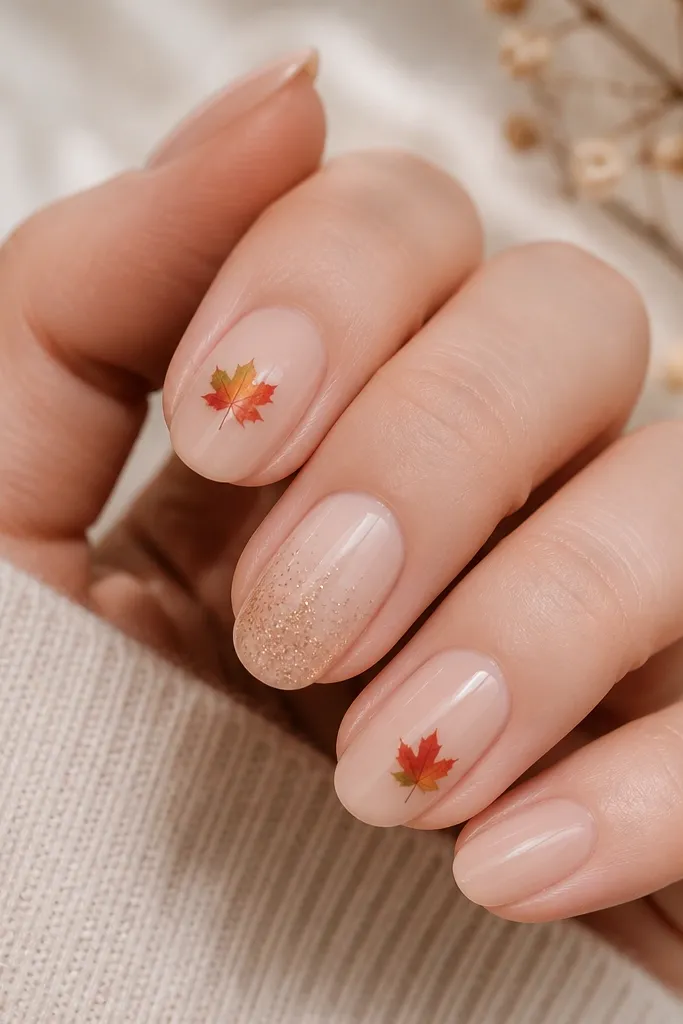
This is fall without going full theme. The nude base keeps it wearable year round, and the maple leaf accent gives you that autumn cue without covering every nail. I like placing the leaf near the cuticle because it looks like it’s growing from your nail bed. Adding one copper glitter nail makes the set feel festive, but only one — so it doesn’t become costume-level. This flatters hands because the nude base visually evens the nail and the leaf detail draws attention upward.
Apply a nude base gel and cure. On accent nails, use nail vinyl leaf stamps or freehand to place a small maple leaf shape — keep it about the size of a rice grain cluster, centered and not touching the sidewalls. Add a tiny green accent dot for the leaf stem highlight. Paint one nail with copper glitter gel in a light veil over the center, then cure. Finish with glossy top coat on all nails.
If you’re hand-drawing leaves, start with the stem line first, then add leaf points outward.
Avoid placing leaves too close to the free edge or they look cramped when your nails grow out.
10. Smoky Plum with Copper Outline
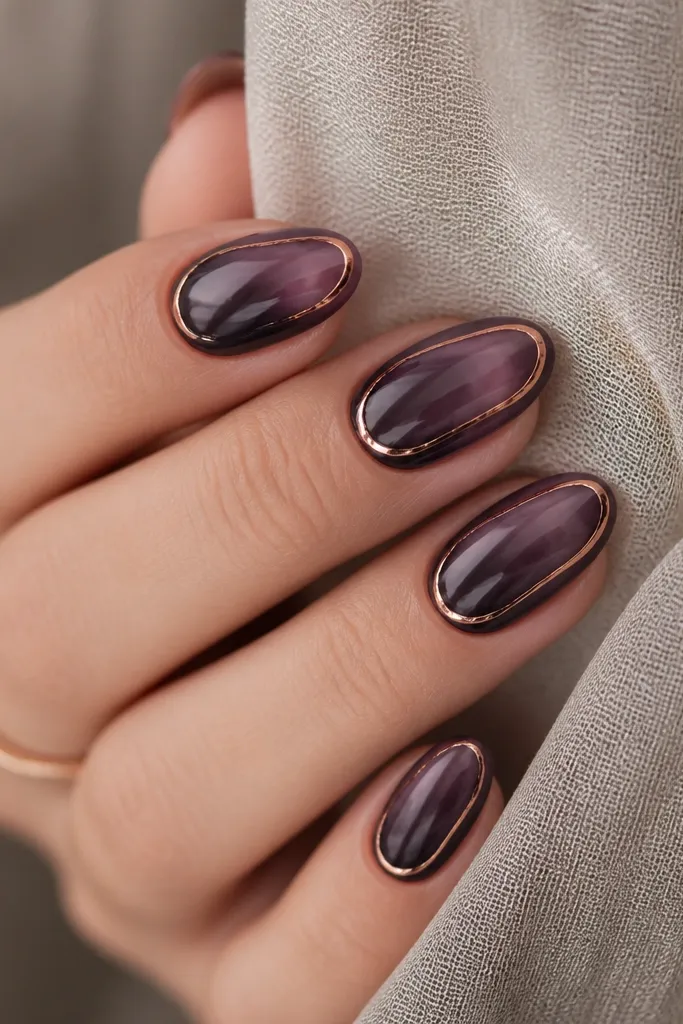
Smoky plum is one of the most flattering fall shades because it reads deep but not harsh. Copper outlines turn it into a warm autumn look that still feels modern, and the outline placement keeps it clean. I like this when I want something darker that doesn’t look heavy like black. The copper line adds a crisp edge, which makes short nails look sharper. This set works across skin tones because plum has enough depth to show on fair skin and enough warmth to complement deeper complexions.
Editor's noteUse copper liner gel over a tacky layer if your outline keeps smudging — it sticks better than on fully cured polish.
Paint smoky plum gel in two thin coats for even coverage and cure each coat. With a metallic copper liner gel and a fine brush, draw a curved outline that sits about 2 mm above the free edge on each nail. The outline should be a partial frame, not a full circle — leave the cuticle side open. Cure and then apply glossy top coat, using a slightly thicker coat over the copper lines so they don’t catch on fabric.
Skip thisDon’t use thick metallic paint — it chips at the edges.
11. Sage and Rust Diagonal Stripe
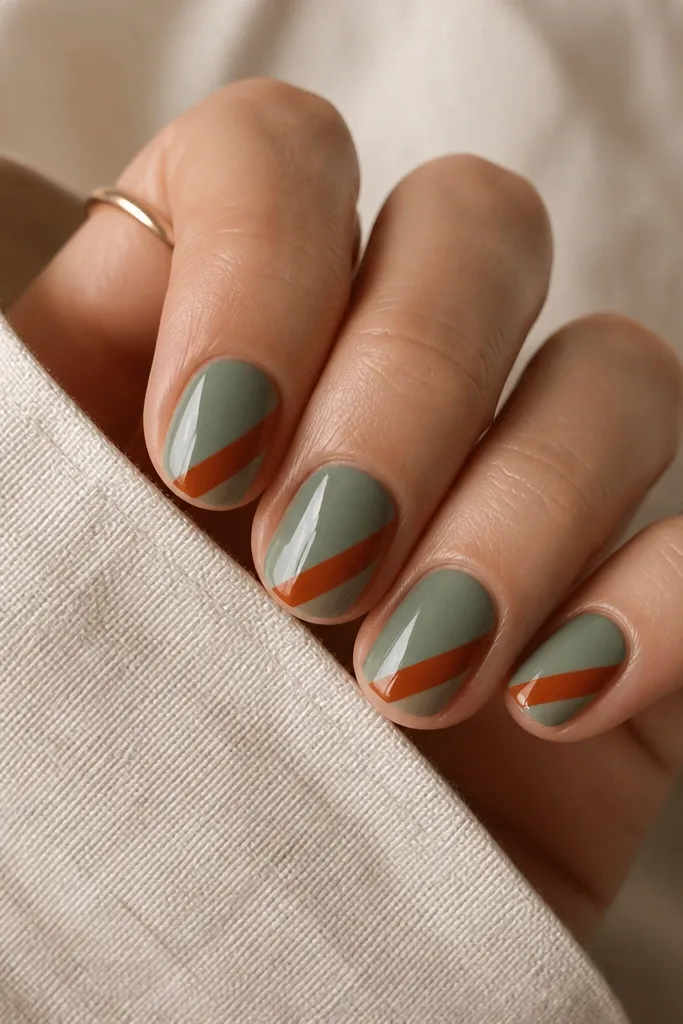
This is the “I want fall colors but not pumpkin” manicure. Sage green is calming and looks fresh year round, and the rust stripe adds that autumn warmth. Diagonal stripes lengthen the nail and make fingers look more narrow because the line pulls the eye across the surface. I’ve worn this with both gold and silver jewelry because the rust has enough warmth to play nice with either metal. It’s especially flattering on short nails since the stripe gives shape without needing extra length.
Editor's noteMeasure the diagonal using your finger — align the stripe angle the same way across every nail so it looks intentional.
Start with a sage green base and cure. Place a thin strip of striping tape diagonally across the nail where you want the stripe, then paint rust-orange gel over it. Cure, remove the tape while the gel is fully cured and wipe residue if needed. If your stripe needs sharpening, go over the edges with a tiny brush dipped in acetone cleanup and cure again. Finish with glossy top coat and cap the free edge.
Skip thisDon’t freehand the stripe without practice — uneven edges make it look cheap fast.
12. Deep Teal with Tiny Gold Studs at the Cuticle
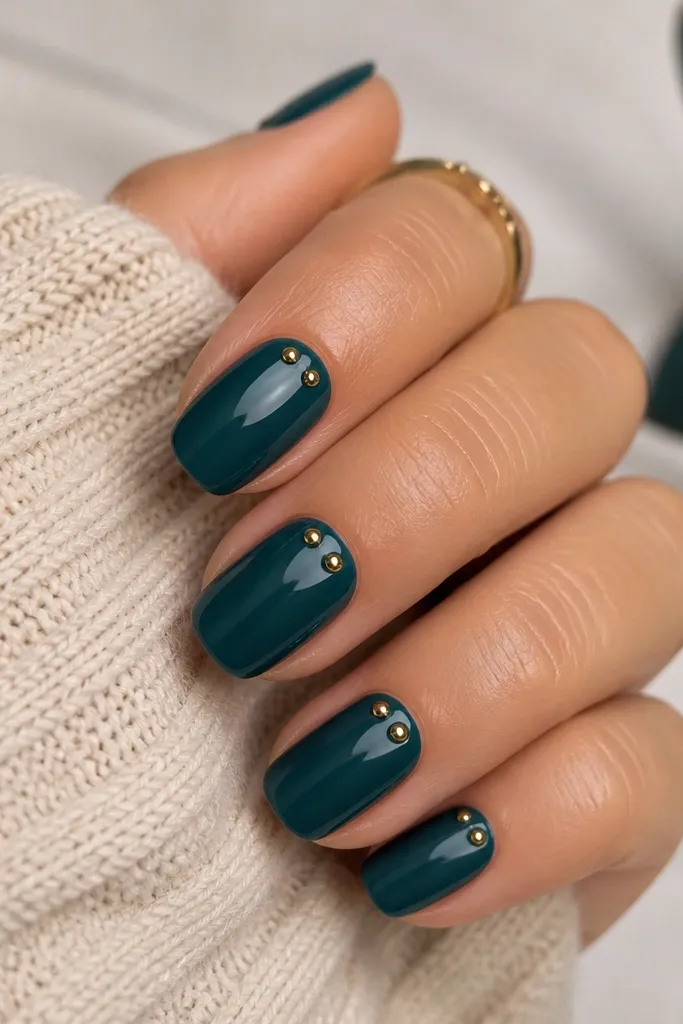
Deep teal gives you fall mood without relying on orange and brown. The tiny gold studs at the cuticle make it look jewelry-like, and because they’re small, the design stays neat as your nails grow. This set is great when you want something that reads “polished” for office days and dinner plans. The teal flatters a wide range of skin tones — it makes fair skin look brighter and makes deeper skin look even richer. I also like it for medium-length nails because the studs catch light and add dimension.
Editor's noteIf studs lift, add a second thin clear gel layer over them and cure — it fixes loose edges.
Apply a deep teal gel base in two thin coats and cure. On each nail, place a small dot of builder gel or tacky gel at the cuticle center. Use tweezers to drop two tiny gold studs into the gel, then nudge them so they sit evenly side by side. Cure under the lamp. Seal with a thin layer of clear gel over the studs to lock them down, then top coat glossy.
Skip thisSkipping the sealing layer over studs leads to snagging on sweaters and hair.
13. Matte Caramel with Chocolate Speckle
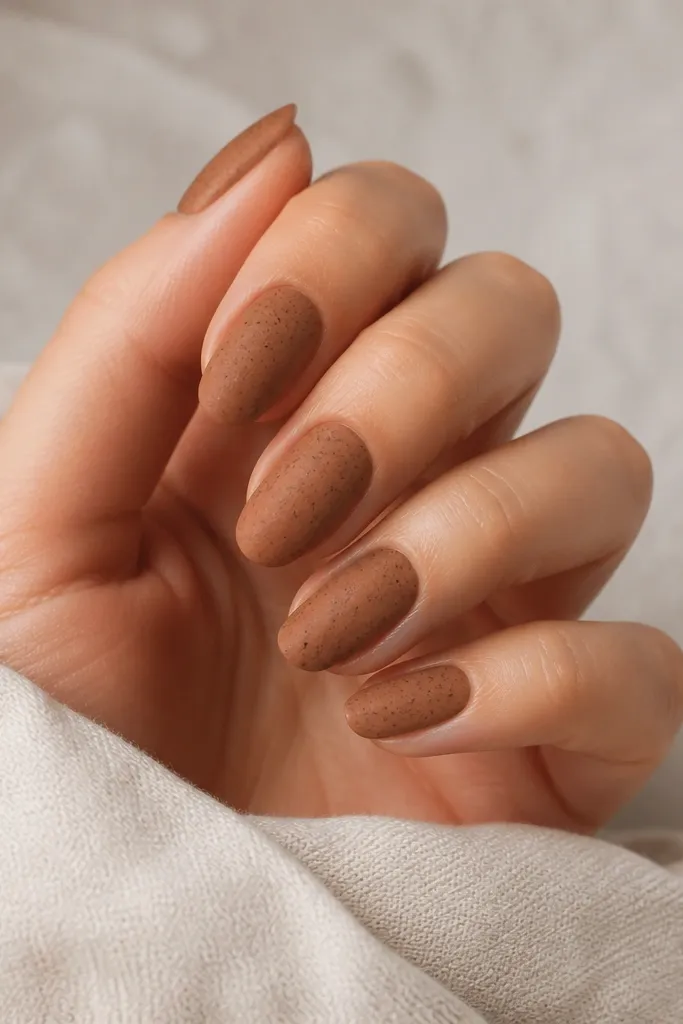
Matte caramel feels like warm dessert on your nails, and it hides small imperfections better than glossy polish. The chocolate speckles add a playful autumn texture without needing a full pattern. I like it when I’m tired of clean lines and want something that looks cool even if my brush control is off. Speckle placement at the center keeps it balanced and flattering. This works on short and medium nails, and it looks especially good on hands with warm undertones because caramel and chocolate are both in the same family.
Paint caramel-brown gel and cure in two thin coats so it looks even. Apply matte top coat and cure. For the speckles, thin chocolate-brown gel slightly with clear gel, then tap a detail brush lightly over the nail to create tiny dots. Focus most speckles in the center area and leave the cuticle and sides cleaner. Finish with a final matte top coat so the speckles stay soft, not shiny.
Practice your speckle density on one nail first — you want “sprinkle” not “snowstorm.”
Don’t add glossy top coat over the speckles — it flattens the texture look.
14. Vintage Mauve with Copper Half-Frames
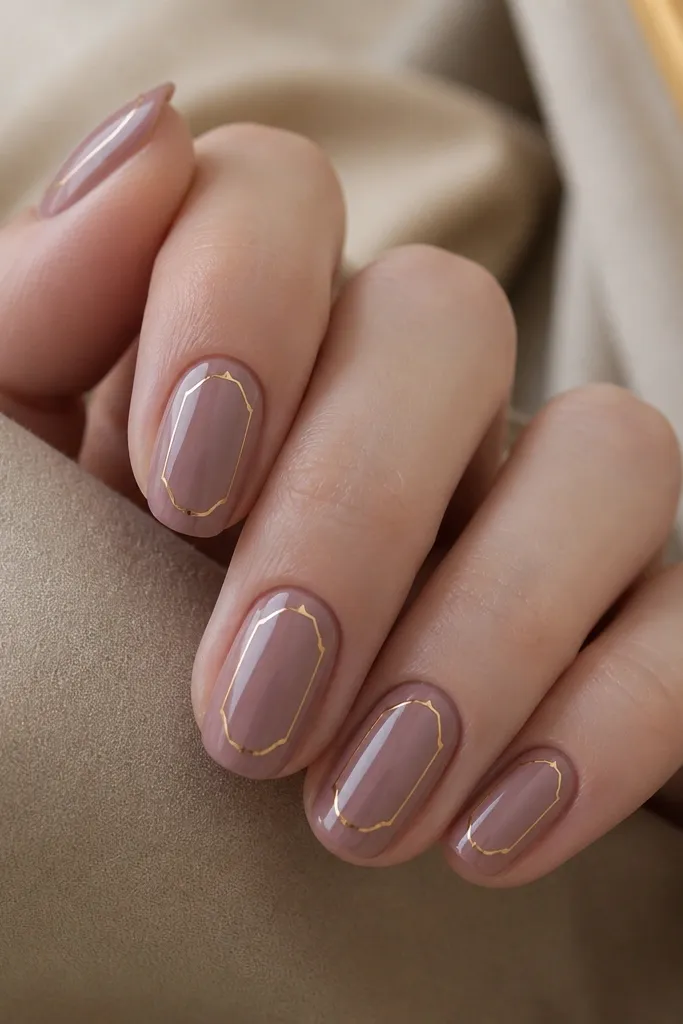
This set is for people who like autumn colors but hate orange. Mauve gives you a vintage feel, and the copper half-frame adds warmth and structure. The frame lines are placed in the middle so your nails look longer and more defined, especially on almond shapes. I’ve worn this with burgundy lipstick and it always looks pulled together. It flatters fair to medium skin tones because mauve is soft and copper brings contrast without going too dark.
Apply two coats of vintage mauve gel and cure. With a copper liner gel, draw an incomplete curved rectangle in the mid-nail area — the bottom of the frame should sit about a third up from the tip. Leave a small gap near the cuticle so it doesn’t look like a border sticker. Cure, then clean any uneven edges with a fine brush dipped in acetone. Seal with glossy top coat and cap the free edge.
Keep the frame lines the same thickness on every nail — that consistency is what makes it look salon-level.
Don’t make the frame too close to the sides or it will look cramped when your nails grow.
15. Classic Chocolate French with Sheer Rosy Base
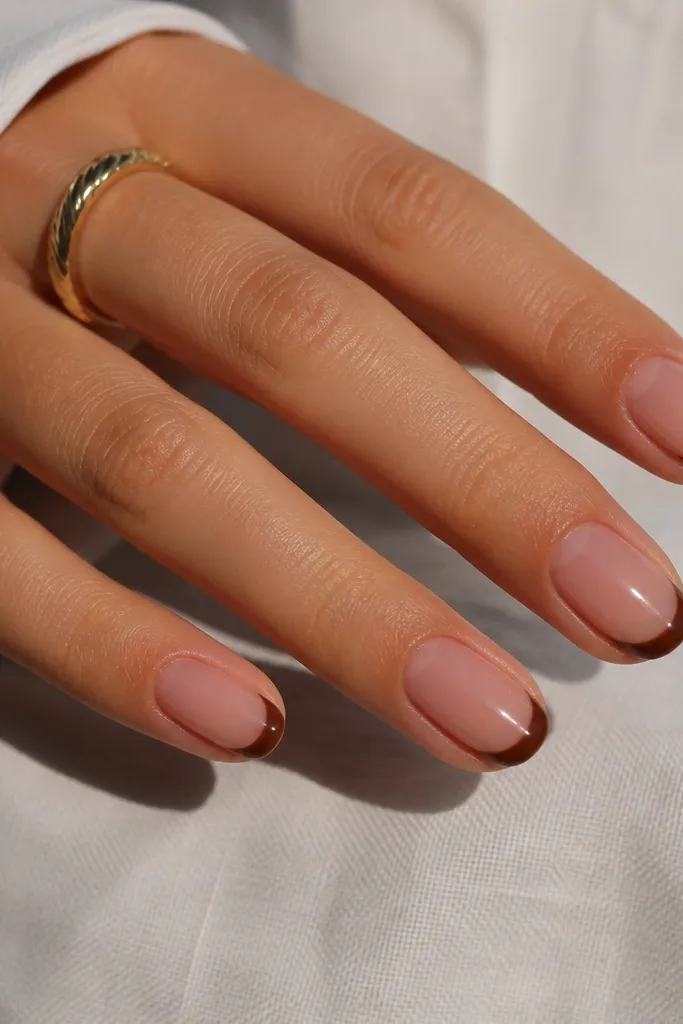
This is the adult version of fall nails. The sheer rosy base makes your nails look healthy and natural, while the chocolate French tip adds that warm autumn definition. I love it because it grows out better than full dark polish — the base stays close to your nail color, so regrowth doesn’t stand out as much. It flatters short oval nails and makes hands look neat even when you’re busy. The chocolate shade works across skin tones, and the rosy base can be adjusted slightly peachier or pinker to match your undertone.
Start with a sheer rosy gel base and cure. Paint the chocolate French tip with a thin, even line, keeping the tip width about 1.5 to 2 mm on short nails. Fill in the French area cleanly but avoid thick product — thick tips look bulky. Cure fully, then apply glossy top coat. Cap the free edge and run the brush lightly along the sides for long wear.
Use a French guide strip once, then freehand the rest using the guide nail as your template.
Avoid uneven tip thickness — the French line should look like one smooth arc.



