1. Icy Blue French with Micro-Glitter Edge
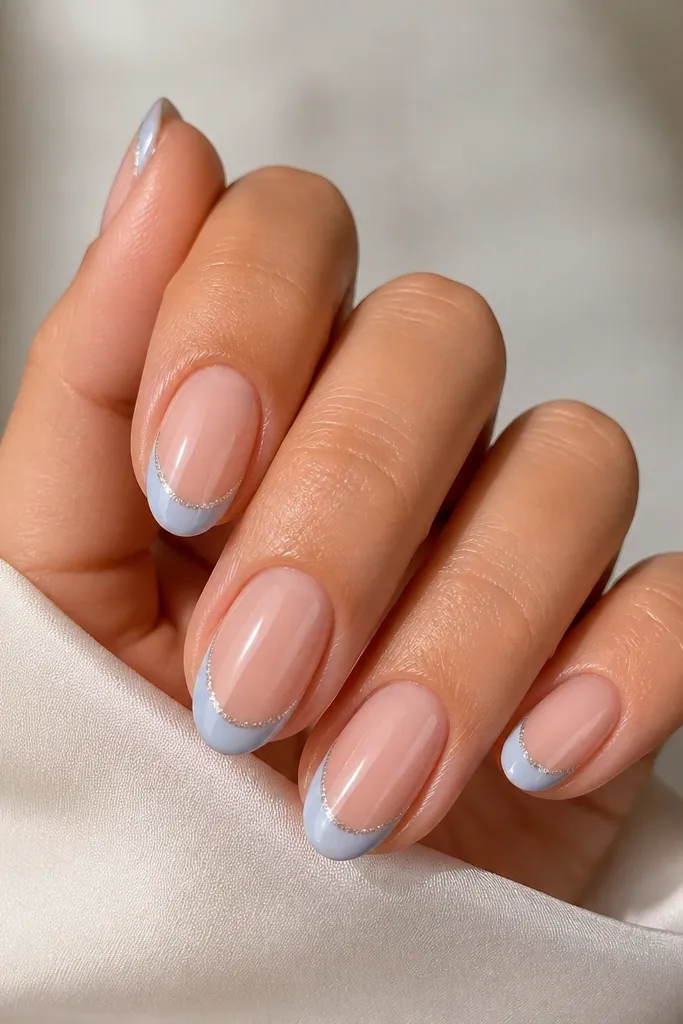
This design is the cleanest way to wear blue when you want “cool” without full coverage. The sheer nude base keeps your nail bed looking natural, while the icy blue French gives that winter-sky look. I like it on short almond because the tip line stays sharp and doesn’t spread. It also flatters a wide nail bed since the French is controlled by a thin guide line. For seasonal_evergreen, the micro-glitter edge catches light like frost without turning into chunky sparkle.
Start by prepping and dehydrating your nails, then apply a thin nude builder gel base and cure. Next, paint a straight French line with icy blue gel, keeping it about 1/3 of the nail length from the tip. Add a second pass for opacity, then use a striping brush to press micro-glitter gel only along the outer rim of the French — like a 1mm border. Seal with a glossy top coat, cure fully, and wipe the tacky layer if your system needs it.
Ask your tech to use a nail guide strip or French stencil so the blue line stays even across all fingers.
Skipping a second icy-blue pass is the fastest way to get patchy coverage near the corners.
2. Denim Fade Ombré on Squoval
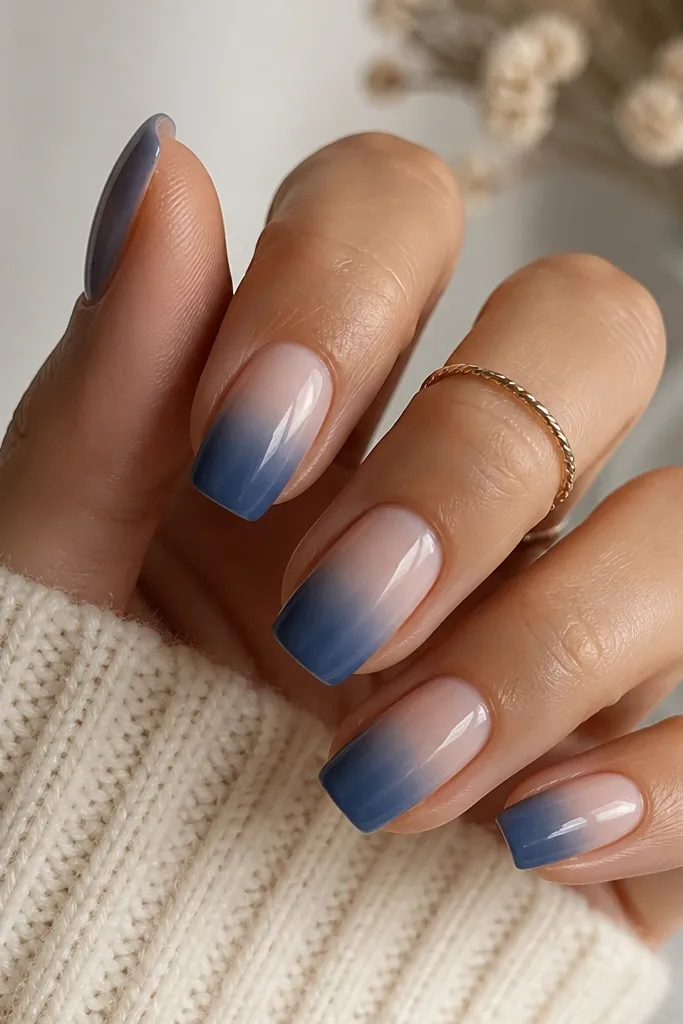
Denim fade ombré is my go-to when I want blue to look wearable for everyday and still look seasonal. The dusty denim tone flatters warm skin tones better than bright cobalt because it has a slightly muted, “washed” feel. Squoval shape is key here — the rounded corners blend the fade so it doesn’t look like a harsh block. This also suits shorter nails because the gradient creates length without needing a super long tip. The overall effect is casual-cool, like your favorite pair of jeans in winter light.
Start with a nude base and cure, then take a makeup sponge (cut into a small wedge) and load it with denim blue gel. Dab the denim at the tip first, then blend upward in light taps until you like the fade height. Clean up the edges with a small brush dipped in slip solution or gel cleanser, then cure. Finish with a second thin denim layer only at the outer third if you need more depth, then seal with a glossy top coat.
Use a sponge that’s already slightly rough — smooth sponges can make the gradient look cloudy.
Doing too heavy of a denim layer at the start creates a muddy ombré instead of a soft fade.
3. Cobalt Glass Tips with Clear Overlay
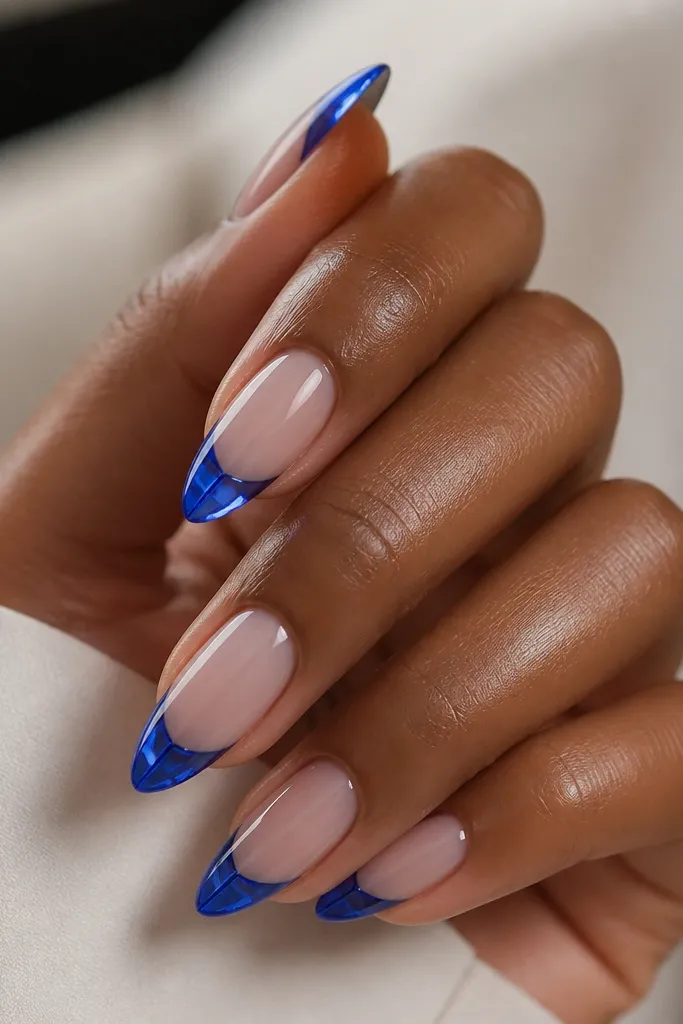
If you like a dramatic but still clean look, cobalt glass tips are the move. The cobalt is deep enough to feel bold, but the clear overlay makes it look smooth and dimensional instead of flat. I’ve worn this on medium almonds and it looks especially sharp on hands with longer fingers because the glass dome exaggerates the tip shape. On fair and medium skin, cobalt reads crisp and blue without turning gray. For seasonal_evergreen, the “glass” finish gives you that icy, winter shine even when the rest of your outfit is cozy.
Start with a nude base layer and cure, then apply cobalt blue only to the free edge with a thin brush. Build the cobalt slightly thicker at the center so it domes naturally, then cure. Apply a clear overlay gel over the entire tip area — I keep it concentrated over the blue and taper it toward the sides. Cure, then file the dome to a smooth curve and finish with a high-gloss top coat.
After curing the clear overlay, run a gentle file along the sidewalls so the dome doesn’t catch on hair or sweaters.
Skipping the clear overlay makes cobalt tips look like a sticker instead of a glass panel.
4. Winter Snowflake Negative Space
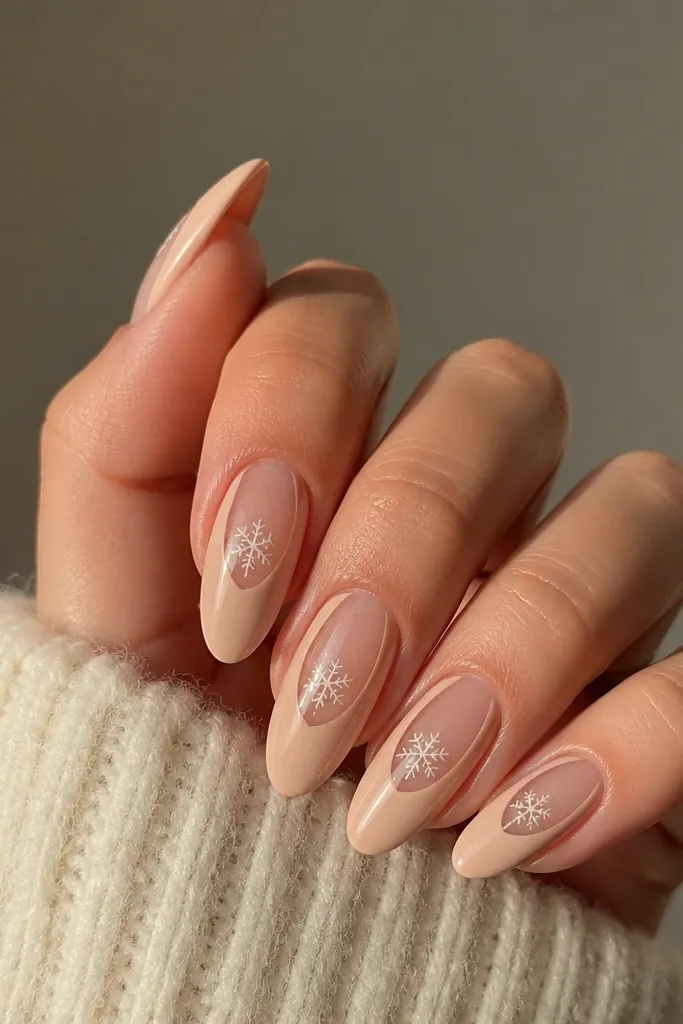
Negative space makes blue feel airy instead of heavy, and it’s perfect for people who hate full coverage. The nude base keeps everything warm, while the white snowflakes pop against the blue accents you add sparingly. I like this on long almond because the negative panels elongate the nail and keep the snowflake placement crisp. It’s flattering on all skin tones because the contrast is controlled and not too icy across the whole nail. For seasonal_evergreen, the snowflake motif reads winter without going cartoon.
Start by applying nude gel and curing, then leave a small center window unpainted by using thin nail tape or a stencil strip. Paint a thin icy blue line along the negative-space edges, not across the middle — think of it like a frame. Draw a snowflake in white gel pen or a fine liner brush, keeping each flake about the size of a pencil eraser tip. Remove the tape, cure, then seal with a glossy top coat over everything.
Editor's noteUse gel paint for the snowflakes, not regular polish — it stays sharp under top coat.
Skip thisPlacing snowflakes too close to the cuticle makes the design look crowded and shorter.
5. Midnight Blue Velvet Matte with One Glossy Star
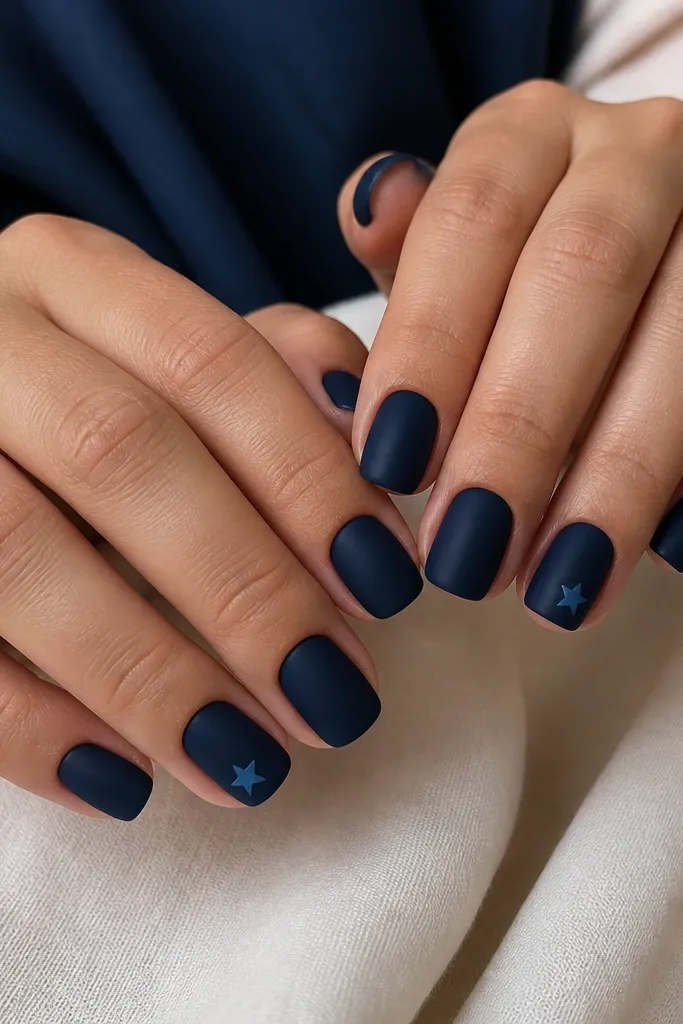
Matte midnight blue is the fastest way to get that “cool winter” look without adding lots of art. The velvet matte finish looks soft to the eye and hides minor imperfections in application. I like it on short squoval because the matte texture looks intentional and not messy. The single glossy star keeps it from looking too flat — it catches light and gives a focal point. This works great for fair, medium, and deeper skin tones because midnight blue stays strong and true across lighting. It also feels seasonal_evergreen because it reads like night sky rather than summer cobalt.
Start with a builder gel base and cure, then paint all nails with midnight blue gel. Cure and apply a matte top coat over every nail except the accent nail. On the accent nail, paint a small star outline in lighter blue or silver chrome gel, then cure and seal with glossy top coat only for that star area. Keep the star near the outer third of the nail so it looks lifted, not flat. Finally, check side angles — matte can look streaky if your top coat is uneven.
Editor's noteUse matte top coat sparingly on the cuticle area so it doesn’t look patchy when your nails grow out.
Skip thisPutting glossy top coat over the whole set ruins the velvet effect.
6. Blue Chrome Cuticle Halo
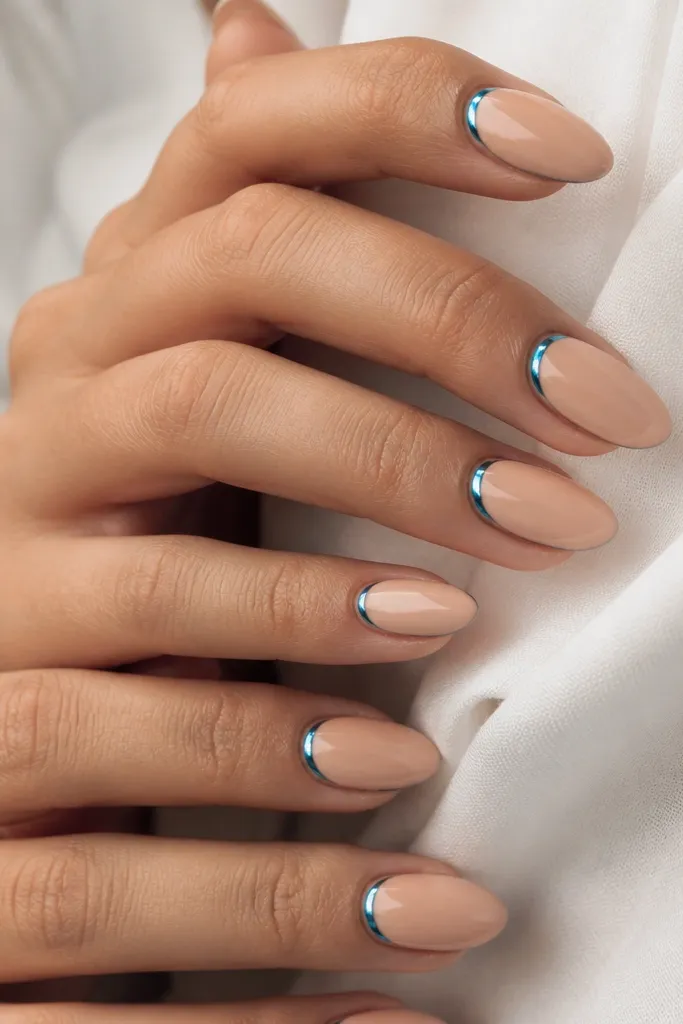
This is the kind of blue design that looks expensive because it’s small and placed perfectly. A cuticle halo makes your nail look neat and gives a “halo” glow that flatters the nail bed. I’ve done it on medium almonds and it makes fingers look longer because the chrome sits at the center line of the nail. Cooler skin tones love the icy chrome, but medium and deep tones look great with a deeper blue chrome so it doesn’t wash out. It’s also evergreen for seasons because it reads like jewelry, not a specific holiday theme.
Start with a nude base and cure, then apply a thin tacky layer only in a crescent around the cuticle. Press blue chrome powder or chrome gel (depending on your system) into that crescent and buff lightly to remove excess. Leave the middle nail area clear so the halo stays thin. Cure and seal with glossy top coat, being careful not to flood the cuticle line and blur the shape. If you want extra definition, add a second halo pass on just the accent nails.
Use a small foam applicator for chrome so the crescent stays sharp and doesn’t spread.
Overworking the chrome after it’s pressed makes it look smoky instead of crisp.
7. Cornflower Blue Ribbon Tips
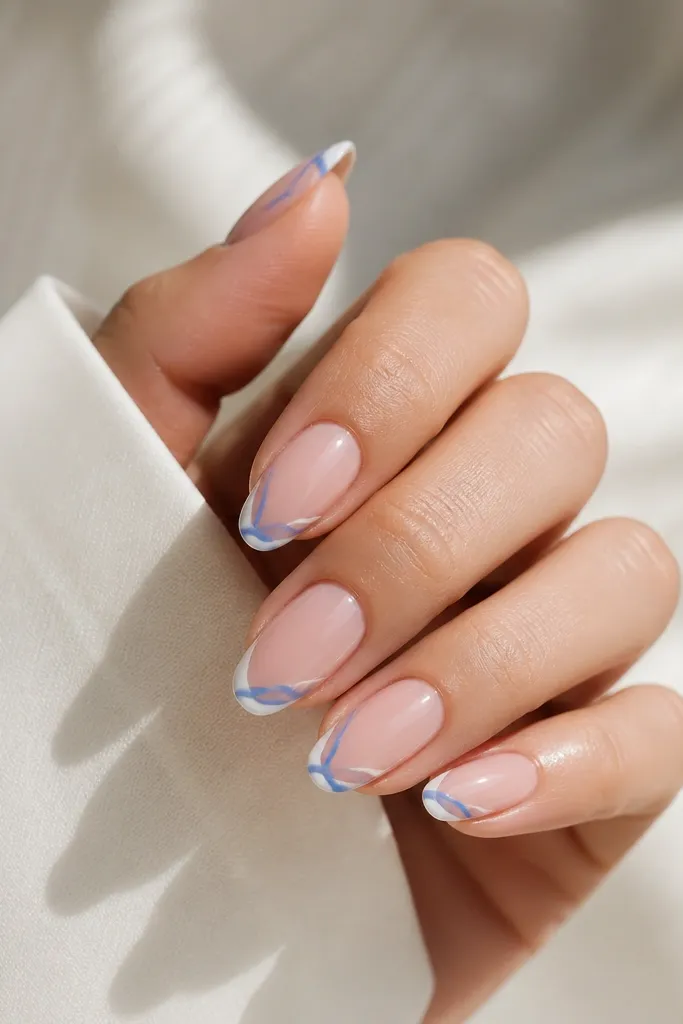
Cornflower blue ribbon tips look like nail art you’d see on a runway, but they’re surprisingly wearable. The color is bright enough to feel fresh, and the ribbon lines keep it from looking like a plain blue tip. I love this on medium almond because the ribbon curves naturally follow the nail shape. It flatters hands with shorter nail beds because the ribbon outlines the tip instead of filling the whole free edge. For seasonal_evergreen, the cornflower tone reads “cool spring” in winter too, especially with a sheer base.
Start with a sheer pink or nude base and cure. Paint a thin cornflower blue border along the free edge, then use striping gel to create two ribbon lines that curve down each side of the tip. Add a super thin white line between the sheer base and the cornflower border so the ribbon looks outlined. Cure, then finish with glossy top coat to smooth the ribbon texture. If you’re using pre-made nail decals, apply them after the base and seal over them with gel top coat.
Editor's noteKeep the ribbon lines about 0.5-1mm apart so it reads like ribbon, not scribbles.
Skip thisThick ribbon lines make the nail look heavy and ruin the “outlined” effect.
8. Blueberry Jam Jelly Tips
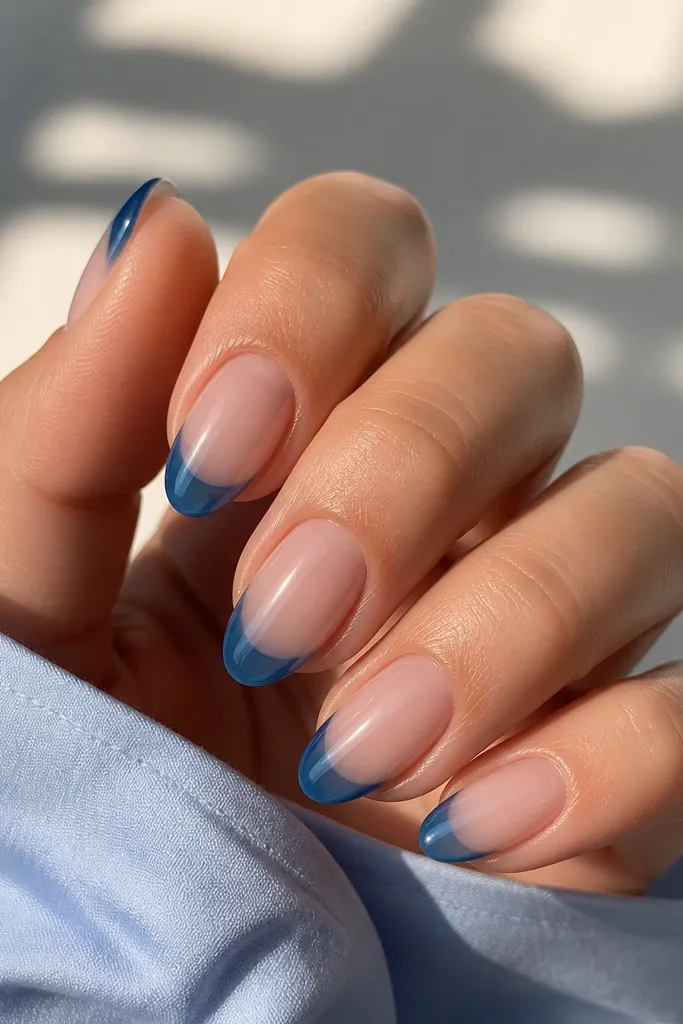
Jelly tips are my favorite way to do blue when you want the color to look juicy, not opaque. The translucent blueberry effect looks glossy and dimensional even without extra chrome. Short almond is perfect because the jelly layer makes the tip look fuller without adding length. This design flatters almost everyone because the base stays sheer and the blue is concentrated at the tip. For seasonal_evergreen, it gives that “winter fruit” vibe that doesn’t feel like holiday snowflakes.
Start with a nude base and cure. Apply a thin layer of translucent blueberry jelly gel only on the free edge and cure, then repeat for your desired intensity — I usually do two coats. Blend the jelly into the nail by lightly brushing the edge where it meets the nude base. For extra depth, add a third jelly coat only at the very tip center. Seal with glossy top coat and wipe any tacky residue if your system requires it.
Editor's noteUse a jelly builder or jelly top from your system so the layer stays smooth and doesn’t shrink.
Skip thisTrying to make jelly fully opaque in one coat makes it look thick and uneven.
9. Indigo Marble with Silver Veins
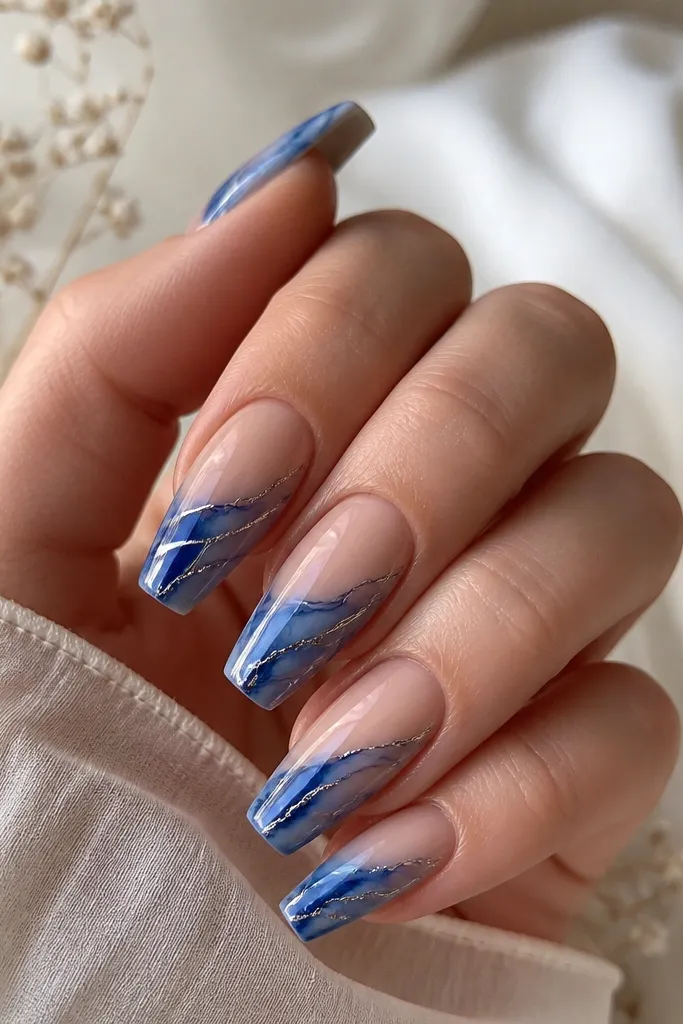
Marble nails look best when the base is calm and the veins are controlled. Indigo marble gives a deep blue that feels grown-up, and silver veins add a winter-metallic touch without needing glitter. I like this on medium coffin because the long sides let the marble move naturally. It flatters different skin tones because the nude base keeps contrast balanced. For seasonal_evergreen, indigo marble reads like stone — not summery water droplets.
Start with a nude base and cure, then apply a thin layer of indigo gel in patches where you want the marble to form. Use a marbling tool or a fine liner brush to pull and swirl the indigo into thin streaks, leaving negative space for the marble depth. Add silver gel veins by dragging a thin line through the indigo streaks, then feather it out with a damp brush. Cure between layers if your system needs it. Finish with glossy top coat and avoid over-fileing — marble needs smooth edges to look like stone.
Editor's notePractice on one nail first — marble looks right when the veins vary in thickness.
Skip thisCovering the entire nail with indigo makes it look like a solid blue instead of marble.
10. Blue and White Checker Accent on Almond
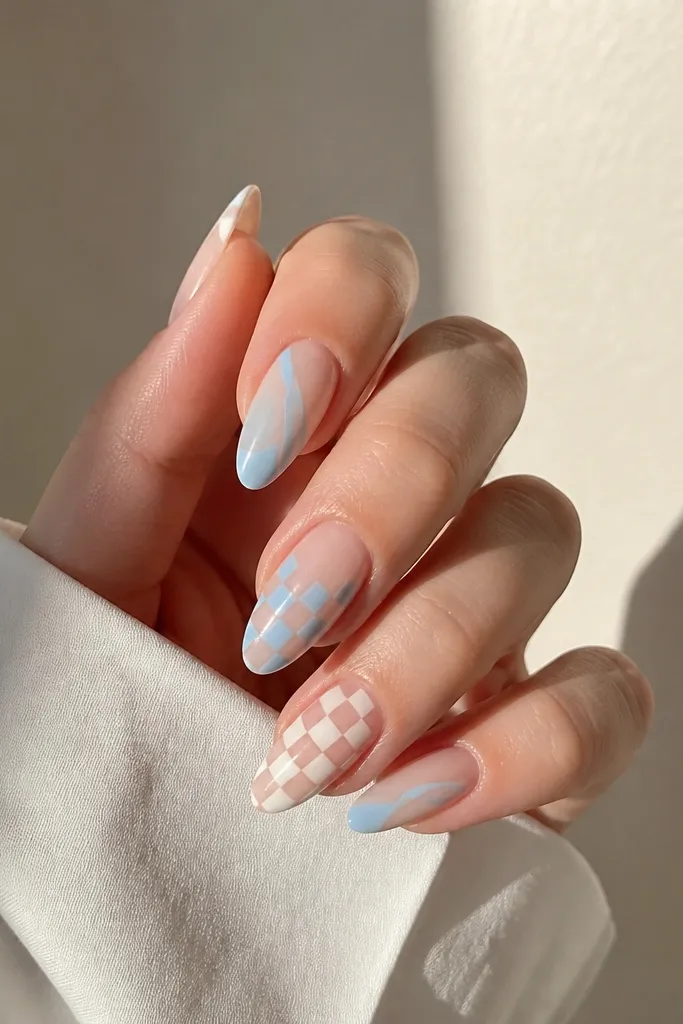
Checker accents are playful without taking over, and they look especially good when only two nails carry the pattern. The blue-and-white combo reads clean and seasonal, like winter socks. On almond shape, the pattern stays neat and doesn’t spread outward. This flatters most nail beds because the nude base leaves breathing room. I’ve worn a set like this to office events and it still feels fun, not childish.
Start with a nude base on all nails and cure. Paint a solid icy blue stripe near the tip on the non-checker nails, keeping it about 2mm wide. For the checker nails, use nail tape or a checker stamp template to create a grid, then fill squares with blue gel and white gel. Remove the tape carefully after curing each color so the edges stay crisp. Seal with glossy top coat and lightly file the top surface so the checker looks smooth, not raised.
If you don’t have a checker stamp, use nail tape strips and press them down firmly before painting each square.
Rushing tape removal before gel cures — it pulls lines and makes the checker look smudged.
11. Cobalt Starburst Gradient with Thin Outline
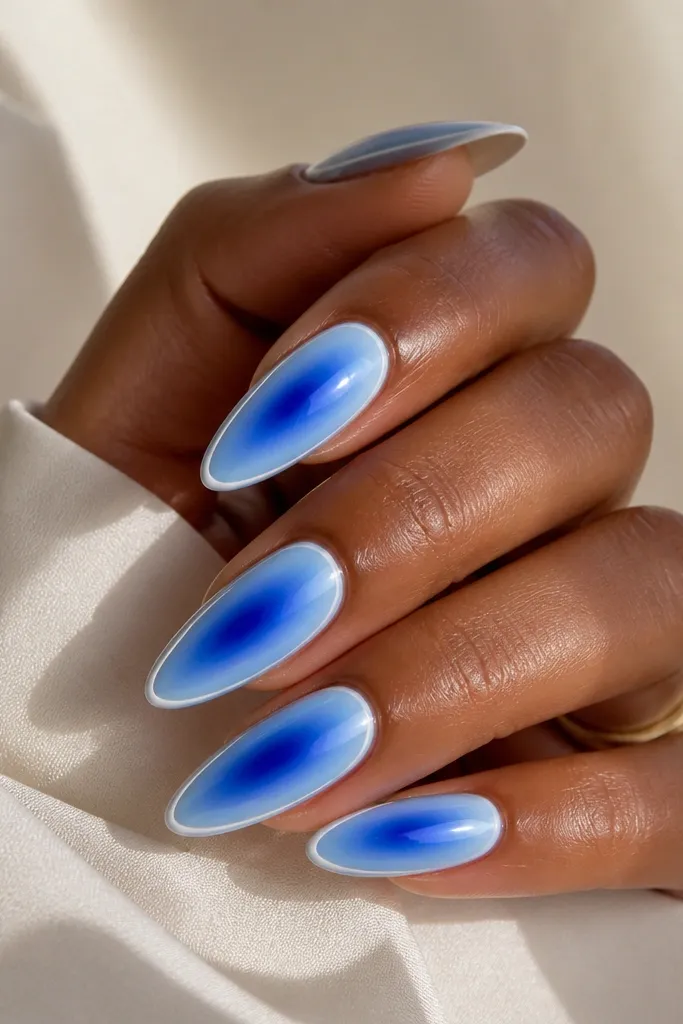
Starburst gradients look like light beams, and they’re surprisingly flattering because they pull the eye to the center of the nail. Using cobalt down the center and fading to icy blue at the edges creates a tapered, slimming effect. I like this on long almond because the radial lines have space to stretch without hitting the sidewalls too soon. It works well for fair and medium skin tones because both blues stay bright; on deeper skin tones, use a slightly warmer nude base so the gradient doesn’t look too icy. For seasonal_evergreen, it feels like aurora without being full-on glitter.
Start with a nude base and cure, then sponge a cobalt blue gradient from the center outward. Use a thin liner brush to add radial streaks of icy blue, pulling them from the center to the tip edges. Apply a thin white outline around the starburst area to frame it and keep the look crisp. Cure, then build the gradient with one more light coat if you need more brightness. Finish with glossy top coat to smooth and intensify the colors.
Keep the radial streaks uneven — identical lines look mechanical and less like light.
Skipping the white outline makes the gradient blend into the nude base and lose the starburst shape.
12. Blue Pearl Demi-Cuticle with Nude Sheer Base
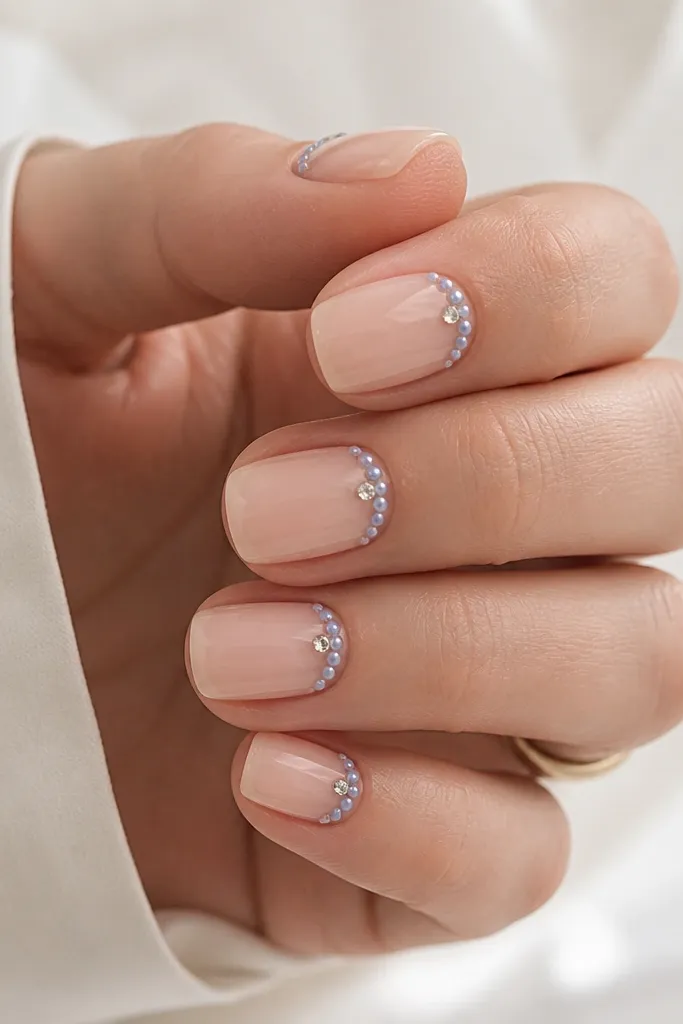
Pearls at the demi-cuticle look neat, not costume-y, when you keep them small and place them in a tight curve. The nude sheer base makes the blue pearls feel delicate, and the demi placement elongates the nail bed. I like this on short squoval because the curve hugs the natural nail shape and keeps it tidy. This design flatters hands that get noticed close-up since the pearls create texture at the base. For seasonal_evergreen, the blue pearls read like winter jewelry and don’t feel tied to one holiday.
Start with a sheer nude base and cure, then apply a thin gel tacky strip in a curved line about 1mm above the cuticle. Place micro blue pearls along the curve using gel adhesive, then cure in short bursts if your system heats too fast. Add one tiny crystal at the center of the curve for a focal point. Seal around the pearls with a thin layer of gel top coat so the surface feels smooth. Cure fully and wipe tacky residue if needed.
If pearls lift after a few days, add a thin gel cap over the edges only, not over the whole nail.
Using large pearls on short nails — the scale makes it look heavy.
13. Glacier Blue Foil Flakes on Clear Base
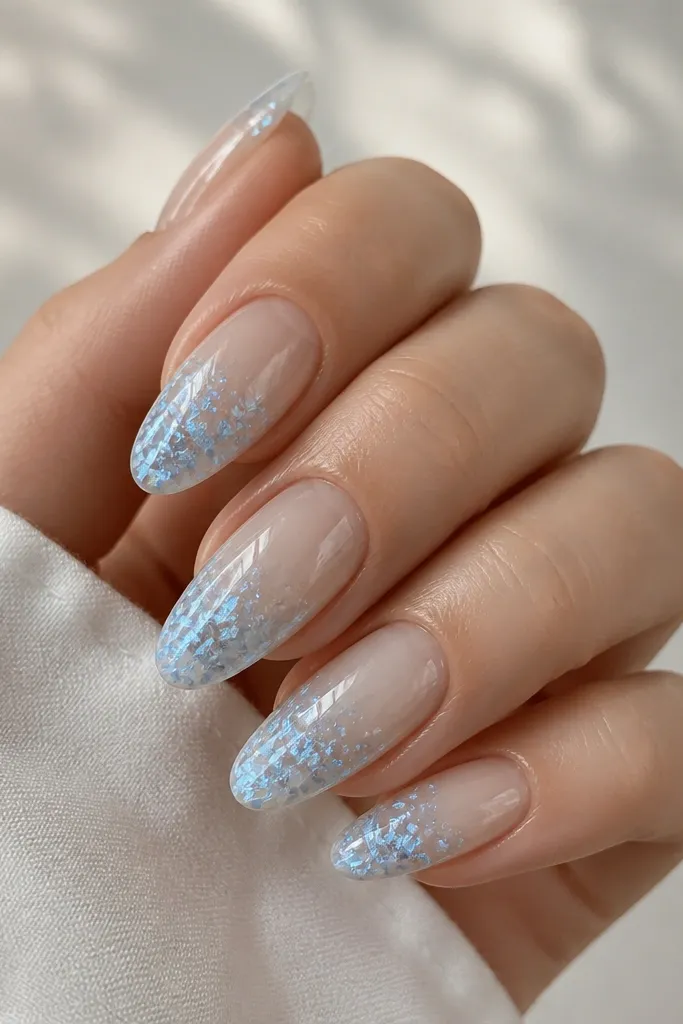
Foil flakes look best when they’re placed like confetti, not painted all over. A clear or milky base keeps the design airy, and glacier blue foil gives that icy reflective effect under lights. Medium almond is ideal because the foil catches light along the curve and looks dimensional. This flatters all skin tones because the base is neutral and the foil provides color where it matters. For seasonal_evergreen, it reads like ice crystals without needing snowflake drawings.
Start with a clear or milky base gel and cure, then apply a tacky layer only at the outer tip area. Press glacier blue foil flakes into the tacky zone — use a gentle stamping motion so flakes stay where you want them. Add a second small cluster near the sidewall if the nail looks too empty, then cure. Seal with a gel top coat that’s slightly thicker so it smooths the foil texture without flattening the shape. Cure again and file lightly at the edges for a clean finish.
Editor's notePress foil with the flat side of a foil applicator — fingers can leave fingerprints in the gel.
Skip thisOverloading foil — too many flakes make the nail look textured and messy instead of crisp.
14. Blueberry Milky Pink Base with Dark Blue Dots
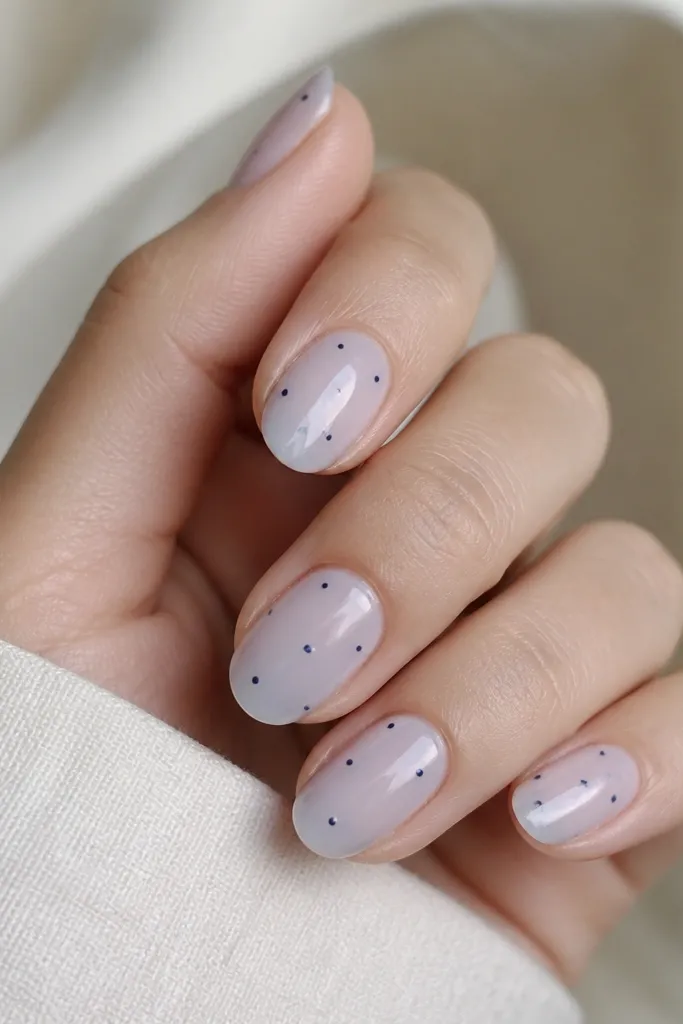
This design is a sweet spot between cute and grown-up. The milky pink base with a subtle blue tint keeps it soft, while dark navy dots add contrast so it still reads “blue” from a distance. I like it on short almond because the dots don’t feel too busy and the base stays smooth. It flatters fair skin because the milky base looks creamy, and it flatters deeper skin because the navy dots show up clearly. For seasonal_evergreen, the navy dots feel winter-friendly compared to bright summer prints.
Start by creating a milky base using a pink milky gel tinted slightly with a drop of blue — you want it to look like soft frosting, not purple. Apply one thin coat, cure, then apply a second if needed. Use a dotting tool dipped in dark navy gel to place dots randomly, but keep them mostly in the upper half of the nail. Cure each layer if your gel system requires it. Finish with a glossy top coat to make the dots sit under glass instead of looking matte.
If you want a more “designed” look, vary dot sizes: one larger dot near the center and two smaller around it.
Putting dots too close together — it turns into a blob and loses the spaced-out pattern.
15. Evergreen Pine Tips in Deep Blue
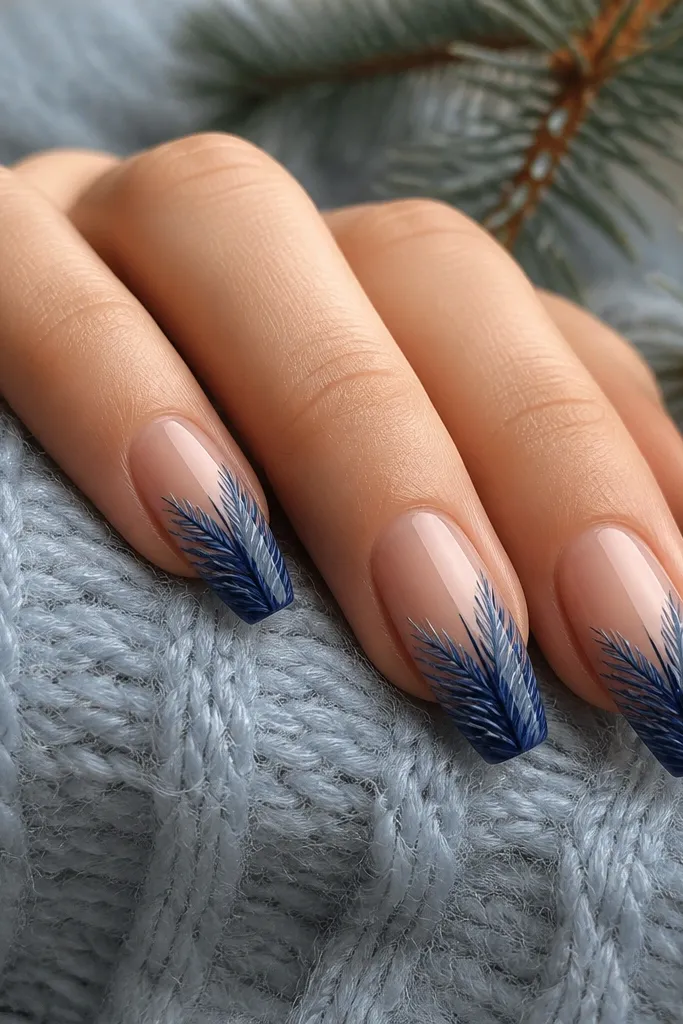
This is where “seasonal_evergreen” actually shows, because pine tips look like tiny winter trees. Deep blue gives the evergreen mood without going green-heavy, and the light-blue highlights make the needles look crisp. I love this on medium coffin because the tip area gives you enough space to paint needle clusters without crowding. It flatters hands with longer nail beds because the trees can sit at the tip and point upward. For fair and medium skin, the deep blue reads rich. On deeper skin tones, I keep the nude base slightly warmer so the tree detail stays clear.
Start with a nude base and cure, then paint a deep blue tip area that covers about 1/3 to 1/2 of the nail. With a liner brush, draw small pine needle strokes from the outer edge toward the center, layering clusters so they look like overlapping brush lines. Add light-blue highlights on just the top edge of each cluster so the needles pop. Cure, then seal with a glossy top coat and avoid flooding the needle detail — you want it to stay defined. If your top coat is thick, brush it gently from the center outward.
Editor's noteUse a flat-to-angled brush for needle strokes; it gives you sharper tips than a round brush.
Skip thisPainting one big pine shape without needle layering — it looks like a blob instead of trees.